How To Install Linoleum Flooring Over Concrete
Linoleum flooring, a durable and environmentally friendly option, can be successfully installed over a concrete subfloor. This article provides a comprehensive guide on how to properly prepare the concrete surface, select the appropriate materials, and execute the installation process to achieve a long-lasting and aesthetically pleasing result. Proper installation ensures the longevity and performance of the linoleum, preventing issues such as bubbling, cracking, or adhesive failure.
Assessing the Concrete Subfloor
Before beginning the installation process, thorough assessment of the concrete subfloor is essential. This step identifies potential issues that could compromise the integrity of the finished floor. Key considerations include:
Moisture Content: Concrete is porous and can absorb moisture from the surrounding environment. Excessive moisture can lead to adhesive failure and mold growth beneath the linoleum. To determine the moisture content, conduct a calcium chloride test (also known as a moisture vapor emission rate test) or use an electronic moisture meter. Follow the manufacturer's instructions for each test. Acceptable moisture levels are typically specified by the linoleum and adhesive manufacturers. If moisture levels are elevated, remediation measures, such as applying a moisture barrier, are necessary before proceeding.
Surface Levelness: Linoleum requires a smooth and level surface to prevent uneven wear and appearance. Use a long straightedge and a level to identify any dips, humps, or irregularities in the concrete. Large deviations exceeding 3/16 inch over a 10-foot span should be addressed with a self-leveling compound. Smaller imperfections can often be corrected with patching compound.
Surface Cleanliness: The concrete surface must be free of dirt, dust, grease, paint, adhesive residue, and any other contaminants that could interfere with the adhesive bond. Thoroughly sweep or vacuum the floor to remove loose debris. Scrub the surface with a concrete cleaner and a stiff brush to remove stubborn stains and grime. Rinse the floor with clean water and allow it to dry completely before proceeding.
Surface Porosity: Concrete surfaces vary in porosity. A highly porous surface can absorb too much adhesive, resulting in a weak bond. Conversely, a sealed or non-porous surface may not allow the adhesive to properly adhere. Perform a water drop test to assess the porosity. Place a few drops of water on the concrete surface. If the water beads up, the surface may be sealed and require mechanical abrasion to improve adhesion. If the water is quickly absorbed, the surface is highly porous and may require sealing or priming before applying the adhesive.
Preparing the Concrete Surface
Once the concrete subfloor has been assessed, the necessary preparation steps can be implemented. This phase ensures the concrete is properly prepared to receive the linoleum flooring.
Moisture Mitigation: If moisture testing reveals elevated levels, a moisture barrier must be applied. These barriers are typically epoxy-based or urethane-based coatings that prevent moisture vapor from passing through the concrete and affecting the linoleum and adhesive. Follow the manufacturer's instructions for application, including surface preparation, mixing ratios, and drying times.
Leveling and Patching: Use a self-leveling compound to correct significant dips or humps in the concrete. Pour the self-leveling compound onto the floor and use a gauge rake or trowel to spread it evenly. Allow the compound to dry completely according to the manufacturer's instructions. For smaller imperfections, apply a concrete patching compound with a trowel. Feather the edges of the patch to blend it seamlessly with the surrounding surface. Allow the patching compound to dry completely before sanding it smooth.
Surface Abrasion: Mechanical abrasion can improve the adhesion of the linoleum to the concrete surface. This can be achieved by using a concrete grinder with a diamond grinding wheel or by shot blasting the surface. The goal is to create a slightly roughened surface profile that provides a better mechanical key for the adhesive to grip. After abrasion, thoroughly clean the surface to remove any dust or debris.
Priming (Optional): Depending on the porosity of the concrete and the type of adhesive being used, a primer may be necessary. Primers improve adhesion by sealing the concrete surface and creating a uniform bond. Choose a primer that is compatible with both the concrete and the adhesive. Apply the primer according to the manufacturer's instructions, typically using a roller or brush. Allow the primer to dry completely before applying the adhesive.
Installing the Linoleum Flooring
With the concrete subfloor properly prepared, the linoleum flooring can be installed. This stage requires careful planning, precise cutting, and proper adhesive application.
Acclimation: Before installation, allow the linoleum flooring to acclimate to the room's temperature and humidity for at least 48 hours. This allows the material to expand or contract, preventing issues such as gapping or buckling after installation. Store the linoleum rolls or tiles flat in the room where they will be installed.
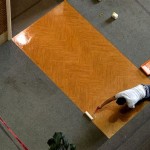
Layout and Cutting: Plan the layout of the linoleum to minimize seams and waste. Start by finding the center of the room and working outwards. Use a chalk line to create straight guidelines for aligning the linoleum. Measure and cut the linoleum to fit the room's dimensions, leaving a small expansion gap (typically 1/4 inch) around the perimeter. Use a sharp utility knife or linoleum cutter to make precise cuts. For complex shapes or corners, create templates to ensure accurate cuts.
Adhesive Application: Choose an adhesive specifically designed for linoleum flooring and concrete subfloors. Apply the adhesive to the concrete surface using a notched trowel. The size and shape of the notches on the trowel will determine the amount of adhesive applied. Follow the adhesive manufacturer's instructions for the recommended trowel notch size and open time (the amount of time the adhesive can be exposed to air before installing the linoleum). Work in small sections to prevent the adhesive from drying out before the linoleum is installed.
Linoleum Placement: Carefully place the linoleum onto the adhesive, aligning it with the guidelines and ensuring proper alignment with adjacent pieces. Use a floor roller to firmly press the linoleum into the adhesive, ensuring full contact and eliminating air pockets. Start from the center of the linoleum and work outwards towards the edges. Overlap the edges of adjacent linoleum sheets slightly and use a seam roller to create a tight, seamless bond. After the adhesive has cured, use a seam cutter to trim the overlap and create a flush seam.
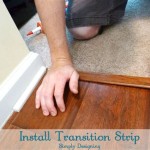
Edge Treatment: After the linoleum is installed, install baseboards or other edge treatments to cover the expansion gap and provide a finished look. Attach the baseboards to the wall using nails or adhesive. Seal the gap between the linoleum and the baseboards with a flexible sealant to prevent moisture from entering.
Curing and Maintenance: Allow the adhesive to fully cure according to the manufacturer's instructions before walking on the floor. Avoid heavy traffic or moving furniture onto the floor during the curing period. Once the adhesive is cured, clean the linoleum floor with a damp mop and a mild detergent specifically designed for linoleum. Avoid using abrasive cleaners or scouring pads, as they can damage the surface of the linoleum. Regular cleaning and maintenance will help to prolong the life of the linoleum floor and keep it looking its best.
Addressing Potential Problems
Even with careful preparation and installation, certain problems can arise during or after the process. Understanding these potential issues and how to address them can save time and resources.
Bubbling or Blistering: Bubbling or blistering of the linoleum is often caused by trapped air pockets or inadequate adhesive coverage. To fix this, carefully cut a slit into the bubble with a utility knife. Inject adhesive into the slit using a syringe or applicator. Use a floor roller to press the linoleum back down onto the adhesive, forcing out any excess air. Cover the area with a weight until the adhesive has cured.
Seam Separation: Seam separation can occur if the linoleum was not properly seamed or if the subfloor is unstable. To repair a separated seam, clean the edges of the linoleum with a solvent to remove any dirt or adhesive residue. Apply a seam sealer to the edges of the linoleum and press them together firmly. Secure the seam with painter's tape until the sealer has cured.
Adhesive Failure: Adhesive failure can be caused by inadequate surface preparation, excessive moisture, or using the wrong type of adhesive. To address adhesive failure, remove the affected section of linoleum and thoroughly clean the concrete surface. Ensure the surface is dry and free of contaminants. Apply a new layer of adhesive and reinstall the linoleum, following the manufacturer's instructions.
By adhering to these guidelines and addressing potential problems promptly, a successful and long-lasting linoleum flooring installation over concrete can be achieved. Careful planning and attention to detail are crucial for ensuring the durability and aesthetic appeal of the finished floor.

How To Install Linoleum Flooring

How To Install Linoleum Flooring On Concrete Doityourself Com

How To Install Linoleum Flooring With S Wikihow

Concrete Subfloor Preparation For The Vinyl Floor Installation How To Diy Mryoucandoityourself

How To Install Linoleum Flooring With S Wikihow

How To Prepare A Concrete Floor For Vinyl Flooring Parrys

Installing Vinyl Floor Tile On Cement Garage Basement

How To Install Linoleum Flooring Guide Forbes Home

How To Install Linoleum Flooring Ez

How To Lay Flooring On Concrete Factory Direct