How To Install Laminate Flooring When Walls Aren't Square
Installing laminate flooring is a popular DIY project, offering a stylish and affordable way to upgrade your home. However, one common challenge that homeowners face is working with walls that aren't perfectly square. This can lead to uneven flooring, gaps, and a less professional-looking installation. This article will guide you through the process of installing laminate flooring when faced with walls that aren't square, ensuring a successful outcome.
1. Accurately Measure and Plan
Before starting any installation, it's crucial to have a clear understanding of the room dimensions and the extent to which your walls are out of square. This involves measuring the length and width of the room at multiple points to identify any discrepancies. Consider using a laser level or a long straight edge to confirm the squareness of your walls. This information will help you plan your installation strategy and adjust for any imperfections.
When planning, prioritize the layout of the flooring. You'll need to consider the direction of the planks, the location of doors and doorways, and the placement of any obstacles like radiators or fireplaces. Ideally, you'll want to layout the planks so that the seams are aligned with the longest walls to minimize the appearance of any irregularities. Additionally, plan how you'll handle any areas where the flooring needs to be cut to fit around obstacles.
2. Establish a Straight Starting Line
With your measurements and plan in place, start by establishing a straight starting line for your laminate flooring. This is essential for ensuring a clean and consistent installation, especially when walls are not square. You can achieve this using a chalk line or a laser level.
If your walls are severely out of square, using a laser level is recommended for greater accuracy. Position the level along the wall where you intend to start your flooring, making sure it's perfectly level. Project the laser beam onto the floor and trace a line along it using a chalk line or pencil. This straight line will serve as your initial reference point for the rest of the installation.
3. Adjust for Uneven Walls
One of the most significant challenges of installing laminate flooring on uneven walls is maintaining consistent spacing between the planks. If you simply start laying the first row along the straight line and continue straight across, the planks may not align with the opposing wall due to the wall's unevenness. This can result in gaps or uneven flooring.
To address this, adjust the spacing between planks gradually as you move across the room. If you notice your planks are starting to drift away from the wall, decrease the distance between the planks slightly. Conversely, if the planks are bumping against the uneven wall, increase the spacing slightly. This gradual adjustment helps to maintain a consistent gap between the planks and the wall, creating a smooth and flush installation.
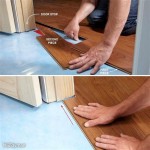
4. Cut and Trim to Fit
As you approach obstacles like doorways, closets, or other fixed features, you'll need to cut and trim the laminate planks to fit. This involves carefully measuring the area and using a sharp utility knife or a circular saw to make precise cuts.
When cutting laminate flooring, it's crucial to use a cutting guide or jig to ensure straight and accurate cuts. This is particularly important when dealing with uneven walls and adjusting the spacing between planks. Additionally, use a fine-tooth saw blade to minimize splintering or chipping of the laminate.
5. Secure and Finalize the Installation
Once you have laid all the planks and made any necessary cuts, you'll need to secure the flooring. Laminate flooring is typically installed using a click-and-lock system, which allows the planks to interlock without the need for adhesives. However, it's important to check the manufacturer's instructions for your specific flooring type to ensure you're using the correct installation method.
After securing the flooring, it's vital to ensure the floor is flat and even throughout the installation area. If you encounter any unevenness or bumps, you can use shims or spacers to level the planks. Once the installation is complete, allow the flooring to acclimate for at least 24 hours before installing baseboards or other trim.

How To Start The First Row On Laminate Floor If Wall Is Not Straight Hunker

Laminate Floor Installation Tips

How To Start The First Row On A Laminate Floor If Wall Is Not Straight Quora

How To Install Laminate Flooring On Your Own Diy Hq Longwood Fl

Installing Laminate At 45 Degree Angle

How To Make A Laminate Flooring Accent Wall

How To Install Laminate Flooring On Your Own Diy Hq Longwood Fl

How To Install Laminate Flooring Guide 2024

How To Install Laminate Flooring

5 Tips To Install Laminate Flooring Like A Pro Casa Watkins Living