How to Install Laminate Flooring on Curved Stairs
Installing laminate flooring on stairs, especially curved stairs, presents a unique challenge compared to standard flooring projects. The complexity stems from the need to accurately cut and fit the laminate to the irregular shapes of the treads and risers. This process requires meticulous planning, precise measurements, and specialized tools to achieve a professional and aesthetically pleasing result. While the task may seem daunting, with careful preparation and adherence to the correct techniques, a homeowner can successfully enhance the look and value of their home by installing laminate flooring on curved stairs.
Before embarking on the installation process, it's crucial to understand the existing structure of the stairs. Most stairs consist of treads (the horizontal part you step on), risers (the vertical part between treads), and potentially a nose (the overhanging edge of the tread). Curved stairs introduce the added complexity of varying widths and depths, making accurate templating essential.
The choice of laminate flooring is also critical. Consider factors such as thickness, durability, and the desired aesthetic. Opt for a laminate with a high abrasion class (AC rating) to ensure it can withstand the heavy foot traffic on stairs. Furthermore, choose a color and style that complements the surrounding décor and enhances the overall visual appeal of the staircase.
Key Point 1: Accurate Templating and Measurement
The foundation of a successful laminate stair installation on curved stairs rests upon accurate templating and measurement. Due to the varying dimensions of each tread and riser, creating individual templates is paramount. Several methods can be employed for this process. One common approach involves using thin cardboard or plywood to create a precise replica of each stair component.
Start by cutting a piece of cardboard slightly larger than the tread or riser you are templating. Carefully position the cardboard against the stair, ensuring it conforms to the contours of the curve. Use a pencil to trace the outline of the stair onto the cardboard. For complex curves, consider using flexible measuring tools or a contour gauge to capture the shape accurately. Alternatively, a digital templating system can be used, which provides highly precise measurements using specialized scanning equipment. This method often requires professional assistance and may be more suitable for significant renovation projects.
Once the outline is traced, use a utility knife or scissors to carefully cut along the pencil lines, creating the template. Test the template against the actual stair to ensure it fits snugly and accurately represents the shape. Make any necessary adjustments until the template fits perfectly. Repeat this process for each tread and riser, labeling each template clearly to avoid confusion during the cutting stage.
After creating the templates, transfer the measurements onto the laminate flooring planks. Arrange the templates on the laminate, optimizing the layout to minimize waste and achieve the desired grain direction. Use a sharp pencil or marker to trace the outline of the templates onto the laminate. Remember to account for any necessary expansion gaps between the laminate and the surrounding walls or trim. These gaps typically range from 1/4 to 3/8 of an inch and are crucial for accommodating the natural expansion and contraction of the laminate due to changes in temperature and humidity.
Double-check all measurements and markings before proceeding to the cutting phase. This step is critical to prevent errors and ensure a proper fit. Taking the time to verify the accuracy of the templates and measurements will save time and resources in the long run.
Key Point 2: Precise Cutting and Fitting Techniques
With accurate templates prepared, the next critical step is to precisely cut the laminate flooring planks according to the template outlines. The success of this phase relies on using the appropriate cutting tools and employing proper techniques to achieve clean, accurate cuts. The tool of choice is typically a jigsaw with a fine-tooth blade designed for cutting laminate. A table saw can also be used for straight cuts, but its maneuverability is limited when dealing with curved shapes.
Before cutting, secure the laminate plank onto a stable work surface using clamps. This will prevent the plank from shifting during the cutting process, ensuring a more precise cut. When using a jigsaw, hold the tool firmly and guide it slowly along the marked line. Avoid applying excessive pressure, as this can cause the laminate to splinter or chip. Let the tool do the work, and maintain a consistent cutting speed.
For curved cuts, use a jigsaw with a scrolling blade, which allows for greater maneuverability. Follow the outline carefully, making small, incremental movements to achieve a smooth, consistent curve. If the cut is particularly intricate, consider making multiple passes, gradually removing material until the final shape is achieved.
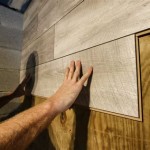
After cutting each piece, dry-fit it onto the corresponding stair tread or riser to check for accuracy. If necessary, use a sanding block or file to fine-tune the edges and ensure a perfect fit. Pay close attention to the corners and edges, ensuring they align seamlessly with the stair structure.
When installing the laminate, consider using a construction adhesive in addition to nails or screws. This will provide a stronger, more secure bond between the laminate and the stair, preventing movement and reducing the risk of squeaking. Apply the adhesive evenly to the back of the laminate piece and press it firmly into place. Use clamps or weights to hold the laminate in position until the adhesive has fully cured.
Remember to install stair nose moldings on the tread edges for safety and aesthetics. These moldings provide a finished look and protect the edges of the laminate from wear and tear. Choose moldings that match the color and style of the laminate, and install them according to the manufacturer's instructions.
Key Point 3: Addressing Unique Challenges of Curved Stairs
Curved stairs present unique challenges that require specific solutions. One common issue is dealing with the varying widths of the treads and risers. As the stairs curve, the dimensions of each step change, requiring careful attention to detail during the templating and cutting process.
Another challenge is achieving a seamless transition between the laminate flooring and the surrounding walls or trim. Due to the irregular shape of the stairs, it may be necessary to use flexible trim or molding to cover any gaps or imperfections. Flexible trim can be bent and shaped to conform to the curves of the stairs, providing a clean, professional finish.
When installing laminate on curved stairs, it's essential to consider the direction of the grain. Aligning the grain consistently across all the treads and risers will create a more visually appealing and cohesive look. Pay attention to the orientation of the laminate planks when cutting and installing them, ensuring the grain runs in the same direction on each step.
For particularly complex curves, consider using smaller pieces of laminate to create a more flexible and adaptable surface. This technique involves cutting the laminate into smaller segments and arranging them to conform to the contours of the stairs. While this approach requires more cutting and fitting, it can be an effective way to achieve a smooth, seamless finish on highly curved stairs.
Furthermore, consider the lighting in the stairwell. The angle of light can accentuate any imperfections in the installation, so it's important to pay close attention to detail and ensure a flawless finish. Use a level to check the alignment of the laminate, and make any necessary adjustments to ensure a smooth, even surface.
Finally, remember to prioritize safety during the installation process. Wear appropriate safety gear, such as safety glasses and gloves, to protect yourself from injuries. Use caution when operating power tools, and always follow the manufacturer's instructions. A well-prepared and safely executed installation will result in beautiful and durable laminate flooring on curved stairs.
After the installation is complete, carefully inspect the entire staircase to ensure that all laminate pieces are securely attached and that there are no gaps or imperfections. Clean the laminate flooring with a damp cloth to remove any dust or debris. Avoid using harsh chemicals or abrasive cleaners, as these can damage the surface of the laminate.

Faq Installing Laminate Around Curved Staircase

Faq Installing Laminate Around Curved Staircase

Laying Laminate Flooring On Curved Stairs

Can I Used Engineer Hardwood Floors On Rounded Stairs Doityourself Com Community Forums

Can I Used Engineer Hardwood Floors On Rounded Stairs Doityourself Com Community Forums

Vinyl Plank On Curved Stairs Quite Diffe Could Work In Plett Flooring Luxury

How To Install Prefinished Hardwood On Curved Staircase Mryoucandoityourself

Installing Hardwood Flooring On Concrete Around Curved Stair Case

How To Lay Laminate Flooring On Stairs Discount Depot Blog

5 Tips Adding Hardwood To Curved Staircase Thetarnishedjewelblog
Related Posts