How to Install Laminate Floor Tiles
Laminate flooring offers a durable and stylish alternative to traditional hardwood flooring, providing a cost-effective way to enhance the look and feel of a room. Installing laminate flooring is a DIY project that can be completed by most homeowners with basic tools and a little patience. This article will guide you through the process of installing laminate floor tiles, providing a step-by-step explanation to ensure a successful outcome.
1. Preparation and Planning
Before embarking on the installation, thorough preparation is crucial. This involves assessing the existing subfloor, gathering necessary materials, and meticulously planning the layout.
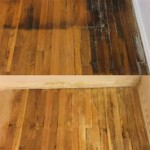
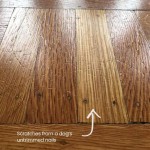
Assess the Subfloor: The subfloor must be level and free from any imperfections that could compromise the laminate floor's stability. Use a level to check for any dips or humps, and address any issues by sanding down high spots or filling in low areas with a leveling compound. Ensure the subfloor is clean and free of debris.
Gather Materials and Tools: You will need the following:
- Laminate floor tiles
- Underlayment
- Tapping block and mallet
- Pull bar
- Measuring tape and pencil
- Utility knife
- Circular saw or jigsaw (optional)
- Safety glasses and work gloves
Plan the Layout: Carefully measure the room and determine the best starting point for your installation. Consider the direction of the light and the flow of traffic in the room. It's often recommended to start in the center of the room and work outward, minimizing the need for cutting tiles.
2. Installing the Underlayment
Underlayment provides a layer of cushioning and insulation beneath the laminate floor, enhancing comfort, reducing noise, and protecting the floor from moisture.
Select the Right Underlayment: Choose an underlayment that is specifically designed for laminate flooring. It should be moisture-resistant and offer adequate cushioning for your needs.
Install the Underlayment: Unroll the underlayment across the subfloor, ensuring it is tightly fitted and free from wrinkles or gaps. Secure the underlayment with tape or staples, depending on its material. For larger rooms, overlap the underlayment by at least 6 inches.
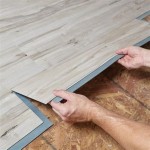
3. Installing the First Row
The first row of laminate tiles is crucial for establishing a straight and level foundation for the rest of the installation.
Measure and Cut: Measure the distance between the wall and the first row, and cut the first tile to fit. Leave a small expansion gap (about 1/4 inch) between the tile and the wall to allow for expansion and contraction.
Secure the First Tile: Place the cut tile against the wall, making sure it is flush with the underlayment. Use a tapping block and mallet to gently tap the tile into place, ensuring it is securely locked into the groove of the neighboring tile.
Install the Remaining Tiles in the First Row: Continue installing tiles in the first row, ensuring each tile is tightly locked into place. Use spacers to maintain the expansion gap between the tiles and the wall.
4. Installing Subsequent Rows
Once the first row is installed, you can move on to installing the remaining rows of laminate tiles.
Stagger Joints: To maintain a visually appealing and stable installation, stagger the joints between tiles in each row. Avoid aligning the seams in consecutive rows.
Secure Tiles: Use the tapping block and mallet to gently tap each tile into place, ensuring it is securely locked into the groove of the previous tile.
Maintain Expansion Gaps: Remember to maintain the expansion gap between the tiles and the walls, using spacers as needed.
5. Cutting Tiles for Special Areas
You will likely need to cut laminate tiles to fit around obstacles such as doorways, pipes, or other fixtures.
Measure and Mark: Carefully measure the area where cuts are required and mark the tile accordingly.
Cut Tiles: Use a utility knife, circular saw, or jigsaw to cut the tiles to size. Be careful to make clean and precise cuts to avoid damaging the tiles.
Install Cut Tiles: Secure the cut tiles into place, ensuring they are tightly locked into the grooves of the surrounding tiles.
6. Finishing Touches
Once all the tiles are installed, there are a few finishing touches to complete the installation.
Install Transition Strips: If you are installing laminate flooring in multiple rooms, use transition strips to create a smooth transition between the different flooring types.
Apply Molding: Install baseboards or molding around the perimeter of the room to cover the expansion gap and provide a finished look.
Clean Up: Remove any excess debris and vacuum the floor to ensure it is clean and ready for use.

How To Install Laminate Flooring For Beginners

Our Step By Guide For Laying Laminate Flooring

How To Install Vinyl Plank Tiles In A Bathroom

Can You Put Laminate Flooring Over Tile Twenty Oak

Diy Install Laminate Flooring With A Pattern Tile

How To Install Laminate Over A Tile Floor 2025 Today S Homeowner

Can You Put Laminate Flooring Over Ceramic Tiles Mellowpine

Wickes How To Lay Laminate Flooring

What S The Easiest Flooring To Install America

How To Install Laminate Flooring Shanty 2 Chic
Related Posts