How To Install Hardwood Floors Over Concrete Slab
Installing hardwood floors over a concrete slab can significantly enhance the aesthetic appeal and perceived value of a home. However, this type of installation requires careful preparation and adherence to specific techniques to ensure a successful and long-lasting result. The primary challenge lies in managing moisture migration from the concrete, which can damage the hardwood over time. This article outlines the essential steps involved in installing hardwood floors over a concrete slab, emphasizing the importance of proper moisture testing, subfloor preparation, and installation methods.
Moisture Testing and Mitigation
The first and arguably most crucial step in installing hardwood over concrete is to accurately assess the moisture content of the slab. Concrete is porous and can retain significant amounts of moisture, which can negatively impact the hardwood flooring. Excessive moisture can lead to warping, cupping, buckling, and even mold growth. Therefore, conducting thorough moisture testing is paramount.
Several methods are available for testing moisture levels in concrete: calcium chloride tests, relative humidity (RH) probes, and electronic moisture meters. The calcium chloride test, also known as the anhydrous calcium chloride test, involves placing a measured amount of calcium chloride on the concrete surface under a sealed dome. After a specified period (typically 72 hours), the calcium chloride is weighed again. The weight gain indicates the amount of moisture absorbed from the concrete, which is then used to calculate the moisture vapor emission rate (MVER). This test provides a quantitative measurement of moisture released from the concrete.
Relative humidity (RH) probes measure the humidity levels within the concrete slab. This method involves drilling small holes into the concrete and inserting the RH probe. The probe then measures the relative humidity at a specific depth within the slab. This method is considered more accurate than the calcium chloride test because it measures the actual moisture content within the slab, rather than just the surface emission rate.
Electronic moisture meters provide a quick and convenient way to assess moisture levels. These meters use electrical conductivity to measure the moisture content of the concrete surface. While they are useful for preliminary assessments, they are generally less accurate than calcium chloride tests or RH probes and should not be relied upon as the sole method for determining moisture levels.
Acceptable moisture levels vary depending on the type of hardwood flooring being installed and the manufacturer's recommendations. Generally, solid hardwood flooring requires lower moisture levels than engineered hardwood. If moisture levels exceed the acceptable range, moisture mitigation measures must be implemented. Several options are available, including applying moisture barriers, using specialized adhesives with moisture-resistant properties, and installing a subfloor with a built-in vapor retarder. Liquid epoxy moisture barriers are commonly used to create a waterproof layer on top of the concrete slab. These barriers are applied in multiple coats to ensure complete coverage and must be allowed to cure fully before proceeding with the flooring installation.
Subfloor Preparation and Installation
Once the moisture testing and mitigation are complete, the next step is to prepare the concrete slab for the subfloor installation. Proper subfloor preparation is critical for creating a stable, level, and smooth surface for the hardwood flooring. The concrete slab should be thoroughly cleaned to remove any dirt, dust, debris, or adhesive residue. This can be achieved by sweeping, vacuuming, and scrubbing the surface. For stubborn residue, a concrete grinder or scraper may be necessary.
After cleaning, the concrete slab should be inspected for any cracks, holes, or unevenness. Small cracks can be filled with a concrete crack filler or patching compound. Larger cracks or significant unevenness may require the application of a self-leveling compound. Self-leveling compounds are cement-based mixtures that are poured onto the concrete surface and allowed to spread and level automatically. This creates a smooth and even surface for the subfloor.
Several subfloor options are available for installing hardwood over concrete, each with its own advantages and disadvantages. One option is to install a plywood subfloor using construction adhesive and concrete fasteners. This method provides a solid and stable base for the hardwood flooring. However, it is important to use pressure-treated plywood to resist moisture and to ensure that the plywood is properly acclimated to the environment before installation.
Another option is to use a floating subfloor system. Floating subfloors consist of interlocking panels that are not directly attached to the concrete slab. These systems typically include a built-in vapor barrier and provide cushioning and sound insulation. Floating subfloors are easier to install than plywood subfloors and can be a good option for DIY projects.
A third option is to use a dimpled underlayment. These underlayments consist of a plastic or rubber sheet with dimples or protrusions on one side. The dimples create an air gap between the concrete slab and the hardwood flooring, allowing moisture to evaporate and reducing the risk of moisture damage. Dimpled underlayments are typically used in conjunction with a moisture barrier.
When installing the subfloor, it is essential to follow the manufacturer's instructions carefully. Proper installation techniques, such as staggering joints and using the correct fasteners, will ensure a stable and long-lasting subfloor.
Hardwood Flooring Installation Techniques
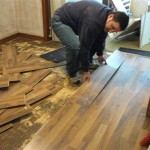
With the subfloor properly installed, the final step is to install the hardwood flooring. Several installation methods are available, depending on the type of hardwood flooring being used. Solid hardwood flooring is typically nailed or stapled to the subfloor. Engineered hardwood flooring can be nailed, stapled, glued, or floated over the subfloor.
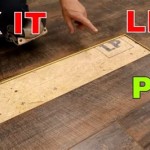
When nailing or stapling solid hardwood flooring, it is important to use a hardwood flooring nailer or stapler that is designed for this purpose. These tools drive nails or staples at the correct angle and depth to secure the flooring without damaging it. It is also important to follow the manufacturer's recommendations for nail or staple spacing.
Gluing engineered hardwood flooring involves applying a specialized adhesive to the subfloor and then placing the flooring planks on top. This method provides a strong and permanent bond between the flooring and the subfloor. It is important to use an adhesive that is recommended for hardwood flooring and to follow the manufacturer's instructions carefully.
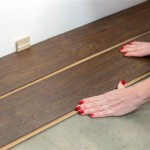
Floating engineered hardwood flooring involves interlocking the flooring planks together without attaching them to the subfloor. This method is relatively easy and quick to install, but it is important to ensure that the subfloor is level and smooth. A thin foam underlayment is typically used under floating hardwood floors to provide cushioning and sound insulation.
Regardless of the installation method, it is important to leave an expansion gap around the perimeter of the room to allow for natural expansion and contraction of the hardwood flooring. This gap is typically covered by baseboards or trim.
Throughout the installation process, it is crucial to maintain consistent temperature and humidity levels in the room. Hardwood flooring should be acclimated to the environment for several days before installation to prevent warping or cupping. Acclimation involves storing the flooring in the room where it will be installed, allowing it to adjust to the temperature and humidity levels. The specific acclimation time will vary depending on the type of flooring and the manufacturer's recommendations.
Cutting hardwood flooring requires specialized tools, such as a miter saw or a table saw. It is important to wear safety glasses and other protective gear when cutting hardwood flooring. When installing the flooring, it is essential to maintain consistent spacing between the planks and to align the joints properly. A tapping block and a pull bar can be used to ensure tight and even joints.
After the hardwood flooring is installed, it should be inspected for any defects or imperfections. Any necessary repairs should be made promptly. The flooring should then be cleaned to remove any dust or debris. Finally, baseboards or trim should be installed to cover the expansion gap and provide a finished look.
Installing hardwood floors over a concrete slab is a complex process that requires careful planning, preparation, and execution. By following these steps and taking the necessary precautions, homeowners can achieve a beautiful and durable hardwood floor that will last for many years.

Guidelines For Hardwood Floor Installation Over Concrete

How To Install A Wood Subfloor Over Concrete Rona

How To Install Tongue Groove Hardwood Floors Over Concrete

Ask Fred How Do I Install Wood Floor Below Grade Schedule

How To Install A Wood Subfloor Over Concrete Rona

How Do I Install A Hardwood Floor On Concrete Slab The Carpet Guys

Fitting Hardwood Floor To Concrete Wood And Beyond Blog

Installing A Hardwood Floor Over Concrete Slab American Information Center

How To Install Hardwood Floors On Concrete Slab Easyklip Easiklip

Installing Wood Subfloors Over Concrete Hardwood Floors
Related Posts