How to Install Engineered Flooring Over Concrete
Engineered flooring presents a desirable alternative to solid hardwood, offering a blend of aesthetic appeal, durability, and easier installation. Installing engineered flooring over a concrete subfloor is a common project for both homeowners and professional contractors. The process, however, requires careful planning and execution to ensure a long-lasting and aesthetically pleasing result. This article provides a detailed guide on how to successfully install engineered flooring over concrete, covering essential steps from preparation to the final touches.
Prior Preparation of the Concrete Subfloor
Proper preparation of the existing concrete subfloor is the most crucial step in the installation process. Neglecting this stage can lead to problems such as uneven flooring, moisture issues, and premature wear and tear. The primary goals of subfloor preparation are to ensure a level, clean, dry, and structurally sound surface.
1. Testing for Moisture: Concrete is porous and prone to moisture migration from the ground. Before commencing any installation, a moisture test is mandatory. Several methods can be employed, including the calcium chloride test (also known as the moisture dome test) and the relative humidity (RH) probe test. The calcium chloride test involves placing a pre-weighed amount of calcium chloride under a sealed dome on the concrete surface for a specified period. The weight gain indicates the moisture emission rate. The RH probe test involves drilling small holes into the concrete and inserting probes to measure the relative humidity within the slab. Acceptable moisture levels vary depending on the flooring manufacturer's recommendations; generally, engineered flooring requires moisture levels below a certain threshold. Consult the flooring manufacturer’s specifications for precise requirements. If the moisture levels exceed acceptable limits, moisture remediation measures are necessary. These may include applying a moisture barrier membrane to the concrete surface before installing the flooring.
2. Cleaning the Subfloor: Thoroughly cleaning the concrete subfloor is essential. Begin by sweeping or vacuuming the entire area to remove loose debris, dust, and dirt. For stubborn stains or adhesive residues, use a scraper to remove them. Following scraping, consider using a concrete cleaner or degreaser to lift any remaining dirt or grease. Rinse the floor thoroughly with clean water and allow it to dry completely. Avoid using harsh chemicals that could damage the concrete or interfere with the flooring adhesive.
3. Leveling the Subfloor: Unevenness in the concrete subfloor can cause problems with the finished flooring, including squeaking, buckling, and uneven wear. Identify any high or low spots using a long level or straightedge. Mark these areas for correction. For minor imperfections (less than 1/8 inch), a self-leveling compound can be used. Follow the manufacturer's instructions for mixing and applying the self-leveling compound. Allow the compound to cure completely before proceeding. For larger imperfections, grinding down high spots may be necessary. This process requires specialized equipment, such as a concrete grinder, and should be performed by a professional. After grinding, thoroughly clean the area to remove any dust or debris.
4. Inspecting for Cracks and Damage: Examine the concrete subfloor for any cracks, holes, or other damage. Small cracks can typically be filled with a concrete patching compound. Follow the manufacturer's instructions for mixing and applying the compound. For larger cracks or structural damage, consult a professional to assess the extent of the damage and recommend appropriate repairs. Ignoring structural issues can compromise the stability and longevity of the flooring installation.
Selecting the Right Engineered Flooring and Underlayment
Choosing the appropriate engineered flooring and underlayment is critical for a successful installation. Consider the specific requirements of the space, including the level of foot traffic, moisture exposure, and desired aesthetic.
1. Choosing the Right Engineered Flooring: Engineered flooring consists of multiple layers, typically with a hardwood veneer on top and a core made of plywood or high-density fiberboard (HDF). The thickness of the hardwood veneer affects the durability and longevity of the flooring. Thicker veneers can withstand more sanding and refinishing. Consider the wear layer, which indicates the thickness of the top veneer; a thicker wear layer will generally translate into better durability. Evaluate the core material for stability and resistance to moisture. HDF cores generally offer better moisture resistance than plywood cores. Select a flooring product that is specifically designed for installation over concrete. Some engineered flooring products come with a built-in underlayment, while others require a separate underlayment.
2. Selecting an Appropriate Underlayment: An underlayment provides several benefits, including moisture protection, sound insulation, and added cushioning. Selecting the correct underlayment depends on the specific needs of the installation. For moisture protection, choose an underlayment with a built-in moisture barrier. This will help prevent moisture from the concrete subfloor from damaging the engineered flooring. For sound insulation, consider an underlayment with a high sound transmission class (STC) rating. This will help reduce noise transmission between floors. For added cushioning, choose an underlayment with a higher density. This will provide a more comfortable walking surface. Consult the engineered flooring manufacturer's recommendations for suitable underlayment options. Some underlayments are not compatible with certain types of engineered flooring.
3. Acclimation: Before installation, the engineered flooring must acclimate to the environment in which it will be installed. This process allows the flooring to adjust to the temperature and humidity levels in the room, minimizing expansion and contraction after installation. Store the flooring in the room where it will be installed for at least 48 to 72 hours before beginning the installation. Follow the manufacturer's recommended acclimation period. Ensure that the room temperature and humidity levels are within the recommended range during acclimation.
Installation Methods and Best Practices
There are primarily two methods for installing engineered flooring over concrete: gluing down and floating. Each method has its advantages and disadvantages, and the choice depends on the specific product and installation requirements.
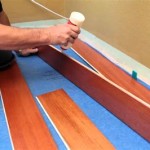
1. Glue-Down Installation: The glue-down method involves adhering the engineered flooring directly to the concrete subfloor using a specialized adhesive. This method provides a strong and stable bond, minimizing movement and squeaking. It is suitable for areas with high foot traffic or where moisture is a concern. Use a high-quality adhesive that is specifically designed for installing engineered flooring over concrete. Apply the adhesive evenly to the subfloor using a notched trowel. Follow the adhesive manufacturer's instructions for the correct trowel size and application rate. Work in small sections to prevent the adhesive from drying out before the flooring is installed. Press the flooring firmly into the adhesive, ensuring full contact. Use a roller to evenly distribute pressure and remove any air pockets. Leave expansion gaps around the perimeter of the room to allow for expansion and contraction. These gaps are typically covered by baseboards or trim.
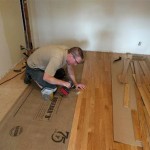
2. Floating Installation: The floating method involves interlocking the engineered flooring planks together without adhering them to the subfloor. The flooring "floats" above the concrete subfloor. This method is generally faster and easier than the glue-down method. It is suitable for areas with moderate foot traffic and where the subfloor is relatively level. Install an underlayment over the concrete subfloor before installing the flooring. This will provide moisture protection, sound insulation, and added cushioning. The underlayment should be installed according to the manufacturer's instructions. Begin installing the flooring along a straight wall, leaving an expansion gap around the perimeter of the room. Interlock the flooring planks together, following the manufacturer's instructions. Some engineered flooring products have a click-lock system that makes installation easier. Use a tapping block and hammer to gently secure the planks together. Avoid hitting the planks directly with the hammer, as this could damage them. Leave expansion gaps around the perimeter of the room to allow for expansion and contraction. These gaps are typically covered by baseboards or trim.
3. Expansion Gaps: Regardless of the installation method, it is imperative to leave adequate expansion gaps around the perimeter of the room and around any fixed objects, such as pipes or columns. These gaps allow the flooring to expand and contract with changes in temperature and humidity, preventing buckling or warping. The recommended expansion gap size varies depending on the flooring manufacturer's recommendations, but it is typically between 1/4 inch and 3/8 inch. Use spacers to maintain the correct expansion gap during installation. Remove the spacers after the adhesive has cured or the flooring is fully installed. Cover the expansion gaps with baseboards, trim, or molding to create a finished look.
4. Cutting Techniques: Accurate cutting is essential for achieving a professional-looking installation. Use a sharp saw, such as a circular saw or a miter saw, to cut the flooring planks. For intricate cuts or curves, a jigsaw may be necessary. Measure twice and cut once to avoid mistakes. When cutting near walls or fixed objects, use a template to ensure accurate cuts. Always wear safety glasses and a dust mask when cutting flooring.

Installing Wood Flooring Over Concrete Diy

Installing Engineered Hardwood On Concrete Twenty Oak

Installing Engineered Hardwood On Concrete Twenty Oak

Installing Hardwood Floors On Concrete Subfloors

Installing Engineered Flooring On A Concrete Slab Fine Homebuilding

How To Install Engineered Flooring On Concrete Adm

How To Install Engineered Wood Flooring On Concrete

Installing Engineered Hardwood On Concrete Villagio Guide

Installing A Hardwood Floor Over Concrete Slab American Information Center

How To Install Engineered Wood Flooring On Concrete
Related Posts