Expert Guide: Installing Allure Vinyl Plank Flooring in Bathrooms
Allure vinyl plank flooring is a popular choice for bathrooms due to its durability, waterproof nature, and ease of installation. If you're looking to update your bathroom floor with Allure vinyl planks, follow our step-by-step guide to ensure a professional-looking and long-lasting result.
Step 1: Prepare the Subfloor
Ensure that the subfloor is clean, dry, and level. Remove any existing baseboards or quarter rounds. Use a moisture barrier (a sheet of polyethylene) under the flooring to prevent moisture from damaging the subfloor or planks.
Step 2: Plan the Layout
Determine the direction in which you want to install the planks. Usually, they're installed parallel to the longest wall. Lay out the planks dry to visualize the final look and adjust the starting point if necessary.
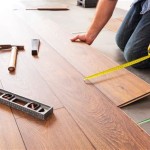
Step 3: Cut the First Row of Planks
Measure and cut the first row of planks to fit snugly against the walls. Use a utility knife or a snap cutter for precise cuts. Leave a small expansion gap between the wall and the plank edges (¼-inch for floating floors and 0-inch for glued-down floors).
Step 4: Anchor the First Row
Apply construction adhesive to the bottom of the first row of planks before placing them on the subfloor. Press down firmly to ensure they adhere properly. Ensure the planks are aligned correctly for a seamless transition.
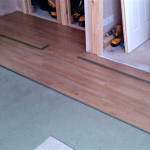
Step 5: Lock Together the Planks
Starting with the second row, angle the end of the plank into the groove of the previous plank. Press down until you hear a "click" sound, indicating that the planks are securely interlocked. Continue the process for all subsequent rows.
Step 6: Cut and Fit the Last Row
Measure and cut the last row of planks to fit the remaining space. You may need to use a jigsaw for more complex cuts. Tap the planks into place using a tapping block to avoid damaging the planks.
Step 7: Install Baseboards and Quarter Rounds
Once the flooring is installed, reinstall the baseboards and quarter rounds. Use a miter saw to cut the corners at a 45-degree angle for a clean finish. Secure them to the wall using nails or screws.
Additional Tips:
* Use a chalk line for straight and precise cuts. * Leave gaps around toilets and fixtures for easy removal. * Seal the seams around toilets and fixtures with silicone caulk for additional moisture protection. * Allow the flooring to acclimate to the room temperature for 24-48 hours before installation. * Clean and maintain the floor regularly using mild detergents to preserve its appearance and durability.
How To Install Vinyl Plank Flooring Allure Gripstrip

How To Install Vinyl Plank Flooring In A Bathroom As Beginner Home Renovation

Installing Vinyl Floors A Do It Yourself Guide The Honeycomb Home

Installing Vinyl Floors A Do It Yourself Guide The Honeycomb Home

How To Install Allure Gripstrip Vinyl Plank Flooring

How To Install Vinyl Plank Flooring

Installing Vinyl Floors A Do It Yourself Guide The Honeycomb Home

Easiest Flooring To Install By Yourself Traffic Master Gripstrip

Installing Vinyl Floors A Do It Yourself Guide The Honeycomb Home

How To Install Vinyl Plank Flooring In A Bathroom As Beginner Home Renovation
Related Posts