How To Install Allure Resilient Vinyl Plank Flooring
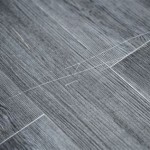
Allure resilient vinyl plank flooring is a popular choice for homeowners due to its durability, water resistance, and ease of installation. This type of flooring mimics the look of hardwood or tile while offering enhanced resilience to everyday wear and tear. The installation process, while relatively straightforward, requires careful preparation and attention to detail to ensure a professional and long-lasting result. This article provides a comprehensive guide on how to install Allure resilient vinyl plank flooring.
Preparing the Subfloor
The success of any flooring installation hinges on the condition of the subfloor. A properly prepared subfloor provides a stable, level, and clean surface for the Allure planks to adhere to. Failure to address imperfections in the subfloor can lead to unevenness, gapping, and premature wear of the flooring.
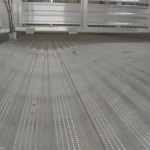
First, thoroughly inspect the existing subfloor. Identify any areas that are uneven, damaged, or contaminated. Common subfloor materials include concrete, plywood, and existing vinyl or tile flooring. The substrate must be structurally sound and capable of supporting the new flooring without flexing or shifting.
For concrete subfloors, use a long level or straightedge to check for high and low spots. Significant variations, exceeding 3/16 inch over a 10-foot span, should be corrected using a self-leveling compound. This compound is mixed according to the manufacturer's instructions and poured onto the subfloor, allowing it to flow and create a smooth, even surface. Ensure the self-leveling compound is fully cured before proceeding. Small cracks may be filled with a concrete patching compound, ensuring it is flush with the surrounding surface.
For plywood subfloors, inspect for loose or damaged boards. Replace any boards that are warped, rotted, or delaminated. Secure loose boards with wood screws driven into the joists. Sand down any raised areas or imperfections to create a smooth surface. Fill any gaps or cracks with wood filler and sand smooth when dry. Ensure the plywood is adequately thick to support the new flooring; a minimum thickness of 5/8 inch is generally recommended.
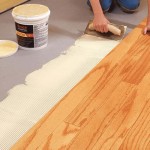
If installing over existing vinyl or tile flooring, ensure the existing flooring is securely bonded to the subfloor. Loose or damaged areas must be removed and the substrate repaired. Clean the existing flooring thoroughly to remove any dirt, wax, or debris. Consider using a degreasing cleaner to ensure a clean surface for adhesion. Embossed patterns in the existing flooring may telegraph through the new vinyl plank flooring; therefore, it might be necessary to apply a leveling compound to create a smooth surface.
Regardless of the subfloor material, it is crucial to thoroughly clean the entire surface before installation. Remove any dust, dirt, debris, and contaminants with a broom, vacuum, and damp mop. Allow the subfloor to dry completely before proceeding to the next step. Ensuring a clean subfloor promotes proper adhesion and prevents issues like mold or mildew growth.
Acclimatizing the Flooring and Planning the Layout
Acclimatization is a critical step in the installation process that allows the Allure resilient vinyl planks to adjust to the environmental conditions of the room. This process helps to minimize expansion and contraction after installation, preventing gaps and buckling. Proper planning of the layout is equally important to ensure an aesthetically pleasing and efficient installation.
Bring the boxes of Allure flooring into the room where they will be installed at least 48 to 72 hours before installation. Lay the boxes flat and open them slightly to allow air to circulate. Maintain a consistent room temperature between 65°F and 85°F (18°C and 29°C) during the acclimatization period. Avoid exposing the planks to direct sunlight or extreme temperatures.
Before beginning the installation, carefully plan the layout of the flooring. Measure the room's length and width to determine the number of planks needed. Consider the direction in which the planks will be installed; generally, running the planks parallel to the longest wall of the room makes the room appear larger. However, personal preference and the room's shape can influence this decision.
Calculate the width of the planks that will be needed for the last row. If the last row will be less than half the width of a plank, it is generally best to adjust the starting row to ensure a more balanced appearance. This involves cutting the planks in the first row to a narrower width. This avoids having a very thin sliver along the final wall.
Consider the placement of doorways and other architectural features. Plan the layout to minimize the number of small pieces around doorways and thresholds. It is also important to plan for expansion gaps around the perimeter of the room. These gaps allow the flooring to expand and contract without putting pressure on the walls.
Use chalk or a pencil to mark reference lines on the subfloor. These lines will help ensure that the first few rows are installed straight and square. Accurate alignment of the initial rows is crucial for maintaining the integrity of the entire installation.
Installing the Allure Resilient Vinyl Plank Flooring
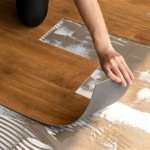
The actual installation process involves carefully aligning and securing the Allure planks to each other. The interlocking system, often referred to as "grip strip" or "click-lock," allows for a floating floor installation, meaning the flooring is not directly adhered to the subfloor.
Start by placing the first row of planks along the longest straight wall, ensuring that the tongue side of the plank faces the wall. Use spacers (approximately ¼ inch) along the wall to maintain the expansion gap. This gap is crucial for allowing the flooring to expand and contract with temperature changes.
Align the end of the first plank with the reference line and press the planks together, engaging the interlocking system. Some Allure planks may require a slight angle to engage the interlocking mechanism. Follow the manufacturer's instructions for the specific type of Allure flooring being installed.
Continue laying planks in the first row, ensuring each plank is securely locked into the adjacent plank. Use a rubber mallet to gently tap the planks together, ensuring a tight and seamless joint. Be careful not to damage the interlocking edges. Any damaged edges can compromise the integrity of the installation.
When you reach the end of the first row, measure and cut the last plank to fit, leaving the required expansion gap. Use a utility knife or a flooring cutter to make precise cuts. A square or straightedge will help ensure accurate cuts.
Use the cut-off piece from the end of the first row to start the second row, provided it is at least 6 inches long. This helps to minimize waste and creates a staggered pattern, which enhances the appearance and stability of the flooring. If the cut-off piece is too short, use a new plank and cut it to a suitable length.
Install the second row by aligning the planks with the first row and engaging the interlocking system. Ensure the seams are staggered by at least 6 inches to create a more visually appealing and structurally sound installation.
Continue installing rows of planks, working your way across the room. Periodically check the alignment of the planks using a straightedge. Make any necessary adjustments to ensure the rows remain straight and square.
When you reach obstacles like doorways or pipes, carefully measure and cut the planks to fit around them. Use a template or cardboard to create a precise pattern before cutting the planks. A jigsaw or coping saw can be used to make intricate cuts.
For the last row, measure and cut the planks to fit, leaving the required expansion gap. Use a pull bar or tapping block to engage the interlocking system on the last row, as it may be difficult to reach with a mallet.
Once the flooring is installed, remove the spacers from around the perimeter of the room. Install baseboards or quarter-round molding to cover the expansion gaps and create a finished look. Secure the baseboards or molding to the wall, not to the flooring, to allow for expansion and contraction.
Clean the flooring with a damp mop and a mild cleaning solution. Avoid using harsh chemicals or abrasive cleaners, as these can damage the surface of the flooring. Inspect the installation for any gaps or imperfections and address them as needed.

How To Install Allure Flooring

Trafficmaster Allure Ultra Resilient Flooring Installation Review

Allure By Traffic Master Flooring Install

Learn How To Install Allure Ultra Simplefit Flooring Official

Allure Resilient Vinyl Plank Flooring Overview

Installing Allure Flooring Easiest Diy Ever

How To Install Allure Gripstrip Vinyl Plank Flooring

Allure Ultra Resilient Vinyl Flooring For Pros The Home Depot

Installing Allure Trafficmaster Resilient Vinyl Flooring Basement Floor Installation Plank

How To Install Allure Flooring
Related Posts