How To Install Allure Interlocking Vinyl Plank Flooring
Allure interlocking vinyl plank flooring offers a durable, attractive, and relatively easy-to-install flooring solution for homeowners. Its interlocking design eliminates the need for messy adhesives, making it a popular choice for DIY projects. This article provides a comprehensive guide on how to install Allure interlocking vinyl plank flooring, covering essential preparation steps, installation techniques, and best practices for achieving a professional-looking result.
Before beginning any flooring project, careful planning is crucial. This involves accurately measuring the room, assessing the subfloor, choosing the appropriate tools and materials, and allowing the flooring to acclimate to the environment. Neglecting these preliminary steps can lead to installation problems, wasted materials, and unsatisfactory results.
Key Point 1: Preparation is Paramount
The success of an Allure flooring installation hinges heavily on thorough preparation. This includes assessing the subfloor, gathering the necessary tools, and acclimating the flooring.
Subfloor Assessment: The subfloor must be clean, level, and dry. Any imperfections, such as unevenness, cracks, or debris, will telegraph through the vinyl plank flooring. Remove any existing flooring materials, including carpet, tile, or vinyl. Use a scraper to remove any residual adhesive or grout. Fill any cracks or holes with a self-leveling compound according to the manufacturer's instructions. Ensure the subfloor is free of dust, dirt, and grease. A clean subfloor promotes proper adhesion and prevents the planks from shifting or buckling. If the subfloor is wood, ensure it is structurally sound. Replace any damaged or rotten sections. Check for squeaks and secure any loose boards with screws. If the subfloor is concrete, test for moisture. Excessive moisture can compromise the adhesive backing of the vinyl planks and lead to mold growth. A moisture meter can be used to determine the moisture content of the concrete. If the moisture level is too high, apply a moisture barrier before installing the flooring.
Tool and Material Acquisition: Gather all the necessary tools and materials before starting the installation process. This prevents interruptions and ensures a smooth workflow. Essential tools include a utility knife with sharp blades, a measuring tape, a straight edge or T-square, a rubber mallet, a tapping block, and spacers. Additional tools that may be helpful include a jigsaw or circular saw for cutting intricate shapes, a pry bar for removing existing flooring, and a vacuum cleaner for cleaning the subfloor. In addition to the Allure vinyl planks, you will also need transition strips for doorways and thresholds. Select transition strips that complement the color and style of your flooring. Consider purchasing extra planks to account for cuts and waste. A general rule of thumb is to add 5-10% extra to the total square footage of the room.
Acclimation Process: Acclimation is the process of allowing the vinyl planks to adjust to the temperature and humidity of the room in which they will be installed. This helps prevent shrinking or expansion after installation. Store the boxes of planks in the room for at least 48-72 hours before installation. The ideal temperature for acclimation is between 65°F and 85°F. Avoid exposing the planks to direct sunlight or extreme temperatures. Maintain a consistent humidity level in the room during acclimation. This will help the planks stabilize and minimize the risk of dimensional changes after installation.
Key Point 2: The Installation Procedure
The installation of Allure interlocking vinyl plank flooring involves careful alignment, interlocking, and securing the planks. Proper technique ensures a seamless and durable flooring surface.
Planning the Layout: Before starting the installation, plan the layout of the planks. This helps minimize waste and ensures a visually appealing result. Measure the width of the room and divide it by the width of a plank to determine how many planks will fit in a row. If the last row will be less than half the width of a plank, adjust the starting row to ensure a more balanced appearance. Similarly, measure the length of the room and divide it by the length of a plank to determine how many planks will be needed per row. Consider staggering the end joints of adjacent rows to create a more natural look and enhance the structural integrity of the floor. A minimum stagger of 6 inches is recommended. Use a chalk line to mark the starting line for the first row of planks. This will ensure that the first row is straight and aligned properly. Leave a small expansion gap of approximately ¼ inch along the walls. This allows the flooring to expand and contract with changes in temperature and humidity.
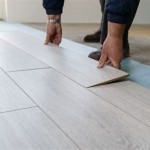
Interlocking the Planks: Allure vinyl planks typically feature a tongue-and-groove interlocking system. Align the tongue of one plank with the groove of the adjacent plank. Gently press the planks together until they snap into place. Use a rubber mallet and tapping block to ensure a tight and secure connection. Avoid hitting the planks directly with the mallet, as this can damage the edges. If the planks are difficult to interlock, check for obstructions or debris in the tongue and groove. Use a utility knife to trim any excess material or imperfections. When installing planks around obstacles, such as pipes or doorways, use a jigsaw or circular saw to cut the planks to the desired shape. Measure the obstacle carefully and transfer the measurements to the plank. Use a template or pattern to ensure accurate cuts. For irregular shapes, consider using a coping saw. After cutting the plank, dry-fit it around the obstacle to ensure a proper fit. Make any necessary adjustments before permanently installing the plank.
Cutting and Fitting Planks: Cutting vinyl planks is generally straightforward and can be accomplished with a utility knife. Score the surface of the plank along the desired cut line, then bend the plank along the score line until it snaps. For thicker planks or more complex cuts, a jigsaw or circular saw may be necessary. When using a power saw, wear safety glasses and use a fine-tooth blade to minimize chipping. When fitting planks around door frames, trim the bottom of the door frame to allow the planks to slide underneath. This creates a clean and professional-looking finish. Use a jamb saw or oscillating multi-tool to trim the door frame. Place a piece of plank flooring next to the door frame to determine the correct cutting height. When fitting planks around pipes, use a hole saw to create a circular opening in the plank. The diameter of the hole should be slightly larger than the diameter of the pipe to allow for expansion. Use a jigsaw or utility knife to cut a slit in the plank from the edge of the plank to the hole. Slide the plank around the pipe and conceal the slit with a pipe collar or caulk.
Securing the Final Rows: The final rows of planks may require cutting to fit the remaining space. Measure the distance between the last full row and the wall. Subtract ¼ inch for the expansion gap. Cut the planks to the required width. Use a pull bar and tapping block to secure the final row of planks. The pull bar allows you to apply pressure to the planks from the wall side. Once the final row is installed, install transition strips at doorways and thresholds. Transition strips provide a smooth transition between different flooring types and protect the edges of the vinyl planks. Secure the transition strips with screws or adhesive, according to the manufacturer's instructions.
Key Point 3: Post-Installation Best Practices
Proper care and maintenance after installation will extend the life and maintain the appearance of Allure vinyl plank flooring.
Initial Cleaning: After the installation is complete, clean the floor thoroughly to remove any dust, debris, or adhesive residue. Use a soft-bristled broom or vacuum cleaner to remove loose dirt and dust. Avoid using a vacuum cleaner with a beater bar, as this can scratch the surface of the flooring. Damp-mop the floor with a mild detergent and water. Avoid using excessive water, as this can seep into the seams and damage the subfloor. Use a microfiber mop to ensure a thorough and streak-free clean. Rinse the mop frequently and change the water as needed. Allow the floor to dry completely before walking on it. Avoid using harsh chemicals, abrasive cleaners, or solvents, as these can damage the finish of the vinyl planks.
Ongoing Maintenance: Regular maintenance is essential to keep your Allure vinyl plank flooring looking its best. Sweep or vacuum the floor regularly to remove dirt and dust. Mop the floor as needed with a mild detergent and water. Use mats or rugs at entryways to trap dirt and moisture. This helps prevent dirt from being tracked onto the floor and reduces wear and tear. Use furniture pads under the legs of furniture to protect the floor from scratches and dents. Avoid dragging heavy objects across the floor. Lift and carry heavy objects instead. Clean up spills immediately to prevent staining. Use a clean cloth or paper towel to blot the spill. Avoid rubbing the spill, as this can spread it and make it more difficult to remove. For stubborn stains, use a vinyl floor cleaner specifically designed for Allure flooring. Follow the manufacturer's instructions carefully.
Addressing Potential Issues: Even with proper installation and maintenance, issues may arise over time. Addressing these issues promptly can prevent further damage and extend the life of your flooring. If planks become loose or damaged, they can be replaced individually. Use a utility knife to carefully remove the damaged plank. Clean the subfloor underneath the plank. Apply a small amount of adhesive to the subfloor. Position the new plank and press it firmly into place. Use a rubber mallet and tapping block to ensure a secure connection. If the flooring develops squeaks, it may be due to an uneven subfloor or loose planks. Inspect the subfloor for any imperfections. Use shims or self-leveling compound to correct any unevenness. Re-secure any loose planks with adhesive or by interlocking them more tightly. If the flooring develops gaps between the planks, it may be due to changes in temperature or humidity. Maintain a consistent temperature and humidity level in the room. Use a color-matched caulk or sealant to fill the gaps. If the flooring develops scratches or scuffs, use a vinyl floor restorer to buff out the imperfections. Follow the manufacturer's instructions carefully.
By following these guidelines, homeowners can successfully install Allure interlocking vinyl plank flooring and enjoy a beautiful and durable flooring surface for years to come. Remember that patient, careful work is the key to a successful DIY flooring project.

How To Install Allure Ultra Simplefit Flooring Official

How To Install Allure Flooring

How To Install Luxury Vinyl Plank Trafficmaster Allure

Allure By Traffic Master Flooring Install

How To Install Your Own Floating Vinyl Plank Flooring In Home Interior Design Wonderhowto

Trafficmaster Allure Ultra Resilient Flooring Installation Review

Installing Vinyl Floors A Do It Yourself Guide The Honeycomb Home

Allure Locking

How To Repair Allure Flooring By Replacing Planks

How To Install Vinyl Plank Flooring Allure Gripstrip
Related Posts