How To Fit Laminate Flooring In A Bathroom: A Comprehensive Guide
Installing laminate flooring in a bathroom can be a cost-effective and aesthetically pleasing alternative to tile, offering a wood-like appearance with relative ease of installation. However, the bathroom environment presents unique challenges, primarily due to moisture exposure. This guide provides a detailed walkthrough of how to install laminate flooring in a bathroom, ensuring a durable and long-lasting result.
Before commencing, it is crucial to understand that not all laminate flooring is suitable for bathrooms. Standard laminate is highly susceptible to water damage, leading to swelling, warping, and ultimately, floor failure. Therefore, selecting a water-resistant or waterproof laminate specifically designed for bathroom use is paramount. These specialized laminates often feature a tightly sealed core and a water-tight locking system, providing significantly improved moisture protection.
This guide assumes the installer possesses basic DIY skills and familiarity with using common tools. If unfamiliar with any of the steps outlined, seeking professional assistance is highly recommended. Safety precautions must be observed throughout the installation process, including wearing safety glasses and gloves.
Key Considerations Before Installation
Before purchasing materials or commencing the installation process, several key factors must be considered:
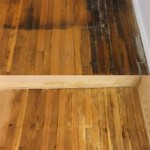
Subfloor Condition: The subfloor is the foundation upon which the laminate flooring will be installed. It must be clean, level, and dry. Any imperfections, such as cracks, holes, or unevenness, must be addressed before proceeding. Concrete subfloors may require patching and leveling compounds, while wood subfloors may need to be reinforced or replaced if showing signs of rot or water damage. The subfloor must be thoroughly cleaned to remove any debris, dust, or grease that could interfere with the adhesion of the underlayment.
Moisture Testing: Performing a moisture test on the subfloor is essential to ensure it is within acceptable levels for laminate installation. Excessive moisture can lead to mold growth and damage to the flooring. For concrete subfloors, a calcium chloride test (also known as a moisture vapor emission rate test) is recommended. For wood subfloors, a moisture meter can be used to measure the moisture content. Consult the laminate manufacturer's specifications for acceptable moisture levels.
Acclimation: Laminate flooring needs to acclimate to the bathroom's temperature and humidity levels before installation. Store the unopened boxes of laminate flooring in the bathroom for at least 48 to 72 hours prior to installation. This allows the material to expand or contract, minimizing the risk of gaps or buckling after installation. Ensure the heating and ventilation systems are operating normally during the acclimation period.
Choosing the Right Laminate: As previously mentioned, selecting a laminate specifically designed for bathroom use is crucial. Look for laminates labeled as "water-resistant" or "waterproof." Pay attention to the manufacturer's warranty, as this often indicates the level of water resistance. Thicker laminates generally offer better durability and water resistance than thinner options. Consider the wear layer rating (AC rating) to ensure the laminate can withstand the high-traffic environment of a bathroom. An AC3 or AC4 rating is typically suitable for residential bathrooms.
Materials and Tools Required
The following materials and tools are typically required for installing laminate flooring in a bathroom:
Water-Resistant/Waterproof Laminate Flooring: Calculate the square footage of the bathroom and add at least 10% for waste and cuts.
Underlayment: A moisture-resistant underlayment is essential for providing a layer of protection against moisture and reducing noise transmission. Some laminates come with pre-attached underlayment; however, a separate moisture barrier is still recommended for bathrooms.
Moisture Barrier: A 6-mil polyethylene film or similar moisture barrier is required to protect the laminate from moisture rising from the subfloor.
Silicone Caulk: High-quality silicone caulk is needed to seal the perimeter of the room, around pipes, and around the toilet flange to prevent water from seeping under the flooring.
Spacers: Spacers are used to maintain a consistent expansion gap between the laminate flooring and the walls.
Transition Strips: Transition strips are used to create a smooth transition between the laminate flooring and other flooring types in adjacent rooms.
Measuring Tape: For accurate measurements of the room and flooring.
Pencil: For marking cut lines.
Utility Knife: For cutting the moisture barrier and other materials.
Circular Saw or Laminate Cutter: For cutting the laminate flooring planks.
Tapping Block: To gently tap the laminate planks together without damaging the edges.
Pull Bar: To help lock the planks together in tight spaces, such as near walls.
Hammer: For use with the tapping block and pull bar.
Safety Glasses: To protect eyes from debris.
Gloves: To protect hands from sharp edges and adhesives.
Knee Pads: To provide comfort during installation.
Level: To check the levelness of the subfloor and installed flooring.
Step-by-Step Installation Process
The following steps outline the process of installing laminate flooring in a bathroom:
1. Preparation: Remove all fixtures from the bathroom, including the toilet, vanity, and baseboards. Thoroughly clean the subfloor and repair any imperfections. Ensure the subfloor is dry and level. If necessary, apply a leveling compound.
2. Install Moisture Barrier: Unroll the moisture barrier and cover the entire subfloor. Overlap the seams by at least 6 inches and tape them securely with moisture-resistant tape. Extend the moisture barrier a few inches up the walls. Trim the excess moisture barrier after the laminate flooring is installed.
3. Install Underlayment: If using a separate underlayment, roll it out over the moisture barrier. Butt the edges of the underlayment together and tape them securely with underlayment tape. Some underlayments come with an adhesive strip for easy installation. Cut the underlayment to fit around pipes and other obstacles.
4. Plan the Layout: Before installing the first row of planks, carefully plan the layout to minimize waste and ensure a balanced appearance. Avoid installing narrow strips of laminate along the walls, as this can look aesthetically displeasing. Consider starting with a full plank or cutting a plank in half to achieve a more balanced layout. Determine the direction in which the planks will run. Typically, running the planks parallel to the longest wall makes the room appear larger.
5. Install the First Row: Begin installing the first row of planks along the longest straight wall. Place spacers between the planks and the wall to maintain the expansion gap. The expansion gap is typically ¼ to ⅜ inch, but consult the laminate manufacturer's specifications for the recommended gap. Ensure the first row is perfectly straight, as this will serve as a guide for the rest of the installation. Lock the planks together according to the manufacturer's instructions, typically using a tongue-and-groove system. Use a tapping block and hammer to gently tap the planks together to ensure a tight fit.
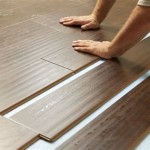
6. Continue Installing the Laminate: Continue installing the laminate flooring row by row, working your way across the room. Stagger the end joints of the planks in each row to create a more visually appealing and structurally sound floor. Use a tapping block and pull bar to ensure a tight fit in tight spaces and along walls. Cut planks to fit around pipes, door frames, and other obstacles using a circular saw or laminate cutter. Remember to leave an expansion gap around all vertical surfaces.
7. Cutting Around Obstacles: When cutting laminate around pipes, use a hole saw or jigsaw to create a hole that is slightly larger than the pipe diameter. After installing the plank, cover the gap with a pipe collar or sealant. For door frames, use a jamb saw or oscillating multi-tool to undercut the door frame, allowing the laminate to slide underneath. This creates a clean and professional finish.
8. Last Row Installation: When installing the last row of planks, you may need to rip the planks lengthwise to fit. Measure the distance between the last full row and the wall, subtracting the expansion gap. Use a circular saw or laminate cutter to cut the planks to the correct width. Use a pull bar to lock the last row of planks into place.
9. Remove Spacers: Once the laminate flooring is installed, remove the spacers from around the perimeter of the room.
10. Install Transition Strips: Install transition strips at doorways and where the laminate flooring meets other flooring types. Transition strips are typically attached with screws or adhesive. Ensure the transition strips are level with the laminate flooring and the adjacent flooring. Consider using a waterproof transition strip specifically designed for bathroom environments to provide an extra layer of protection against moisture.
11. Apply Silicone Caulk: Apply a bead of high-quality silicone caulk around the perimeter of the room, where the laminate flooring meets the walls. Also, apply caulk around pipes, the toilet flange, and any other areas where water could potentially seep under the flooring. Smooth the caulk with your finger or a caulk smoothing tool for a clean and professional finish. Choose a caulk color that complements the laminate flooring.
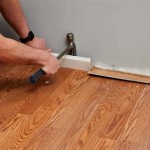
12. Reinstall Fixtures: Reinstall the toilet, vanity, and baseboards. Ensure the toilet is properly sealed to the flange to prevent leaks. Replace the baseboards with new, moisture-resistant baseboards, if necessary. Secure the fixtures to the floor according to the manufacturer's instructions.
13. Clean Up: Clean up any debris and dust from the installation. Use a damp cloth to wipe down the laminate flooring. Avoid using abrasive cleaners, as these can damage the surface of the laminate.
By following these steps carefully and using the appropriate materials, installing laminate flooring in a bathroom can be a successful DIY project, enhancing the aesthetic appeal and functionality of the space. Regular maintenance, including proper cleaning and immediate attention to any spills, will help prolong the life of the laminate flooring and maintain its appearance for years to come.

How To Install Vinyl Plank Flooring In A Bathroom Fixthisbuildthat

How To Fit Wood Flooring In Bathrooms And Beyond Blog

How To Install Waterproof Laminate Flooring Twenty Oak

How To Install Vinyl Plank Flooring In A Bathroom Fixthisbuildthat

Part 1 Diy Install A Laminate Floor In Bathroom

How To Install Vinyl Plank Flooring In A Bathroom Fixthisbuildthat

How To Install Laminate Flooring In A Bathroom The Lady

Lighting And Laminate Flooring Install In Our Bathroom Remodel

Can You Is It Ok To Put Laminate Floors In Bathrooms Ready Diy

Installing Vinyl Plank Flooring Lifeproof Waterproof Rigid Core Sustain My Craft Habit
Related Posts