How To Figure Out How Much Flooring You Need For a Room
Accurately calculating the amount of flooring required for a room is a crucial step in any flooring project. Underestimating can lead to delays, additional costs, and mismatched dye lots, while overestimating results in unnecessary expense and leftover materials. This article provides a comprehensive guide to accurately quantifying the flooring needed, minimizing waste, and ensuring a smooth installation process.
The process necessitates careful measurement, consideration of room shape, accounting for waste, and understanding the specifics of the chosen flooring material. Accuracy in each of these areas directly correlates with the overall success and cost-effectiveness of the flooring project.
Accurately Measuring the Room
The first and arguably most important step is to obtain accurate measurements of the room. This seems straightforward, but potential pitfalls exist that can significantly impact the final calculation. The most common method is to measure the length and width of the room. Use a reliable measuring tape; cloth tapes are less accurate than metal ones. Extend the tape fully and keep it taut to ensure precision. Measure from the furthest points of the room, including within door frames and under any slight recesses. It is preferable to have someone assist in holding the other end of the measuring tape, particularly for larger rooms.
For a rectangular or square room, multiply the length by the width to calculate the area. For instance, a room measuring 12 feet long and 10 feet wide has an area of 120 square feet (12 ft x 10 ft = 120 sq ft). This provides the baseline area for flooring coverage. Always round measurements up to the nearest inch to account for slight variations and imperfections in the room’s dimensions.
Irregularly shaped rooms pose a greater challenge. These may include rooms with alcoves, bay windows, or non-symmetrical walls. The best approach is to divide the room into smaller, more manageable rectangular or square sections. Measure each section individually, calculate the area of each, and then sum the areas together to obtain the total area of the room.
For example, a room might consist of a main rectangular section and a smaller alcove. Measuring and calculating the area of each independently, then adding them together, will provide a more accurate total area. Sketching the room and labeling the measurements of each section is highly recommended to avoid errors and ensure all areas are accounted for.
When dealing with circular or curved areas, the geometry becomes more complex. For complete circles, measure the diameter and calculate the radius (half the diameter). The area is then calculated using the formula πr², where π (pi) is approximately 3.14159. For partial circles or curved walls, specialized measuring tools or online calculators can be helpful. Alternatively, it may be necessary to approximate the shape with straight lines and treat it as a combination of rectangular and triangular sections.
After calculating the total square footage of the room, it's essential to verify the measurements. Remeasuring the room or specific sections helps identify any discrepancies. Even small errors can accumulate, leading to a significant difference in the total amount of flooring needed. Consider the presence of permanent fixtures within the room. While the area beneath large, immovable objects like kitchen islands typically does not require flooring, smaller fixtures like support columns will need to be accounted for in the overall layout and cutting plan.
Accounting for Waste and Cut Loss
Simply knowing the square footage of the room is not enough to determine the necessary amount of flooring. A crucial factor to consider is waste, also known as cut loss. Waste refers to the portion of flooring material that is unusable due to cuts, damage, or unusable off-cuts generated during installation. Accounting for waste is essential to avoid running short of materials and ensures a professional-looking installation.
The amount of waste varies depending on several factors: the shape of the room, the complexity of the installation pattern, and the type of flooring material. Simple rectangular or square rooms with straightforward installation patterns, such as straight lay planks or tiles, typically require less waste. However, irregularly shaped rooms or installations with diagonal patterns, intricate borders, or specific design requirements generate considerably more waste.
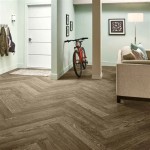
Different types of flooring material also have varying waste factors. Solid hardwood flooring, which often requires cutting and fitting around obstacles or to create specific patterns, tends to have a higher waste factor than simpler materials like sheet vinyl or carpet. Engineered wood, laminate, and certain types of tile fall somewhere in between. The complexity of the design also impacts waste. For example, a herringbone pattern will demand a greater percentage of waste than a standard parallel installation.
A generally accepted rule of thumb is to add a waste factor of 5-10% for simple installations in rectangular rooms. For more complex installations, irregularly shaped rooms, or intricate patterns, a waste factor of 15-20% or even higher may be necessary. To calculate the amount of flooring needed with waste, multiply the total square footage of the room by the waste factor (expressed as a decimal) and add that product to the original square footage. For example, if a room is 120 square feet and a 10% waste factor is applied (0.10), then the calculation is: 120 sq ft + (120 sq ft x 0.10) = 132 sq ft.
It is always prudent to err on the side of caution and overestimate the amount of flooring needed, particularly if the chosen material has a long lead time for reordering or if there are concerns about dye lot variations. Leftover flooring can be stored for future repairs or used in other small projects. Consult with a flooring professional or installer for guidance on appropriate waste factors based on the specific room, material, and installation plan.
Understanding Flooring Material Specifications and Packaging
Another important factor is understanding how the chosen flooring material is packaged and sold. Most flooring materials are sold in boxes or cartons, with each containing a specific square footage of coverage. This information is typically printed on the box or carton label. Before ordering, determine the square footage covered by each unit of flooring and use this information to calculate the number of boxes or cartons needed to cover the total area, including the waste factor.
For example, if the calculation determines that 132 square feet of flooring is required, and each box of flooring covers 20 square feet, divide the total square footage needed by the square footage per box: 132 sq ft / 20 sq ft/box = 6.6 boxes. Since flooring is typically sold in whole boxes, it will be necessary to purchase 7 boxes to ensure enough material is available.
The packaging information can also provide other important details. The dimensions of each plank or tile will influence the layout and cutting plan. Understanding these dimensions helps to visualize the finished floor and minimize waste. Material thickness is also a factor, as it influences the necessary underlayment and transition strips at doorways or where the new flooring meets existing surfaces. The manufacturer's specifications on the packaging often include recommendations for installation, adhesives, and maintenance. Adhering to these recommendations helps to ensure the longevity and performance of the new floor.
It is also crucial to consider dye lots, especially for materials like hardwood, tile, and some laminates. Dye lots refer to the variations in color that can occur between different production runs. If additional flooring needs to be purchased later, it can be difficult to match the original dye lot, resulting in noticeable color differences. Purchasing all the necessary flooring at once minimizes the risk of dye lot mismatches. Inspect all the flooring materials upon arrival to check for any damage or defects. Identifying and addressing these issues before installation saves time and prevents potential problems later. Having extra boxes on hand provides replacements for damaged material and allows for better pattern matching during installation.
Finally, always retain a copy of the flooring purchase receipt and warranty information. This documentation is essential for addressing any warranty claims or future issues with the flooring. Store leftover flooring in a dry, climate-controlled environment to preserve its condition for potential repairs or future projects.

Quantity Calculator How Much Laminate Flooring Do You Need Swiss Krono

How To Measure Your Room Guide

Measuring A Room Carpets4less Canterbury

How Much Hardwood To Order For Flooring T G

Solved How Much Flooring Do I Need To Buy Bob Vila

How To Measure Your Floor Space 4 Easy Methods

How Much Laminate Flooring Do I Need

How Much Extra Flooring Should I Buy Chestnut

How Much Flooring Do I Need Helpful Tips Hardwood Bargains Blog Www Hardwoodbargains Com Helpfultips

Here S How Much Extra Flooring To Buy