How to Install Laminate Flooring: A Comprehensive Guide
Laminate flooring has become a popular choice for homeowners seeking a durable, aesthetically pleasing, and cost-effective alternative to hardwood. It offers a realistic wood grain appearance, ease of maintenance, and resistance to scratches and stains. Successfully installing laminate flooring requires careful planning, preparation, and execution. This article provides a detailed guide to help navigate the process, ensuring a professional-looking result.
Key Point 1: Preparation is Paramount
Prior to beginning the installation, the proper preparation of the subfloor is crucial. The subfloor serves as the foundation for the laminate, and any imperfections or irregularities will telegraph through to the finished surface. This preparation includes assessing the subfloor's levelness, cleanliness, and structural integrity.
The first step is to thoroughly clean the subfloor. Remove any existing flooring, such as carpet, tile, or linoleum. Scrape away any adhesive residue, staples, or nails that may be present. A floor scraper and vacuum cleaner are essential tools for this task. Once the surface is clear of debris, inspect it for any signs of damage, such as cracks, holes, or water stains. These issues must be addressed before proceeding.
Levelness is a critical factor. Laminate flooring, particularly the click-lock type, requires a relatively flat surface to ensure proper engagement of the interlocking edges. Minor imperfections, such as slight dips or humps, can be corrected with floor leveling compound. Employ a long, straight edge or a level to identify any significant deviations. Apply the leveling compound according to the manufacturer's instructions, allowing it to fully cure before continuing.
For concrete subfloors, check for moisture levels. High moisture content can lead to warping and buckling of the laminate. A moisture meter can be used to determine the moisture level. If the reading exceeds the recommended limit, a moisture barrier should be installed. This barrier typically consists of a polyethylene film or a specialized underlayment with a built-in moisture barrier.
Ensure the subfloor is structurally sound. Loose or damaged subfloor boards must be repaired or replaced. Secure any squeaky areas by driving screws through the subfloor and into the joists below. A solid and stable subfloor is essential for a long-lasting laminate floor.
Acclimatization is another crucial aspect of preparation. Laminate flooring needs to adjust to the room's temperature and humidity levels before installation. This process, known as acclimatization, typically involves storing the boxes of laminate in the room where they will be installed for at least 48 to 72 hours. This allows the material to expand or contract, minimizing the risk of gaps forming after installation.
Gather all the necessary tools and materials. This includes the laminate flooring itself, underlayment (if required), a tapping block, a pull bar, a rubber mallet, a measuring tape, a pencil, a saw (either a circular saw, jigsaw, or laminate cutter), spacers, safety glasses, and knee pads.
Key Point 2: Installing the Underlayment and First Row
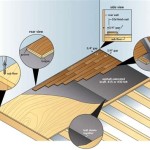
Once the subfloor is properly prepared, the next step is to install the underlayment. Underlayment provides cushioning, reduces noise transmission, and can act as a moisture barrier. Select an underlayment that is compatible with the specific type of laminate flooring being used and the existing subfloor conditions. Some laminate flooring products come with pre-attached underlayment, in which case a separate underlayment is not required.
Roll out the underlayment according to the manufacturer's instructions. Overlap the edges of the underlayment strips slightly and tape them together to prevent moisture from seeping through. Trim any excess underlayment along the perimeter of the room.
Determining the layout of the first row is essential for a successful installation. Begin by measuring the width of the room to determine if the last row of laminate will be less than half a plank wide. If it is, the first row will need to be trimmed to ensure a more aesthetically pleasing and structurally sound finish. A general rule of thumb is to avoid having any row that is less than 2 inches wide.
When trimming the first row, use a circular saw or a laminate cutter to make clean, straight cuts. Ensure the cut edge is positioned against the wall, leaving the factory edge exposed. This allows for expansion and contraction of the flooring.
Install the first row of laminate planks along the longest straight wall in the room. Use spacers to maintain a consistent expansion gap between the laminate and the wall. These spacers typically range from ¼ inch to ½ inch, depending on the manufacturer's recommendations. The expansion gap allows the flooring to expand and contract with changes in temperature and humidity, preventing buckling.
Click the planks together end-to-end, ensuring they are securely locked. Use a tapping block and a rubber mallet to gently tap the planks together, ensuring a tight and seamless fit. Avoid hammering directly on the laminate surface, as this can damage the edges.
Key Point 3: Continuing the Installation and Finishing Touches
After the first row is complete, continue installing the remaining rows of laminate flooring. Stagger the end joints of the planks to create a more visually appealing and structurally sound floor. This also minimizes waste by utilizing cut pieces from previous rows.
To cut planks to fit around obstacles, such as door frames and pipes, use a combination square and a jigsaw. Carefully measure and mark the plank, then use the jigsaw to make precise cuts. A coping saw can be used for intricate cuts or to create a curved edge.
When installing the last row of laminate, it may be necessary to use a pull bar to engage the locking mechanism along the wall. The pull bar allows you to apply leverage from above, ensuring a tight and secure fit. Remember to maintain the appropriate expansion gap along the wall.
Once all the laminate flooring is installed, remove the spacers. The final step is to install baseboards or quarter-round molding to cover the expansion gap along the walls. These moldings not only conceal the gap but also provide a finished and professional look to the floor.
Use a miter saw to cut the baseboards or quarter-round molding to the correct length and angle. Apply construction adhesive to the back of the molding and press it firmly against the wall. Secure the molding with finishing nails, driving them into the wall studs or the subfloor.
Clean the finished floor with a damp mop and a pH-neutral cleaner specifically designed for laminate flooring. Avoid using excessive water, as this can seep into the seams and damage the flooring. Regularly sweep or vacuum the floor to prevent scratches and maintain its appearance.
Doorways often require a transition strip to smoothly connect the laminate flooring to adjacent flooring materials, such as tile or carpet. These transition strips are available in various styles and materials, allowing for a seamless transition between different flooring types. Secure the transition strip with screws or adhesive, ensuring it is flush with both flooring surfaces.
Proper moisture control is essential for maintaining the longevity of laminate flooring. Avoid excessive humidity in the room and promptly clean up any spills or leaks. Consider using mats or rugs in high-traffic areas to protect the floor from scratches and wear.
By following these steps and taking the necessary precautions, installing laminate flooring can be a rewarding DIY project that significantly enhances the appearance and value of a home.

How To Install Laminate Flooring For Beginners

Common Mistakes When Laying Laminate Flooring Next Day Floors

Installing Laminate Flooring For The First Time Crafted Work

Laminate Floor Installation Tips

Laminate Floor Installation For Beginners 9 Clever Tips

How To Install A Laminate Floor

8 Essential Tools For Laminate Flooring Installations The Family Handyman

Common Mistakes When Laying Laminate Leader Floors Blog

How To Lay Laminate Flooring 13 Steps With S Wikihow

How To Install Laminate Flooring The Home Depot
Related Posts