How Do I Install Laminate Flooring Around a Toilet?
Installing laminate flooring around a toilet presents a unique challenge due to the toilet's fixed position and the tight space it occupies. However, with careful planning and execution, you can successfully integrate laminate flooring into this area, creating a seamless and visually appealing finish. This article provides a comprehensive guide to installing laminate flooring around a toilet, outlining the necessary steps and considerations to ensure a smooth and professional installation.
1. Preparation is Key
Before you begin the installation process, it's crucial to prepare the area adequately. This involves several steps that will ensure a successful outcome:
a. Remove the Toilet: The first step is to remove the toilet to gain access to the floor underneath. Begin by turning off the water supply valve, flushing the toilet to empty the tank, and then disconnecting the water supply line. Next, loosen the bolts holding the toilet to the floor, carefully lift the toilet, and place it aside in a safe location.
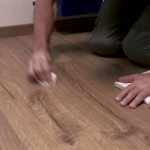
b. Clean and Level the Subfloor: Once the toilet is removed, thoroughly clean the subfloor to remove any debris, dust, or dirt. Check the subfloor for any unevenness or imperfections, as these can affect the installation of the laminate flooring. If necessary, use a leveling compound to smooth out any unevenness.
c. Measure and Plan: Accurate measurements are crucial when installing laminate flooring around a toilet. Measure the area you're planning to cover, taking into account the toilet's footprint and the required space for the floorboards. Determine the best starting point for laying the flooring, ensuring that the boards are aligned with the wall and positioned symmetrically around the toilet.
d. Install Underlayment: Underlayment provides a moisture barrier and sound insulation for the laminate flooring. Select a suitable underlayment product, such as foam or cork, and install it according to the manufacturer's instructions. Ensure that the underlayment is properly secured and overlaps at the seams.
2. Cutting and Positioning the Laminate Boards
With the subfloor prepared, it's time to install the laminate flooring boards. This process requires precision and careful cutting to achieve a seamless fit around the toilet:
a. Cut the Flooring Boards: Use a miter saw to cut the laminate flooring boards to the required length and width, taking into account the toilet's footprint and the floor's dimensions. Ensure that the cuts are precise and clean to avoid gaps or unevenness.
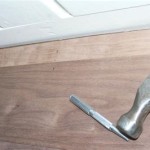
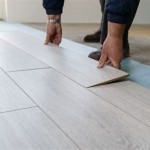
b. Install the First Row: Begin by installing the first row of laminate flooring boards along the wall, ensuring that the boards are properly aligned and locked together using the tongue-and-groove system. Use a tapping block and rubber mallet to gently tap the boards into place, making sure they are tightly secured without buckling.
c. Positioning Boards Around the Toilet: When you reach the area around the toilet, carefully measure and cut the boards to fit snugly around the base of the toilet. Make sure to leave enough space for the toilet to be reinstalled and function properly.
d. Use Trim Pieces for a Finish: If needed, use trim pieces to cover any gaps or unfinished edges around the toilet. These pieces are typically made of the same material as the laminate flooring and can be cut and installed to create a seamless and professional look.
3. Reinstall the Toilet and Final Touches
Once the laminate flooring is installed around the toilet, it's time to re-install the toilet and complete the final touches:
a. Reinstall the Toilet: Carefully lift the toilet back into place and align it with the drain hole in the floor. Ensure that the bolts are properly aligned with the holes in the toilet base and tighten them securely.
b. Reconnect Water Supply: Connect the water supply line to the toilet and test for leaks by turning on the water valve. Make sure that the toilet flushes properly and that there are no leaks in the supply line.
c. Install Transition Strips: If there are any transitions between different floor coverings, such as carpet or tile, install transition strips to create a smooth and seamless transition. These strips come in various materials and finishes to match your flooring style.
d. Clean and Seal: Once the installation is complete, thoroughly clean the laminate flooring to remove any debris or dust. Consider applying a sealant for added protection against stains and scratches, following the manufacturer's instructions.
By following these steps, you can successfully install laminate flooring around a toilet, creating a beautiful and functional space. Remember to take your time, be meticulous with your measurements and cuts, and use the appropriate tools and materials to ensure a professional and lasting outcome.

How To Install Vinyl Plank Flooring In A Bathroom Fixthisbuildthat

How To Install Vinyl Plank Flooring In A Bathroom Fixthisbuildthat

How To Easily Install Vinyl Flooring Around A Toilet

Easy Vinyl Flooring Cutting Around A Toilet

How To Install Vinyl Plank Flooring In A Bathroom Fixthisbuildthat

How To Install Laminate Around A Toilet And Other Round Shapes Installing Flooring Laying

Can You Put Laminate Floors Under Around Vanity Toilet Tub Ready To Diy

How To Cut Engineered Wood Laminate And Lvt Around Your Toilet Flooring Mountain

How To Lay Laminate Flooring Around A Toilet Builddirect

How To Install Vinyl Plank Flooring In A Bathroom Fixthisbuildthat
Related Posts