Home Decorators Collection Laminate Flooring Installation: A Comprehensive Guide
Laminate flooring offers an attractive and durable alternative to hardwood, tile, and other traditional flooring options. The Home Decorators Collection, available at many home improvement retailers, provides a range of laminate flooring styles, colors, and textures. Installing laminate flooring, while generally considered a DIY-friendly project, requires careful planning, proper preparation, and adherence to specific installation guidelines. This article offers a comprehensive guide to installing Home Decorators Collection laminate flooring, covering the essential steps, tools, and considerations for a successful installation.
Before commencing any installation project, it's crucial to thoroughly review the manufacturer's instructions included with the Home Decorators Collection laminate flooring. These instructions provide specific details regarding acclimation, subfloor preparation, expansion gaps, and other important factors that can vary slightly depending on the particular product line. Ignoring these instructions can lead to installation errors and potential warranty issues.
The success of any laminate flooring installation hinges on proper preparation. Neglecting this stage can result in an uneven floor, squeaking, or premature wear. Proper preparation includes acclimating the flooring, inspecting and preparing the subfloor, and gathering the necessary tools and materials.
Acclimation of Laminate Flooring
Acclimation is the process of allowing the laminate flooring to adjust to the temperature and humidity of the room where it will be installed. Laminate flooring, like wood, expands and contracts with changes in moisture levels. Proper acclimation minimizes the risk of buckling or gapping after installation.
The manufacturer's instructions will specify the recommended acclimation period, typically ranging from 48 to 72 hours. During this period, the unopened boxes of laminate flooring should be stored horizontally in the room where they will be installed. The room's temperature should be maintained at a consistent level, ideally between 65°F and 75°F (18°C and 24°C), and the humidity should be within the range specified by the manufacturer. Avoid stacking the boxes too high, as this can restrict airflow and hinder proper acclimation.
If the laminate flooring is being installed over a concrete subfloor, it's essential to test the concrete's moisture content. Excessive moisture can damage the laminate flooring and void the warranty. A moisture meter can be used to measure the moisture content, and if it exceeds the manufacturer's recommended level, a moisture barrier should be installed.
Subfloor Preparation
The subfloor provides the foundation for the laminate flooring. A smooth, level, and clean subfloor is essential for a successful installation. Any imperfections in the subfloor will telegraph through the laminate flooring, resulting in an uneven surface and potential damage to the flooring panels.
For wood subfloors, inspect for any loose boards, protruding nails or screws, and signs of rot or water damage. Loose boards should be secured, protruding fasteners should be driven in or removed, and damaged areas should be repaired or replaced. Use a level to identify any high or low spots. High spots can be sanded down, while low spots can be filled with a self-leveling compound. Ensure the wood subfloor is dry and free of any coatings or finishes that could interfere with the underlayment or laminate flooring.
For concrete subfloors, inspect for cracks, holes, and unevenness. Cracks and holes should be filled with a concrete patching compound, and uneven areas should be leveled with a self-leveling compound. Ensure the concrete subfloor is clean and free of any debris, paint, or coatings. Perform a moisture test as described earlier, and install a moisture barrier if necessary.
Regardless of the subfloor type, thoroughly clean the surface by sweeping, vacuuming, and, if necessary, mopping with a mild cleaning solution. Allow the subfloor to dry completely before proceeding with the installation.
Essential Tools and Materials
Having the right tools and materials on hand will streamline the installation process and ensure a professional-looking result. The following is a list of essential tools and materials for installing Home Decorators Collection laminate flooring:
- Laminate flooring panels
- Underlayment (required by most Home Decorators Collection laminate flooring products)
- Moisture barrier (if required)
- Measuring tape
- Pencil
- Utility knife
- Laminate flooring cutter or saw (circular saw or jigsaw)
- Tapping block
- Pull bar
- Hammer
- Spacers
- Safety glasses
- Dust mask
- Knee pads (optional, but recommended)
- Transition moldings (for doorways and transitions to other flooring types)
- Baseboards or quarter round (for covering the expansion gap along the walls)
A laminate flooring cutter is designed specifically for cutting laminate flooring panels cleanly and efficiently. A circular saw or jigsaw can also be used, but it's important to use a fine-tooth blade designed for cutting laminate to prevent chipping and splintering. Always wear safety glasses and a dust mask when cutting laminate flooring.
Underlayment is a thin layer of material that is installed between the subfloor and the laminate flooring. It provides cushioning, reduces noise transmission, and helps to protect the laminate flooring from moisture. Most Home Decorators Collection laminate flooring products require the use of underlayment to maintain the warranty. Choose an underlayment that is compatible with the laminate flooring and the subfloor type.
Laying Out the Flooring
Before starting the installation, it's important to plan the layout of the flooring. This will help to minimize waste and ensure a visually appealing result. Start by measuring the length and width of the room to determine the number of laminate flooring panels needed. Add an extra 5-10% to account for waste due to cuts and mistakes.
Consider the direction of the floorboards. Typically, laminate flooring is installed parallel to the longest wall of the room, as this can make the room appear larger. However, you may choose to install the flooring in a different direction based on personal preference or specific room features.
Dry-lay a few rows of laminate flooring panels to get a sense of the layout and to identify any potential issues. Check for uneven walls or doorways that may require special cuts. Adjust the layout as needed to ensure that the flooring is symmetrical and visually balanced.
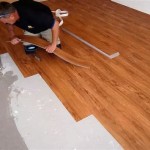
Installing the Laminate Flooring
Once the layout is finalized, begin installing the laminate flooring. Start in one corner of the room and work your way across, following the manufacturer's instructions for the specific Home Decorators Collection laminate flooring product.
Install the underlayment according to the manufacturer's instructions. Overlap the seams of the underlayment and tape them together to prevent moisture from seeping through. If a moisture barrier is required, install it beneath the underlayment.
Place the first row of laminate flooring panels along the wall, leaving an expansion gap of approximately 1/4 inch (6 mm) between the panels and the wall. Use spacers to maintain the expansion gap. The expansion gap allows the laminate flooring to expand and contract without buckling or cupping.
Most Home Decorators Collection laminate flooring products feature a click-lock system, which allows the panels to easily snap together. Angle the next panel into the previous panel and press down until it clicks into place. Use a tapping block and hammer to gently tap the panels together if necessary. Avoid hitting the panels directly with the hammer, as this can damage the locking mechanism.
When you reach the end of the row, you will likely need to cut a panel to fit. Measure the distance between the last full panel and the wall, taking into account the expansion gap. Use a laminate flooring cutter or saw to cut the panel to the correct size. Remember to wear safety glasses and a dust mask when cutting laminate flooring.
Start the next row with the leftover piece from the previous row, as long as it is at least 12 inches (30 cm) long. This will help to minimize waste and create a staggered pattern, which is visually appealing and structurally sound. Stagger the seams of the laminate flooring panels by at least 6 inches (15 cm) to prevent the formation of weak points.
Use a pull bar to tighten the seams of the panels along the walls and in tight spaces. A pull bar is a tool that allows you to pull the panels together without damaging the locking mechanism.
Continue installing the laminate flooring, row by row, until the entire room is covered. Be sure to maintain the expansion gap along all walls and around any pipes or other obstructions.
Finishing Touches
After the laminate flooring is installed, remove the spacers and install the transition moldings in doorways and transitions to other flooring types. Transition moldings help to create a seamless transition and protect the edges of the laminate flooring.
Install baseboards or quarter round to cover the expansion gap along the walls. Baseboards and quarter round add a finished look to the installation and prevent dust and debris from accumulating in the expansion gap.
Clean the laminate flooring with a damp mop and a mild cleaning solution. Avoid using excessive water, as this can damage the flooring. Follow the manufacturer's instructions for cleaning and maintaining the laminate flooring.

Installing Home Decorators Laminate Flooring

Home Decorators Collection Nobelford Oak 12 Mm T X 7 6 In W Waterproof Laminate Wood Flooring 16 Sqft Case 56807 The Depot

Home Decorators Collection Perryridge Oak 12 Mm T X 7 6 In W Waterproof Laminate Wood Flooring 16 Sqft Case 56809 The Depot

Home Decorators Collection Palenque Park 12 Mil X 7 1 In W 48 L Lock Waterproof Luxury Vinyl Plank Flooring 23 8 Sq Ft Case Vtrpalpar7x48 The Depot

Home Decorators Collection Silver Cliff Oak 12 Mm X 7 5 In 50 67 Water Resistant Laminate Wood Flooring 18 42 Sq Ft Case Hdcwr25 The Depot

Kensington Manor Dream Home Review

Home Decorators Collection Vinyl Plank Flooring Reviews 2024

Pin On Decorating

Home Decorators Collection Batiste Lane Oak 12 Mm T X 7 56 In W Waterproof Laminate Wood Flooring 15 95 Sq Ft Case 62476 The Depot

Pin On S
Related Posts