Hardwood Flooring Installation: Changing Direction for a Stunning Look
Installing hardwood flooring adds warmth, elegance, and durability to your home. However, there may come a time when you want to change the direction of the flooring for a fresh look or practical reasons. Whether you're a seasoned DIYer or a professional, understanding the essential aspects of changing the direction of hardwood flooring is crucial for a successful installation.
Planning the Layout
Before you start, carefully plan the layout of the new flooring. Determine the new direction you want the planks to run and mark it on the subfloor. Remember to consider the size and shape of the room, the location of doors and windows, and any existing architectural features.
Preparing the Subfloor
Ensure the subfloor is flat, level, and structurally sound. If necessary, level the subfloor using plywood or a self-leveling compound. Clean the subfloor thoroughly to remove any dust or debris that could interfere with the installation.
Installing the Underlayment
Install an underlayment over the prepared subfloor. Underlayment helps reduce noise, absorbs moisture, and provides a smooth surface for the hardwood flooring. Choose an underlayment recommended for the type of hardwood flooring you'll be installing.
Laying the First Row
Start by laying the first row of planks along the marked line. Ensure the planks are straight and evenly spaced. Use spacers to maintain uniform gaps between the planks. Secure the planks to the subfloor using nails or screws, depending on the flooring type.
Laying the Subsequent Rows
Continue laying the subsequent rows of planks, following the desired direction. Stagger the joints between the planks to prevent weak spots and ensure stability. Use a tapping block and hammer to gently tap the planks into place. Check the alignment and spacing regularly to ensure a clean and professional finish.
Installing Moldings and Trim
Once the flooring is laid, install baseboards, moldings, or other trim pieces to conceal the edges and transitions. Choose moldings that complement the flooring and enhance the overall aesthetic of the space.
Tips for Changing Direction
- When changing the direction of the flooring, it's best to start from the center of the room to ensure symmetry.
- Use a chalk line or laser level to mark straight lines for the new direction.
- Consider the flow of traffic and natural light in the room when determining the flooring direction.
- If you're not confident in your DIY skills, it's always advisable to hire a professional hardwood flooring installer.
Conclusion
Changing the direction of hardwood flooring can transform the look and feel of your space. By following the essential aspects outlined above, you can achieve a professional and visually appealing installation. Whether you opt for a parallel, diagonal, or herringbone pattern, changing the flooring direction can add character, depth, and interest to your home.

Hardwood Laying Direction

Floor Transition Ideas Expert Advice Craftedforlife

Determining The Direction To Lay Install Hardwood Laminate Or Luxury Vinyl Plank Flooring

Wood Direction Change In Hallway Hardwood Floors Flooring

Wall Of Shame A Funny Change Direction Wood Floor Business

Hardwood Flooring Layout Which Direction Diagonal

Angles Corners Edgework Slaughterbeck Floors Inc

Laminate Flooring Direction Cut Diy Home Improvement Forum

Hardwood Flooring Layout Which Direction Diagonal

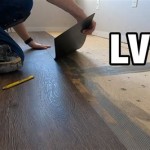
How To Change Direction Lay Hardwood Floor Tricks And Tips Mryoucandoityourself