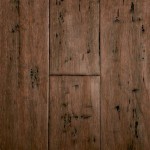
Essential Aspects of Hardwood Flooring Glue Down
Installing hardwood flooring using glue down methods can enhance the durability and aesthetics of your home. To achieve a successful installation, it's crucial to understand the essential aspects of this flooring technique. Here's a comprehensive guide to help you navigate the process and ensure optimal results:
1. Proper Preparation
Before applying glue, ensure the subfloor is clean, dry, and level. Any unevenness can compromise the adhesion of the flooring. Use a moisture meter to test the moisture content of both the subfloor and the hardwood planks. The ideal moisture content for hardwood flooring installation is between 6% and 9%. If the subfloor is excessively moist, it may require moisture mitigation measures, such as a vapor barrier or dehumidifier.
2. Choosing the Right Glue
The type of glue used for hardwood flooring glue down is crucial. Water-based glues are commonly used as they offer strong adhesion and are less likely to damage the wood. Two-component glues, consisting of a resin and a hardener, provide exceptional strength and durability. Always refer to the manufacturer's recommendations for the specific glue you choose, as they may have specific application instructions and drying times.
3. Glue Application
Apply the glue to the subfloor using a notched trowel. The size of the notches will vary depending on the type of glue and the size of the hardwood planks. Ensure even coverage without excessive glue application. The thickness of the glue layer should be consistent, as too thin or too thick layers can affect the adhesion.
4. Planking Installation
Place the first row of hardwood planks along a straight wall, ensuring they are square and aligned with the desired direction of the flooring. Apply gentle pressure to firmly seat the planks in the glue. Stagger the joints between rows to enhance the strength and stability of the flooring. Use a rubber mallet or a tapping block to gently tap the planks into place, avoiding direct hammer contact with the wood.
5. Clamping and Drying Time
Once the planks are installed, use clamps or weights to apply pressure on the floor. This helps maintain strong adhesion while the glue dries. The drying time can vary depending on the type of glue used, humidity, and temperature. Allowing ample drying time is essential to ensure a secure and lasting installation. Follow the manufacturer's instructions for the specific glue you choose.
6. Finishing Touches
After the glue has dried completely, remove the clamps or weights. Inspect the floor for any gaps or unevenness. If necessary, fill any gaps with wood filler that matches the color of the flooring. Sand the filled areas flush with the surrounding surface. Finally, apply a protective finish, such as polyurethane or oil, to protect the hardwood flooring and enhance its appearance.

Can You Glue Down Solid Wood Flooring Hardwood Guide Reallyfloors America S Est

Pros Cons Of Glue Down Flooring Installation Floorset

How To Install Prefinished Hardwood Floor Glue Down Technique Diy Mryoucandoityourself

Glue Down Vs Floating Wood Floor Installation Finfloor

Floating Floor Vs Nail Down Slaughterbeck Floors Inc

Hardwood Floor Installations

Best Adhesive For Hardwood Parquet Flooring Over Plywood Sfk

Naperville Hardwood Floor Installation Tadas Wood Flooring

Installation Methods For Wooden Floor Craftedforlife

How To Glue Down Engineered Wood Flooring Direct
Related Posts