Gluing Laminate Flooring Joints: A Comprehensive Guide
Laminate flooring, a popular and cost-effective alternative to hardwood, offers durability and aesthetic appeal for various residential and commercial spaces. While most laminate flooring installations rely on a click-lock system for secure joining, certain situations necessitate the use of glue to reinforce or stabilize the joints. This article provides a comprehensive overview of when and how to effectively glue laminate flooring joints, ensuring proper adhesion, preventing moisture damage, and prolonging the life of the flooring.
The click-lock system, prevalent in modern laminate flooring, allows for a floating installation, meaning the flooring is not directly adhered to the subfloor. Instead, the planks interlock, creating a stable surface. However, this system can be compromised by factors such as uneven subfloors, high-traffic areas, or exposure to moisture, leading to gaps, squeaks, or potential water damage. In these instances, gluing the joints becomes a viable solution.
When to Consider Gluing Laminate Flooring Joints
Gluing laminate flooring joints is not a standard procedure for all installations. The decision to glue should be carefully considered based on specific conditions and requirements. Several scenarios warrant the application of glue to enhance the flooring's performance and longevity.
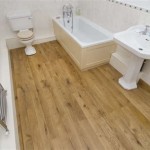
High-Moisture Environments: Areas prone to moisture, such as bathrooms, kitchens, and basements, are prime candidates for glued laminate flooring. Even water-resistant laminate can suffer damage if water seeps through the joints. Gluing creates a more impermeable barrier, minimizing the risk of water absorption and subsequent swelling, warping, or mold growth.
Uneven Subfloors: While proper subfloor preparation is crucial for any laminate installation, minor imperfections can still exist. These irregularities can put stress on the click-lock system, causing planks to separate or move. Gluing the joints provides added stability, preventing the planks from shifting and distributing weight more evenly across the surface. It is important to note that gluing is not a substitute for proper subfloor preparation. Significant unevenness requires leveling before installation.
High-Traffic Areas: In areas with heavy foot traffic, such as hallways, entryways, and commercial spaces, the constant impact can weaken the click-lock mechanism over time. Gluing the joints in these areas significantly increases the flooring's resistance to wear and tear, preventing premature separation and extending its lifespan. Consider gluing the joints of the first few rows and last few rows near entryways, as these are subjected to the most wear and tear.
Specific Manufacturer Recommendations: Some laminate flooring manufacturers may recommend or even require gluing in certain situations, such as large installations or specific room types. Always consult the manufacturer's installation instructions for specific guidelines regarding gluing.
Repairing Damaged Joints: If existing laminate flooring has developed gaps or loose joints, gluing can be used as a repair method to re-establish a secure connection between the planks. This is often more cost-effective than replacing the entire floor.
Choosing the Right Adhesive for Laminate Flooring
Selecting the appropriate adhesive is paramount for a successful gluing application. Not all glues are created equal, and using the wrong type can damage the flooring or result in a weak bond.
Water-Resistant PVA Glue: Polyvinyl Acetate (PVA) glue, specifically formulated to be water-resistant, is the most common and recommended adhesive for laminate flooring joints. This type of glue provides a flexible, yet strong bond that can withstand the expansion and contraction of the flooring due to temperature and humidity fluctuations. Ensure the PVA glue is specifically labeled as water-resistant or water-proof for best results, especially in moisture-prone areas.
Laminate Flooring Adhesive: Some manufacturers offer specialized adhesives designed specifically for their laminate flooring products. These adhesives are formulated to provide optimal adhesion and compatibility with the flooring's materials. While often more expensive, these adhesives can offer superior performance and peace of mind.
Avoid Construction Adhesives and Epoxy: Construction adhesives and epoxy are generally too rigid for laminate flooring and can damage the locking mechanism. They can also be difficult to remove if adjustments are needed during installation. These types of adhesives should be avoided.
When in doubt, consult the laminate flooring manufacturer's recommendations for specific adhesive types to ensure compatibility and warranty compliance.
The Process of Gluing Laminate Flooring Joints
Gluing laminate flooring joints requires careful preparation and precise application. Following these steps will ensure a strong, durable, and aesthetically pleasing result.
Preparation: Begin by thoroughly cleaning the subfloor to remove any dirt, debris, or existing adhesives. Ensure the subfloor is level and dry. Acclimate the laminate flooring to the room's temperature and humidity for at least 48 hours before installation. This allows the flooring to expand or contract, minimizing movement after installation.
Applying the Adhesive: Apply a thin, consistent bead of adhesive to the upper groove of each plank before connecting it to the adjoining plank. It is crucial to use the correct amount of glue – too much will create a mess and may impede the locking mechanism, while too little will result in a weak bond. Aim for a bead of glue approximately 1/8 inch in diameter.
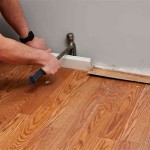
Joining the Planks: Immediately after applying the glue, carefully engage the locking mechanism of the plank and firmly press the planks together. Ensure a tight, seamless connection. Excess glue that squeezes out from the joint should be wiped away immediately with a damp cloth. Avoid using excessive water, as this can damage the laminate surface.
Weighting and Securing: After joining several rows of planks, use weights or heavy objects to hold the planks firmly together while the adhesive cures. This ensures a consistent, even bond. Place the weights evenly across the surface to prevent uneven pressure. Use painter's tape to secure the seams and prevent shifting during the curing process. This is especially important for larger installations or areas with uneven subfloors.
Curing Time: Allow the adhesive to cure completely according to the manufacturer's instructions. This typically takes 24-48 hours. Avoid walking on the flooring during the curing period to prevent disturbing the bond. Remove the weights and tape after the adhesive has fully cured.
Expansion Gaps: Even with glued joints, it is essential to maintain proper expansion gaps around the perimeter of the room. Laminate flooring expands and contracts with changes in temperature and humidity, and these gaps allow for that movement without causing buckling or damage. Refer to the manufacturer's instructions for the recommended expansion gap size.
Clean-Up: Thoroughly clean any remaining adhesive residue from the flooring surface with a damp cloth and a mild detergent. Avoid using abrasive cleaners, as these can scratch or damage the laminate finish.
Troubleshooting Common Issues
Even with careful planning and execution, some issues may arise during or after the gluing process. Understanding these issues and how to address them can ensure a successful outcome.
Excess Glue Squeeze-Out: Excessive glue squeeze-out indicates that too much adhesive was applied. Immediately wipe away the excess glue with a damp cloth before it dries. If the glue has already dried, carefully scrape it off with a plastic scraper. Avoid using metal tools, as these can scratch the laminate surface.
Gaps Between Planks: Gaps between planks after gluing can be caused by insufficient adhesive, uneven subfloors, or improper locking. If gaps appear during the curing process, add more weight to the affected area to ensure a tight connection. If the gaps persist after curing, the planks may need to be removed and reinstalled with fresh adhesive.
Squeaking Noises: Squeaking noises can indicate that the subfloor is not level or that the adhesive bond is weak. If the subfloor is uneven, it may need to be leveled before reinstalling the flooring. If the adhesive bond is weak, apply more adhesive to the affected joints and re-secure the planks.
Adhesive Failure: Adhesive failure can be caused by using the wrong type of adhesive, applying insufficient adhesive, or exposing the flooring to excessive moisture. Ensure that the correct adhesive is used and applied according to the manufacturer's instructions. In moisture-prone areas, consider using a waterproof adhesive or installing a moisture barrier beneath the flooring.
Damaged Locking Mechanism: Applying excessive force when connecting the planks can damage the locking mechanism. If the locking mechanism is damaged, the planks may not fit together properly, resulting in gaps or uneven surfaces. Damaged planks should be replaced.
Proper planning, preparation, and execution are critical for successfully gluing laminate flooring joints. When done correctly, gluing can significantly enhance the flooring's durability, stability, and resistance to moisture, ultimately extending its lifespan and improving its overall performance.

Laminate Flooring Or Glued Which Is Best

Laminate Flooring Or Glued Which Is Best

Flooring Fixing Methods Glue Down Floors Direct Wood

Floating Glue Joint Installation Instructions Simple Flooring Company

Pros Cons Of Glue Down Flooring Installation Floorset

Common Mistakes When Laying Laminate Leader Floors Blog

Can You Glue Down Floating Floors Here S What Should Know Cozy Home Hunter

Floating Floor Vs Nail Down Slaughterbeck Floors Inc

Can I Glue Glueless Laminate Flooring Ehow

Laminate Flooring Or Glued Which Is Best