Glued Vinyl Plank Flooring Installation: A Comprehensive Guide
Glued vinyl plank flooring is an increasingly popular choice for homeowners and businesses alike, offering a durable, waterproof, and stylish flooring option. While the installation process may seem daunting, it's relatively straightforward with the right preparation and attention to detail.
This comprehensive guide will walk you through the essential steps to ensure a successful glued vinyl plank flooring installation.
1. Preparation
Before you begin installing your glued vinyl plank flooring, it's crucial to prepare your subfloor thoroughly. The surface should be flat, level, clean, and dry. Any existing imperfections or debris can affect the adherence of the glue and compromise the integrity of the flooring.
If necessary, you may need to level the subfloor using self-leveling compound. Ensure the subfloor is completely cured before proceeding to the next step.
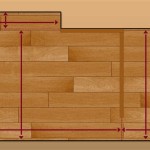
2. Determine the Layout
Once your subfloor is ready, it's time to determine the layout of your glued vinyl plank flooring. Start by measuring the area and creating a plan for how the planks will be placed. Consider the direction of the light in the room and the overall aesthetic you want to achieve.
It's advisable to snap a chalk line or use a laser level to ensure straight lines and avoid any alignment issues during installation.
3. Spread the Glue
The next step is to spread the glue onto the subfloor. Use a notched trowel to apply an even layer of glue, following the manufacturer's specifications. Ensure that the glue is spread completely and evenly, but avoid using too much as it can ooze up between the planks and create a mess.
Allow the glue to become tacky before proceeding to the next step.
4. Place the Planks
With the glue tacky, carefully place the vinyl planks into position. Start from one corner and work your way out, interlocking the planks as you go. Use a tapping block or a rubber mallet to gently secure the planks into place.
Ensure that the planks are pressed down firmly to ensure good adhesion. Check for any gaps or unevenness and adjust the planks accordingly.
5. Trim and Install Accessories
Once the glued vinyl plank flooring is installed, trim any excess around the edges using a utility knife or a jigsaw. Install any necessary moldings, baseboards, or transitions to complete the look.
Allow the glue to cure completely before moving any heavy furniture or walking on the new flooring.
By following these steps carefully, you can achieve a professional-looking glued vinyl plank flooring installation that will last for years to come.
Post Nbl Express Eco Flooring

Floating Vinyl Plank Flooring Vs Glue Down 99cent Floor

Deal Floors Step By Glue Down Vinyl Plank Installation Guide Flooring Blog Ideal In Dallas Fort Worth

Does Vinyl Flooring Need To Be Glued Down Thediyplan

A Beginner S Guide To Installing Vinyl Plank Flooring Dumpsters Com

Glue Down Vs Floating Lvp Which Is Better Whole Cabinet Supply

Diy How To Install Glue Down Vinyl Plank Flooring

How To Repair Luxury Vinyl Plank Flooring The Palette Muse

Ivc Lvt Igrip Glue Down Installation With Trowel Full

How To Install Glue Down Vinyl Plank
Related Posts