Understanding Glue Down Vinyl Flooring: A Comprehensive Guide
Glue down vinyl flooring represents a popular choice for both residential and commercial spaces due to its durability, versatility, and aesthetic appeal. Unlike floating vinyl floors, which rely on a click-lock system, glue down vinyl requires adhesive to be directly bonded to the subfloor. This installation method provides a secure and stable surface that offers numerous benefits, but also demands careful preparation and execution.
This article provides a detailed exploration of glue down vinyl flooring, encompassing its advantages, disadvantages, installation process, maintenance requirements, and various factors influencing its overall performance. Understanding these aspects will empower informed decision-making when considering this flooring option.
Advantages of Glue Down Vinyl Flooring
One of the primary advantages of glue down vinyl flooring is its enhanced stability. The direct adhesion to the subfloor ensures a more solid and less bouncy feel underfoot compared to floating floors. This solidity contributes to a higher-quality feel and a more natural resemblance to solid flooring materials like hardwood or tile.
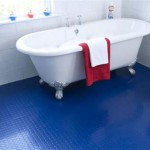
Furthermore, glue down installations often exhibit improved resistance to moisture. While all vinyl flooring offers a degree of water resistance, the tightly bonded nature of glue down systems minimizes the potential for water to seep underneath the flooring, especially in areas with high humidity or potential spills. This moisture resistance makes it a suitable choice for kitchens, bathrooms, and basements.
Another significant benefit lies in its dimensional stability. Glue down vinyl is less susceptible to expansion and contraction due to temperature fluctuations, which can be a concern with floating floors, particularly over large areas. This stability reduces the likelihood of gaps appearing between planks or tiles over time.
Due to its direct adherence to the subfloor, glue down vinyl flooring tends to be quieter underfoot than floating options. The absence of an air gap between the flooring and the subfloor minimizes the echo and sound transmission, creating a more peaceful environment. This feature is especially valuable in multi-story buildings or homes with high foot traffic.
Finally, glue down vinyl provides a wider range of design possibilities. The ability to cut and shape the material with precision allows for intricate patterns and custom designs that may be challenging to achieve with other flooring types. This versatility opens up creative opportunities to personalize the space and enhance its aesthetic appeal.
Disadvantages and Considerations
Despite its numerous advantages, glue down vinyl flooring also presents certain drawbacks that require careful consideration. The installation process is generally more labor-intensive and time-consuming compared to floating floors. It requires meticulous subfloor preparation, precise adhesive application, and careful placement of each plank or tile.
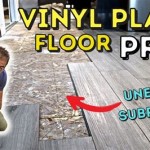
Subfloor preparation is paramount for a successful glue down installation. The subfloor must be perfectly level, clean, and free from any imperfections. Any existing cracks, bumps, or debris can telegraph through the vinyl flooring, resulting in an uneven and unattractive surface. Self-leveling compounds may be necessary to achieve a smooth and even subfloor, adding to the overall cost and time involved.
The removal process for glue down vinyl can be more difficult and time-consuming than removing floating floors. The adhesive bond makes it challenging to lift the material without damaging the subfloor. Special tools and techniques may be required to effectively remove the flooring and any residual adhesive. This can be a significant consideration for future renovations or replacements.
Another potential disadvantage is the cost associated with professional installation. While DIY installation is possible, achieving a flawless glue down installation requires expertise and experience. Hiring a professional installer can ensure proper subfloor preparation, adhesive application, and precise placement, but it will add to the overall project cost.
Furthermore, the type of adhesive used can impact the overall performance and longevity of the flooring. Selecting the appropriate adhesive for the specific type of vinyl flooring and the subfloor material is crucial. Using an incompatible adhesive can lead to adhesion failures, resulting in loose planks or tiles and premature wear.
Installation Process: A Step-by-Step Guide
The successful installation of glue down vinyl flooring relies heavily on adhering to a meticulous process. The following steps outline the key considerations and procedures involved in achieving a professional-quality installation.
1. Subfloor Preparation: This is the most critical step in the entire process. The subfloor must be thoroughly cleaned, removing any dirt, dust, debris, and existing adhesives. Any cracks or imperfections must be filled with a suitable patching compound and allowed to dry completely. Uneven surfaces should be leveled using a self-leveling compound as needed. The subfloor should be tested for moisture content to ensure it is within the manufacturer's recommended range. A moisture barrier may be necessary in areas with high humidity or potential moisture issues.
2. Acclimation: The vinyl flooring should be acclimated to the room's temperature and humidity for at least 48 to 72 hours prior to installation. This allows the material to adjust to the environment and minimize expansion or contraction after installation. Store the flooring in the room where it will be installed, laying the boxes flat and ensuring proper ventilation.
3. Layout Planning: Before applying any adhesive, plan the layout of the flooring to ensure a visually appealing and balanced appearance. Determine the starting point and direction of the planks or tiles. Consider potential pattern repeats and minimize the number of small cuts along the perimeter of the room. Dry-lay a few rows or sections to visualize the final result and make any necessary adjustments.
4. Adhesive Application: Apply the adhesive according to the manufacturer's instructions, using the recommended trowel size and spread rate. Work in small sections, typically no larger than what can be covered within the adhesive's open time. Ensure even and consistent coverage, avoiding any puddles or dry spots. Pay close attention to the edges and corners, ensuring proper adhesion in these critical areas.
5. Plank/Tile Placement: Carefully position each plank or tile onto the adhesive, ensuring proper alignment and spacing. Press firmly to ensure full contact with the adhesive. Use a roller to further press the flooring into the adhesive and remove any air pockets. Clean any excess adhesive from the surface of the flooring with a damp cloth.
6. Cutting and Fitting: Use a utility knife and a straight edge to cut the vinyl flooring to fit around pipes, corners, and other obstructions. Make precise cuts to ensure a tight and seamless fit. Consider using a template for irregular shapes or curves.
7. Rolling and Curing: After installing the flooring, use a heavy roller to thoroughly roll the entire surface. This helps to ensure proper adhesion and remove any remaining air pockets. Allow the adhesive to cure completely according to the manufacturer's instructions before allowing foot traffic on the floor. Typically, this requires at least 24 to 48 hours.
8. Finishing Touches: Install baseboards, quarter round, or other trim to conceal the edges of the flooring and provide a finished look. Clean the floor with a mild detergent and water, following the manufacturer's recommendations. Avoid using harsh chemicals or abrasive cleaners that can damage the surface of the flooring.
Maintenance and Care
Proper maintenance and care are essential for preserving the appearance and longevity of glue down vinyl flooring. Regular cleaning and preventative measures can help to protect the surface from scratches, stains, and other damage.
Regular sweeping or vacuuming is crucial for removing dirt, dust, and debris that can scratch the surface of the flooring. Use a soft-bristled broom or a vacuum cleaner with a felt brush attachment to avoid damaging the vinyl. Avoid using vacuums with beater bars, as they can scratch or dull the surface.
For deeper cleaning, use a damp mop and a mild detergent specifically designed for vinyl flooring. Avoid using harsh chemicals, abrasive cleaners, or solvents, as they can damage the finish. Ensure that the mop is wrung out thoroughly to prevent excessive moisture from seeping into the seams.
Protect the flooring from furniture scratches by using felt pads under the legs of chairs, tables, and other furniture. Avoid dragging heavy objects across the floor, as this can cause scratches and gouges. Use rugs or mats in high-traffic areas to protect the flooring from wear and tear.
Clean up spills immediately to prevent staining. Use a clean cloth or paper towel to blot the spill, working from the outside in. Avoid rubbing, as this can spread the stain. For stubborn stains, use a mild cleaning solution specifically designed for vinyl flooring.
Avoid prolonged exposure to direct sunlight, as this can cause the flooring to fade or discolor over time. Use curtains, blinds, or window film to filter the sunlight and protect the flooring.
Periodically inspect the flooring for any signs of damage, such as loose planks or tiles, scratches, or stains. Address any issues promptly to prevent them from worsening. Repair any loose planks or tiles by re-applying adhesive or replacing them as needed.
By following these maintenance and care guidelines, glue down vinyl flooring can maintain its beauty and durability for many years to come.

Glue Down Vs Floating Lvp Which Is Better Whole Cabinet Supply

Does Vinyl Flooring Need To Be Glued Down Thediyplan

Floating Vinyl Plank Flooring Vs Glue Down 99cent Floor

Deco S Colors Glue Down Floor And Wall Diy Mambo Wood Aged 6 In X 36 Multi Tonal Luxury Vinyl Plank 30 Sq Ft Case Cms2 The Home Depot

Post Nbl Express Eco Flooring

Glue Down Vs Floating Vinyl Flooring Pros And Cons

A Surfaces Woodlett Outerbanks Grey 12 Mil X 6 In W 48 L Glue Down Water Resistant Vinyl Plank Flooring 36 Sqft Case Hd Lvg2024 0034 The Home Depot

Lean About Everlife Glue Down And Plank Flooring

Glue Down Vinyl Flooring Lifestepp

Msi Timbero Aristocrat 7 In X 48 Glue Down Luxury Vinyl Plank Flooring 39 52 Sq Ft Case Com
Related Posts