Flooring Over Tile in the Kitchen: Considerations and Methods
The kitchen, a focal point of any home, often undergoes renovations to improve aesthetics and functionality. One common upgrade involves replacing or altering the existing flooring. While complete tile removal is a viable option, it can be time-consuming, labor-intensive, and potentially costly. Consequently, many homeowners explore the possibility of installing new flooring directly over existing tile. This method, while seemingly simpler, requires careful consideration and proper execution to ensure a satisfactory and long-lasting result.
Successfully installing flooring over tile hinges on several factors, including the condition of the existing tile, the type of new flooring being installed, the expected lifespan of the new flooring, and the homeowner's tolerance for a slight increase in floor height. A thorough assessment of these factors is crucial before embarking on such a project.
Assessing the Existing Tile Floor
The condition of the existing tile floor is paramount to the success of the overlayment. Any loose, cracked, or uneven tiles must be addressed before installing new flooring. Loose tiles will create voids beneath the new flooring, leading to instability and potential damage. Cracked tiles, similarly, can propagate cracks upwards through the new flooring. Uneven tiles will result in an uneven subfloor, creating an unsightly and potentially hazardous surface.
A thorough inspection of the existing tile should involve visually examining each tile for cracks, chips, or signs of damage. Tapping each tile with a rubber mallet can help identify loose tiles. A hollow sound indicates that the tile is not properly adhered to the subfloor. The entire surface should be assessed with a level or straight edge to identify any height variations or undulations. Small height variations can often be accommodated with self-leveling compounds, while larger variations may require more extensive repairs.
Addressing these issues typically involves removing and replacing loose or damaged tiles. This requires carefully chipping away the grout surrounding the affected tile, removing the tile, and cleaning the underlying subfloor. A fresh layer of thin-set mortar is then applied, and the new tile is set in place, ensuring it is level with the surrounding tiles. Once the mortar has cured, new grout is applied to fill the gaps between the tiles.
If the existing grout is cracked or damaged, it should also be repaired or replaced. Cracked grout can allow moisture to penetrate beneath the tile, potentially damaging the subfloor and leading to mold growth. Replacing grout involves removing the old grout with a grout saw or rotary tool and applying fresh grout. The new grout should be properly sealed to prevent future moisture penetration.
Selecting the Right Flooring Type
The type of new flooring being installed significantly impacts the feasibility and success of overlaying tile. Certain flooring types are more suitable for this application than others. The key considerations are the flooring's thickness, flexibility, and ability to adhere to a smooth, non-porous surface like tile.
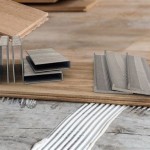
Luxury Vinyl Plank (LVP) and Luxury Vinyl Tile (LVT) are popular choices for overlaying tile. They are relatively thin, durable, and resistant to moisture. Many LVP and LVT products feature a click-lock system, which allows for installation without the need for adhesives. This "floating floor" approach can be advantageous as it allows for expansion and contraction of the flooring without putting stress on the underlying tile. However, it is essential to ensure that the existing tile floor is as level as possible, as any significant undulations will telegraph through the LVP or LVT.
Engineered Hardwood can also be installed over tile, but it requires more careful preparation. Due to its inherent rigidity, engineered hardwood is less forgiving than LVP or LVT. A perfectly level subfloor is essential. Additionally, a moisture barrier is typically required to protect the wood from moisture migrating up from the subfloor. The installation method can vary depending on the product. Some engineered hardwood floors can be floated, while others require gluing or nailing to the subfloor.
Laminate Flooring is another option, but similar to engineered hardwood, it requires a level subfloor and a moisture barrier. Laminate flooring is typically installed as a floating floor, which can make it a relatively straightforward installation process. However, laminate is susceptible to moisture damage, so it is crucial to ensure the subfloor is dry and that a proper moisture barrier is installed.
Sheet Vinyl is less commonly used for overlaying tile, but it is a viable option if properly installed. The primary challenge with sheet vinyl is achieving a smooth, seamless installation over the grout lines of the existing tile. A self-leveling compound may be necessary to fill in the grout lines and create a perfectly smooth surface. The sheet vinyl is then glued down to the leveled surface.
Tile itself can technically be installed over existing tile, but this is generally not recommended. The added weight can put undue stress on the subfloor, and the overall height of the floor will be significantly increased. The adhesion of the new tile to the existing tile can also be problematic. If installing new tile over old tile is considered, a specialized bonding agent designed for tile-over-tile applications must be used.
Preparing the Tile Surface for New Flooring
Proper preparation of the existing tile surface is critical for ensuring the long-term adhesion and performance of the new flooring. This involves cleaning, leveling, and potentially applying a bonding agent.
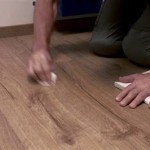
Cleaning the Tile: The existing tile floor should be thoroughly cleaned to remove any dirt, grease, or debris. A strong degreasing cleaner is recommended to remove any oil or grease residue, particularly in kitchen areas. The floor should be rinsed thoroughly with clean water and allowed to dry completely before proceeding.
Leveling the Tile: As previously mentioned, unevenness in the existing tile floor can cause problems with the new flooring. Small height variations can be addressed with a self-leveling compound. This is a pourable liquid that flows into low spots and hardens to create a smooth, level surface. The manufacturer's instructions should be carefully followed when applying self-leveling compound. Multiple coats may be required to achieve the desired levelness. Larger variations may necessitate more extensive patching or grinding of the existing tile.
Addressing Grout Lines: Grout lines can telegraph through thinner flooring materials like LVP and sheet vinyl. While self-leveling compound helps to fill the gaps, another option is to apply a thin layer of patching compound specifically designed for filling grout lines. This compound is applied with a trowel and smoothed out to create a flush surface. The patching compound should be allowed to dry completely before proceeding.
Applying a Bonding Agent: Depending on the type of new flooring being installed, a bonding agent may be necessary to improve adhesion. A bonding agent is a liquid primer that is applied to the tile surface to create a better bond between the tile and the new flooring. Consult the manufacturer's recommendations for the new flooring to determine if a bonding agent is required and which type is most suitable.
Acclimation: Many flooring materials, particularly wood and vinyl, require acclimation to the environment before installation. This involves allowing the flooring to sit in the room where it will be installed for a specified period of time (typically 48-72 hours) to allow it to adjust to the temperature and humidity levels. This helps to prevent expansion and contraction issues after installation.
In summary, installing flooring over existing tile in the kitchen can be a viable option, offering a time-saving and cost-effective alternative to complete tile removal. However, the success of this method hinges on a thorough assessment of the existing tile's condition, careful selection of the new flooring type, and meticulous preparation of the tile surface. By addressing these key considerations, homeowners can achieve a beautiful and durable new floor that enhances the look and functionality of their kitchen.

Diy Flooring How We Changed Our Kitchen In 3 Days For Less Than 400 Your Home Renewed

Flooring Install Tiles On Top Of Laminate Floor In Kitchen Home Improvement Stack Exchange

New Vinyl Plank Flooring Over Tile Table And Hearth

Can You Put Laminate Or Vinyl Plank Flooring Over Tile

Coretec Flooring The Perfect Diy Kitchen Makeover

13 Ideas For Upgrading Your Kitchen Floors Extra Space Storage

What Type Of Flooring Can You Put Over Ceramic Tile Rubi Blog Usa

Lvt Flooring Over Existing Tile The Easy Way Vinyl Floor Installation Diy

Kitchen Tile Flooring Options How To Choose The Best Floor

4 Flooring Ideas To Brighten Up Your Kitchen
Related Posts