Floating Wood Flooring Installation: A Comprehensive Guide
Floating wood flooring offers a versatile and often cost-effective alternative to traditional hardwood installation methods. Unlike solid hardwood which is typically nailed or glued down, floating floors are not directly affixed to the subfloor. Instead, the planks or tiles interlock to create a unified surface that rests on an underlayment. This method is suitable for various subfloors, including concrete, plywood, and even existing vinyl or tile, provided they are level and properly prepared. Understanding the nuances of floating wood flooring installation is crucial for achieving a professional and long-lasting result.
The term "floating" refers to the floor's independence from the subfloor. The weight of the interconnected planks or tiles, combined with the friction between the flooring and the underlayment, holds the floor in place. This installation technique offers several advantages. It can be quicker and easier than traditional methods, especially for DIY enthusiasts. Floating floors are also less susceptible to issues caused by minor subfloor imperfections and can often be installed over radiant heating systems, although specific product guidelines should always be consulted.
There are two primary types of floating wood flooring: engineered hardwood and laminate. Engineered hardwood consists of a thin layer of real hardwood veneer bonded to multiple layers of plywood or high-density fiberboard (HDF). This construction provides greater dimensional stability and resistance to moisture than solid hardwood, making it a better choice for areas with fluctuating humidity. Laminate flooring, on the other hand, is a synthetic product made from compressed fiberboard topped with a photographic applique layer that mimics the appearance of wood. Laminate is generally more affordable than engineered hardwood and is highly durable and scratch-resistant.
Key Point 1: Preparing the Subfloor
Proper subfloor preparation is paramount to the success of any floating floor installation. A level, clean, and dry subfloor ensures a stable and long-lasting floor. The subfloor should be inspected for any signs of moisture damage, rot, or mold. Any such issues must be addressed before proceeding with the installation, as they can compromise the integrity of the flooring and create health hazards.
Leveling the subfloor is perhaps the most critical step. Even minor imperfections can cause the floating floor to flex, creak, or separate at the seams. A self-leveling compound can be used to fill in low spots and smooth out the surface. For more significant unevenness, grinding or additional shimming may be required. A long straightedge and a level are essential tools for identifying and correcting these issues.
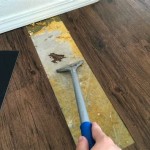
Cleaning the subfloor thoroughly is also essential. All debris, including dust, dirt, nails, staples, and old adhesive residue, must be removed. A vacuum cleaner with a brush attachment is suitable for removing loose particles, while a scraper can be used to dislodge stubborn residues. Adhering to cleanliness helps the underlayment perform effectively.
Assessing the subfloor for moisture content is vital, especially when installing over concrete. A moisture meter can be used to determine the moisture levels in the concrete. If the moisture content exceeds the manufacturer's recommended limit, a moisture barrier should be installed before the underlayment. This barrier will prevent moisture from rising through the concrete and damaging the flooring.
Before starting installation, remove any baseboards or trim around the perimeter of the room. These will be reinstalled after the flooring is complete, covering the expansion gap. Failing to remove them prior to installation will prevent the flooring from properly expanding and contracting over time.
Key Point 2: Installing the Underlayment
The underlayment serves multiple functions in a floating floor installation. It provides a cushioning layer between the flooring and the subfloor, reducing noise transmission and increasing comfort underfoot. It also helps to smooth out minor imperfections in the subfloor and acts as a moisture barrier (depending on the type of underlayment). Choosing the right underlayment is crucial for optimizing the performance and longevity of the floating floor.
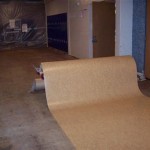
There are several types of underlayment available, each offering different properties and benefits. Foam underlayment is a common choice, offering good cushioning and sound absorption. Cork underlayment provides excellent thermal insulation and soundproofing. Rubber underlayment is highly durable and resistant to compression, making it a good choice for high-traffic areas. Some underlayments also include a built-in moisture barrier, eliminating the need for a separate moisture barrier film.
The underlayment should be rolled out and cut to fit the room, leaving a slight gap (approximately ¼ inch) around the perimeter. This gap allows for expansion and contraction of the flooring and underlayment due to temperature and humidity changes. The edges of the underlayment should be butted together tightly and taped to prevent them from shifting during installation.
When installing underlayment with a built-in moisture barrier, ensure that the seams are overlapped and taped according to the manufacturer's instructions. This creates a continuous moisture barrier that protects the flooring from moisture damage. Some underlayments require a specific overlap amount to ensure proper sealing.
It is important to choose an underlayment that is compatible with the type of floating flooring being installed. Consult the flooring manufacturer's recommendations for the appropriate underlayment thickness and material. Using the wrong underlayment can void the warranty or compromise the performance of the floor.
Key Point 3: Laying the Floating Floor Planks/Tiles
The actual installation of the floating floor planks or tiles involves interlocking them together, creating a continuous surface that rests on the underlayment. The process typically begins in one corner of the room and progresses row by row. Accurate measurements and careful alignment are essential for achieving a professional and aesthetically pleasing result.
Before starting the installation, it is important to plan the layout of the flooring. Ideally, the planks or tiles should be laid parallel to the longest wall of the room to create a more spacious appearance. Consider the placement of doorways and other architectural features to minimize the need for cutting and waste.
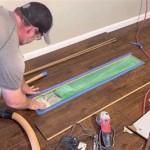
Many floating floors feature a click-lock system, where the planks or tiles simply snap together. The tongue-and-groove design allows for easy interlocking, creating a tight and secure connection. Follow the manufacturer's instructions carefully, as the specific interlocking mechanism can vary depending on the product. Some systems require tapping the planks together with a tapping block and a hammer to ensure a tight fit.
Maintain an expansion gap of approximately ¼ inch around the perimeter of the room. This gap allows the flooring to expand and contract without putting pressure on the walls. Use spacers to maintain the gap during the installation process. The expansion gap will be covered by baseboards or trim after the installation is complete.
When cutting planks or tiles to fit around obstacles or at the end of a row, use a saw designed for cutting wood or laminate flooring. A jigsaw or a circular saw with a fine-tooth blade is suitable for this purpose. Measure carefully and cut accurately to ensure a precise fit. Consider using a utility knife to score the surface before cutting, which can help to prevent chipping or splintering.
Stagger the end seams of the planks or tiles to create a more visually appealing and structurally sound floor. A random pattern is generally preferred, but ensure that the end seams of adjacent rows are not aligned. This helps to distribute the weight and stress evenly across the floor. Most Manufacturers recommend an end-seam stagger pattern of at least 6 inches.
As the installation progresses, regularly check the alignment of the planks or tiles. Use a straightedge to ensure that the rows are straight and that there are no gaps or unevenness. If any issues are detected, correct them immediately before proceeding further. The longer uncorrected issues are left, the further away they will get and be harder to fix.
After the flooring is installed, remove the spacers and install the baseboards or trim around the perimeter of the room. These will cover the expansion gap and provide a finished look. Nail or screw the baseboards or trim to the wall, not to the flooring. This allows the flooring to expand and contract freely without being restricted.
Finally, clean the floor thoroughly to remove any dust or debris. Use a damp mop or a vacuum cleaner with a soft brush attachment. Avoid using harsh chemicals or abrasive cleaners, as these can damage the surface of the flooring. Follow the manufacturer's recommendations for cleaning and maintenance to keep the floating floor looking its best for years to come.

What Is A Floating Floor Pros And Cons 50floor

What Is A Floating Floor Pros And Cons Esb Flooring

Floating Floor Vs Nail Down Slaughterbeck Floors Inc

How To Install A Floating Wood Floor

Glue Down Vs Floating Wood Floor Installation Finfloor

How To Install A Floating Floor

The Disadvantages Of Floating Floors T G Flooring

Flooring Fixing Methods Floating Floors Direct Wood Blog

What Is A Floating Floor Flooring

What Is A Floating Floor Flooring America
Related Posts