The Art of Engineered Hardwood Flooring Installation: Unlocking the Secrets
Engineered hardwood flooring has gained immense popularity in recent years, combining the natural beauty of wood with enhanced durability and stability. Installing engineered hardwood flooring requires meticulous attention to detail to ensure a flawless and long-lasting result. Here's a comprehensive guide to essential aspects of engineered hardwood flooring installation:
1. Proper Acclimation
Before installation, engineered hardwood planks must acclimate to the temperature and humidity conditions of the room where they will be installed. This process typically takes several days and involves placing the planks in the room with spacers between them to allow for air circulation. Proper acclimation minimizes the risk of planks expanding or contracting after installation, which can lead to gaps or buckling.
2. Subfloor Preparation
The subfloor serves as the foundation for your engineered hardwood flooring. It must be level, dry, and structurally sound. Any irregularities or moisture issues can compromise the stability of the flooring. Depending on the subfloor type, you may need to apply a self-leveling compound or install an underlayment to address any imperfections.
3. Moisture Barrier
A moisture barrier is essential to prevent moisture from seeping into the engineered hardwood flooring from the subfloor. This is particularly important in areas with high humidity or potential for water damage. A polyethylene vapor barrier is commonly used for this purpose, protecting the flooring from moisture vapor transmission.
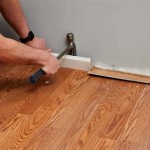
4. Installation Methods
Engineered hardwood flooring can be installed using two primary methods: nailing or floating. Nailing involves securing the planks to the subfloor using nails or screws. This method provides a secure and durable installation. Floating floors, on the other hand, are not nailed or screwed down but rather interlock together using proprietary locking systems. Floating floors are easier to install and are suitable for applications over existing flooring.
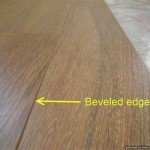
5. Expansion Gaps
Expansion gaps are necessary to accommodate the natural movement of wood due to changes in temperature and humidity. These gaps are left around the perimeter of the room, as well as around fixed objects such as walls and pillars. Expansion gaps ensure that the flooring has room to expand and contract without buckling or warping.
6. Finishing Touches
Once the flooring is installed, it must be sanded and finished to protect it from wear and tear. Sanding levels the surface and removes any imperfections. Subsequently, a finish such as polyurethane or penetrating oil is applied to enhance durability, resist moisture, and enhance the aesthetic appeal of the flooring.
Conclusion
Installing engineered hardwood flooring requires careful consideration of these essential aspects to ensure a successful and long-lasting result. By following these guidelines, you can create a beautiful and functional floor that will add value and timeless appeal to your home.

How To Install Lock Engineered Hardwood Flooring

How To Install An Engineered Hardwood Floor

Installing Engineered Hardwood On Concrete Twenty Oak

How To Install Lock Engineered Hardwood Flooring

How To Install Lock Engineered Hardwood Flooring

Engineered Timber Flooring Installation Havwoods

How Much Does It Cost To Install Engineered Hardwood Floors Floorings

Engineered Wood Floor Laying Flooring Installation Method

How To Install Engineered Hardwood Flooring Without Professionals

How To Install Engineered Hardwood Floors 4 Easy Installation Options
Related Posts