DIY Tongue and Groove Flooring Installation: A Comprehensive Guide
Installing tongue and groove flooring is a rewarding DIY project that can transform the look of your home. While it may seem daunting at first, the process is surprisingly straightforward with the right tools and preparation. Here's a comprehensive guide to help you navigate the essential aspects of tongue and groove flooring installation:
Tools and Materials:
- Tongue and groove flooring planks
- Floor underlayment
- Miter saw or circular saw
- Measuring tape
- Level
- Nail gun or hammer and nails
- Floor spacers
- Pry bar
- Safety glasses
Preparation:
Before you begin, it's crucial to prepare the subfloor. Ensure it is flat, level, and free of any debris. If necessary, install a layer of floor underlayment to provide cushioning and noise reduction.
Layout and Measurements:
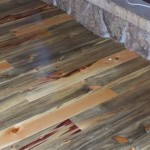
Determine the direction you want the flooring to run. Measure the length and width of the room to calculate the number of planks needed. Start laying the first row of planks along the longest wall, leaving a small gap between the planks and the wall to allow for expansion.
Cutting and Installation:
Use a miter saw or circular saw to cut the end planks to fit the length of the wall. Place floor spacers along the walls to maintain a consistent gap. Insert the tongue of one plank into the groove of the adjacent plank and tap it into place using a hammer or nail gun. Ensure the planks are level and aligned.
Second Row and Beyond:
For the second row, offset the joints from the first row. This will help distribute the weight of the flooring more evenly. Continue installing the planks row by row, alternating the tongue and groove joints for stability.
Finishing Touches:
Once the flooring is installed, remove the floor spacers and trim around the edges of the room using a baseboard or quarter round molding. This will enhance the overall appearance and conceal any gaps.
Tips for Success:
- Wear safety glasses throughout the process.
- Use a level to ensure each row is straight and flat.
- Tap the planks gently into place to avoid damaging them.
- Allow the flooring to acclimate to the room temperature for at least 24 hours before installation.
- Seal the flooring with a polyurethane or water-based finish for protection and durability.
By following these steps, you can achieve a professional-looking tongue and groove flooring installation that will add value and enhance the beauty of your home. Remember to take your time, follow the manufacturer's instructions, and don't hesitate to seek help if needed.

5 Essential Tips For Tongue And Groove Flooring District Floor Depot

How To Install Tongue And Groove Flooring Blog

Diy Installing Tongue And Groove Wood Flooring

Installing Pine Tounge And Groove Flooring

How To Install Hardwood Flooring Step By Forbes Home

Ins And Outs Of Tongue Groove Flooring

Install Tongue And Groove Wood Veneer Flooring

How To Install Tongue And Groove Flooring Blog

How To Install Hardwood Flooring The Home Depot

How To Install Oak Hardwood Floors Young House Love
Related Posts