DIY Pine Wood Plank Flooring: A Step-by-Step Guide for Beginners
Installing pine wood plank flooring is a rewarding project that can transform the look and feel of your home. Whether you're a seasoned DIYer or tackling your first flooring project, this guide will provide you with the essential steps to ensure a successful installation.
1. Planning and Preparation
Before starting, determine the square footage of the area to be covered and purchase enough planks to allow for 10-15% waste. Gather necessary tools, including a circular saw, hammer, nail gun, and measuring tape. Acclimate the planks to the room temperature for at least 24 hours before installation to prevent buckling or gaps.
2. Subfloor Preparation
A solid subfloor is crucial for a stable flooring. Ensure it is flat, level, and free from any loose boards. Install a vapor barrier to prevent moisture from seeping up into the planks. This is especially important in areas with high humidity.
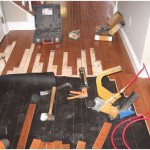
3. Laying the First Row
To ensure a straight starting point, snap a chalk line along the longest wall. Start by placing two spacers along the wall and install the first plank, aligning it with the chalk line. Secure the plank with nails or screws, countersinking them slightly below the surface.
4. Continuing the Installation
For the next row, offset the end joint by at least 6 inches from the previous row. Use a spacers along each side of the plank to maintain consistent spacing. Continue installing planks in rows, securing them securely along the sides and ends.
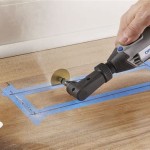
5. Fitting Around Obstacles
When encountering obstacles like door frames or pipes, measure and cut the planks accordingly. Use a jigsaw for intricate cuts. For door jambs, cut the planks slightly longer than necessary and trim the excess with a chisel or plane after installation.
6. Finishing Touches
Once the flooring is installed, nail or screw along the perimeter of the room, concealing the nails or screws with wood putty. Fill any remaining gaps between the planks with wood filler and sand or plane to create a smooth surface. Finally, apply a suitable finish, such as polyurethane or wax, to protect the floor from wear and tear.
Additional Tips:
- Use a moisture meter to check the moisture content of the subfloor and planks.
- Stagger the end joints of the planks randomly to create a natural look.
- Leave a small gap between the planks and walls to allow for expansion.
- Consider renting a flooring nailer for a faster and more secure installation.
- Follow manufacturer's instructions carefully regarding spacing, nailing patterns, and finishing products.

Diy Wide Plank Pine Floors Part 1 Installation The Roots Of Home

Diy Wide Plank Pine Floors Part 1 Installation The Roots Of Home

Diy Wide Plank Pine Floors Part 1 Installation The Roots Of Home

Diy Wide Plank Pine Floors Part 2 Finishing Rustic Wood

Diy Wide Plank Pine Floors Cut From Our Trees Face Nailed

Diy Wide Plank Pine Floors Part 2 Finishing The Roots Of Home

How To Install Beautiful Wood Floors Using Basic Unfinished Lumber The Creek Line House

Diy Wood Floors

Wide Plank Floor Diy Rough Cut To Tongue And Groove 10 Steps With S Instructables

Diy Whitewashed Wood Floors Renovation Semi Pros
Related Posts