DIY Laminate Wood Floor Installation: A Comprehensive Guide
Installing laminate flooring is a popular DIY project, offering a stylish and affordable way to upgrade your home. It's a relatively straightforward process that can be tackled by homeowners with basic DIY skills and the right tools. This article will guide you through the steps of installing laminate wood flooring, providing clear instructions and helpful tips to ensure a successful outcome.
1. Preparation is Key: Planning and Gathering Supplies
Before you start installing laminate flooring, careful planning and preparation are crucial. Begin by measuring the room accurately to calculate the total square footage of flooring needed. It's best to order 10-15% extra to account for cuts and potential waste. Next, gather the necessary tools, which may include:
- Measuring tape
- Utility knife
- Circular saw or jigsaw
- Tapping block and mallet
- Pull bar or floor scraper
- Pencil
- Level
- Underlayment
- Laminate floor clips or glue
- Spacer blocks
- Safety glasses and gloves
Once you have all the necessary supplies, carefully prepare the subfloor. Ensure it is level and free of any debris, cracks, or unevenness that could affect the installation. If needed, repair any defects or install a leveling compound to create a smooth and even surface.
2. Laying the Foundation: Installing the Underlayment
Underlayment plays a crucial role in a successful laminate floor installation. It provides insulation, sound dampening, and a moisture barrier. The type of underlayment used depends on the specific requirements of your project and the existing subfloor. Some common types include foam underlayment, felt underlayment, and cork underlayment.
Lay the underlayment in the direction of the laminate planks. Ensure that the seams overlap, and that the edges are tightly joined. Use a utility knife to cut the underlayment to fit around obstacles and trim it to the desired size. Secure the underlayment with staples, tape, or other recommended methods based on the specific product instructions.
3. Starting the Installation: Laying the First Row
Once the underlayment is installed, you can begin laying the laminate planks. Start from the most visible corner of the room. It's important to leave a gap between the wall and the first plank to allow for expansion and contraction. This gap is typically around 1/4 inch and can be created using spacers.
Align the first plank against a wall or a straight edge, ensuring it is flush with the underlayment. Use a tapping block and mallet to gently tap the plank into place. Avoid hammering directly on the plank as this can damage the surface.
4. Connecting the Planks: Click-Lock or Glue-Down Methods
Laminate flooring typically uses either a click-lock or a glue-down installation method. For click-lock systems, the planks have tongue-and-groove edges that interlock together. This method usually involves sliding the planks into place while maintaining a slight angle until they click securely.
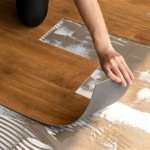
Glue-down installations, as the name suggests, involve using a special adhesive to bond the planks to the underlayment. For glue-down installations, spread a thin layer of adhesive on the underlayment before placing the planks. Ensure that the adhesive is applied evenly, and allow it to dry slightly before placing the planks.
5. Finishing Touches: Cutting and Trimming
As you move across the room, you will likely need to cut planks to fit around corners, doorways, and other obstacles. Use a circular saw or jigsaw to make precise cuts. Planks can be cut to length or width based on the specific layout and design. Always measure twice and cut once to ensure accuracy.
When cutting planks, remember to consider the direction of the grain and the position of the tongue and groove. You may also need to trim the laminate around existing fixtures, such as baseboards or door jambs. Use a utility knife to trim the edges of the laminate planks for a seamless fit.
6. Completing the Installation: Setting the Last Rows
After completing the main section of the floor, you will need to install the last few rows. This may require cutting planks to smaller sizes and using tools like a miter saw or a hand saw.
For the last row, use a tapping block and mallet to gently tap the planks into place. Make sure they are properly aligned with the previous rows and click securely into place. If there is a gap between the final plank and the wall, you can either trim the plank or use a transition molding.
7. Cleaning Up: Removing Debris and Finishing the Floor
After completing the installation, clean up any debris or excess adhesive. Sweep the floor thoroughly to remove any loose particles. If you are using a glue-down system, allow the adhesive to fully cure before applying any furniture or heavy loads on the floor.
Finally, complete the installation by attaching baseboards or quarter-round molding around the perimeter of the room. This will cover the expansion gap and provide a finished look. Ensure that the moldings are properly secured to the wall and aligned with the floor.

How To Install Laminate Flooring For Beginners

How To Install Laminate Flooring For Beginners Diy

Diy Laminate Or Vinyl Flooring A To Z

Diy How To Lay Laminate Flooring With Craig Phillips

Installing Laminate Flooring For Beginners Full Diy Guide

Diy Laminate Floor Installation Extreme How To

10 Great Tips For A Diy Laminate Flooring Installation The Happy Housie

Dangers Of Diy Floor Installation Garrison Collection

How To Install Laminate Flooring For The 1st Time Easy Tips Room Renovation

Easiest Process To Lay New Plank Flooring
Related Posts