DIY Hardwood Flooring: A Guide to Installing Your Dream Floor
Hardwood flooring is a timeless and elegant choice for any home. Its durability, beauty, and value make it a popular option for homeowners seeking to enhance their living spaces. While professional installation is always an option, many homeowners choose to tackle this project themselves to save money and gain a sense of accomplishment. DIY hardwood flooring can be a rewarding endeavor, but it requires careful planning, preparation, and execution. This guide will provide comprehensive information on the process, outlining key steps, essential tools, and important considerations.
Choosing the Right Hardwood Flooring
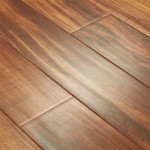
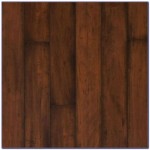
The first step in any DIY hardwood flooring project is selecting the right type of wood. Numerous species are available, each offering unique characteristics in terms of color, grain pattern, hardness, and price. Some popular options include oak, maple, cherry, walnut, and hickory. Consider the following factors when making your selection:
- Style: Hardwood flooring comes in various styles, including strip, plank, and parquet. Strip flooring features narrow boards, while plank flooring uses wider boards. Parquet flooring utilizes small pieces of wood arranged in intricate patterns.
- Color: Hardwood flooring is available in a wide spectrum of colors, from light to dark. Choose a color that complements your existing decor and personal preferences.
- Hardness: Hardwood flooring is rated on the Janka Hardness Scale, which measures the wood's resistance to dents and scratches. Higher ratings indicate greater durability.
- Finish: Hardwood flooring can be pre-finished or unfinished. Pre-finished flooring comes with a factory-applied finish, while unfinished flooring requires sanding and finishing on-site. Pre-finished flooring is generally easier to install but offers less customization options.
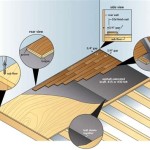
Preparing the Subfloor
A solid and level subfloor is essential for a successful hardwood flooring installation. If your existing subfloor is not in good condition, you need to repair or replace it before laying the hardwood. The following steps will guide you in preparing your subfloor:
- Inspect the Subfloor: Carefully examine the subfloor for any signs of damage, such as cracks, gaps, or unevenness. Use a level to check for any significant dips or humps.
- Repair Damaged Areas: If you find any damaged areas, repair them using plywood, shims, or wood filler. Ensure the repaired areas are smooth and flush with the surrounding subfloor.
- Level the Subfloor: If the subfloor is uneven, use self-leveling compound or shims to achieve a level surface.
- Moisture Barrier: Install a moisture barrier, such as a plastic sheet, to prevent moisture damage to the hardwood flooring.
Installing the Hardwood Flooring
Once your subfloor is properly prepared, you can begin installing the hardwood flooring. The installation process will vary depending on the type of hardwood flooring you choose and the manufacturer's instructions. However, the general steps involve the following:
- Start at the Wall: Begin installing the first row of hardwood flooring along the longest wall of the room. Leave a small gap between the wall and the flooring to allow for expansion and contraction.
- Secure the Flooring: Use nails, staples, or glue to secure the hardwood planks to the subfloor. Follow the manufacturer's guidelines for proper installation techniques.
- Lay Subsequent Rows: Continue laying rows of hardwood flooring, ensuring each plank is tightly fitted against the previous one. Use a tapping block and mallet to secure the planks properly.
- Cut Planks as Needed: Measure and cut planks to fit around obstacles, such as doorways, windows, and corners. Use a circular saw or a jigsaw to cut the planks accurately.
Essential Tools and Materials
To complete a successful DIY hardwood flooring project, you'll need a range of tools and materials. Ensure you have the following items ready before you begin:
- Circular Saw or Jigsaw
- Measuring Tape
- Hammer
- Tapping Block
- Mallet
- Level
- Safety Glasses
- Gloves
- Knee Pads
- Hardwood Flooring
- Underlayment
- Nails, Staples, or Glue
- Finishing Supplies (if using unfinished flooring)
Tips for Successful Installation
To increase your chances of a successful DIY hardwood flooring project, consider these helpful tips:
- Plan Ahead: Carefully plan the layout of the hardwood flooring and determine the quantity you need to purchase. This will ensure you have sufficient materials and prevent any delays during the installation process.
- Acclimate the Wood: Before installing the hardwood flooring, allow it to acclimate to the room's temperature and humidity for a few days. This will prevent warping or cupping after installation.
- Work in Sections: Break the installation process into smaller sections, working on a few rows at a time. This will make the project less overwhelming and allow you to maintain a consistent level of quality.
- Be Patient and Take Your Time: Hardwood flooring installation requires precision and attention to detail. Don't rush the process, as it can potentially lead to mistakes.
- Seek Professional Help When Needed: If you encounter any difficulties during the installation process, don't hesitate to seek professional help from a qualified flooring contractor. It's better to get expert assistance than to risk compromising the quality of your hardwood flooring.

Make Your Own Plank Flooring Using 1 X 12 Lumber Hallstrom Home

Diy Hardwood Floors Under 1 50 Sq Ft The Harper House

Tips For Diy Hardwood Floors Installation She Wears Many Hats

Inexpensive Wood Floor That Looks Like A Million Dollars

Make Your Own Plank Flooring Using 1 X 12 Lumber Hallstrom Home

Diy Wood Floors Flooring

Creating A Diy Pallet Wood Floor With Free 9 Steps S Instructables

How To Install Beautiful Wood Floors Using Basic Unfinished Lumber The Creek Line House

Inexpensive Wood Floor That Looks Like A Million Dollars

Tips For Diy Hardwood Floors Installation She Wears Many Hats
Related Posts