Can You Whitewash Wood Floors? A Comprehensive Guide
Whitewashing wood floors is a popular technique used to achieve a bright, airy, and rustic aesthetic. It involves applying a diluted white pigment to the wood surface, allowing the natural grain to show through while lightening the overall tone. While conceptually simple, successful whitewashing requires careful preparation, the right materials, and a strategic approach. This article will delve into the process, exploring its feasibility, necessary steps, and potential challenges.
The term "whitewashing" can encompass several different techniques, ranging from traditional lime-based washes to modern paint and stain applications. The common thread is the intention to impart a white or off-white color while preserving the character of the wood. The desired level of opacity and the specific look will influence the chosen method and materials. Before commencing any project, it is crucial to understand the nuances of whitewashing and how different techniques interact with various wood species.
The suitability of whitewashing for specific wood floors depends on several factors, including the type of wood, its existing finish, and the homeowner's aesthetic preferences. Some wood species, due to their natural color and grain patterns, may be more receptive to whitewashing than others. For instance, lighter-colored woods like maple or ash often achieve a more subtle and even whitewashed appearance compared to darker woods like walnut or cherry.
Furthermore, the existing finish on the wood floor significantly impacts the preparation process. Floors with thick, glossy polyurethane coatings will require extensive sanding to allow the whitewash to penetrate the wood. In contrast, floors with a lighter stain or a less durable finish may only require a light scuff sanding for proper adhesion.
Key Point 1: Assessing Floor Suitability and Preparation
Before beginning any whitewashing project, a thorough assessment of the existing wood floor is paramount. This involves identifying the wood species, evaluating the existing finish, and determining the overall condition of the floor. Understanding these factors will dictate the necessary preparation steps and ultimately influence the final result.
Inspect the floor for any existing damage, such as scratches, dents, or water stains. These imperfections may become more apparent after whitewashing, so addressing them beforehand is essential. Repairs such as filling cracks or sanding down uneven areas should be completed before moving on to the next phase. The extent of the repair work will depend on the condition of the floor and the desired final appearance.
The existing finish must be properly prepared to ensure the whitewash adheres correctly. In most cases, this involves sanding the floor to remove the existing finish and create a porous surface. The level of sanding required will depend on the type and thickness of the existing finish. Floors with multiple layers of polyurethane may require multiple passes with progressively finer grits of sandpaper.
For floors with a lighter or less durable finish, a light scuff sanding may be sufficient. This involves using a fine-grit sandpaper (e.g., 180-220 grit) to lightly abrade the surface and create a key for the whitewash to adhere to. After sanding, thoroughly clean the floor to remove all dust and debris. A vacuum cleaner followed by a damp cloth is usually sufficient.
It is recommended to test the whitewashing technique on a small, inconspicuous area of the floor before applying it to the entire surface. This allows you to evaluate the color and opacity of the whitewash and adjust the application technique accordingly. It also provides an opportunity to assess the wood's reaction to the chosen product and ensure the desired aesthetic effect is achieved.
Key Point 2: Choosing the Right Whitewashing Method and Materials
Several methods can be used to whitewash wood floors, each with its own advantages and disadvantages. The choice of method will depend on the desired level of opacity, the type of wood, and the homeowner's personal preferences. Common options include using diluted paint, specialized whitewash stains, and traditional lime washes.
Diluted paint is a readily available and cost-effective option for whitewashing wood floors. Latex paint is generally preferred for its ease of application and cleanup. To achieve the desired whitewashed effect, the paint is typically diluted with water in a ratio of approximately 1:1 or even more diluted depending on the desired transparency. Applying multiple thin coats is preferable to applying a single thick coat, as this allows for better control over the final color and prevents the paint from obscuring the wood grain.
Specialized whitewash stains are specifically formulated for whitewashing wood. These stains typically contain a blend of pigments and binders that create a translucent, chalky finish. They are often easier to apply and control than diluted paint, and they may provide better adhesion and durability. Whitewash stains are available in a variety of shades, ranging from bright white to off-white and even tinted options.
Traditional lime washes are a more historical and natural option for whitewashing wood. Lime wash is made from slaked lime and water, and it creates a breathable, matte finish. Lime wash is particularly well-suited for use on porous surfaces, such as unsealed wood. However, it can be more challenging to apply than paint or stain, and it requires specific safety precautions due to its alkalinity.
In addition to the whitewashing product itself, other essential materials include paintbrushes, rollers, rags, sanding equipment, and protective gear. High-quality brushes and rollers will ensure a smooth and even application. Rags are used to wipe away excess whitewash and to create a distressed or textured look. Safety glasses, gloves, and a dust mask are essential for protecting yourself from dust and fumes.
Key Point 3: Application Techniques and Finishing Touches
Proper application techniques are crucial for achieving a professional-looking whitewashed finish. The goal is to apply the whitewash evenly and thinly, allowing the natural wood grain to show through. The specific application technique will vary depending on the chosen method and the desired aesthetic effect.
When using diluted paint or whitewash stain, apply a thin coat to the floor using a brush or roller. Work in small sections, overlapping each stroke to prevent streaks or blotches. After applying the whitewash, immediately wipe away the excess with a clean rag. This will help to reveal the wood grain and create a more subtle, translucent effect. The pressure and direction of the wiping motion can be adjusted to create different textures and patterns.
For a more distressed or rustic look, consider using a dry brush technique. This involves dipping a brush lightly into the whitewash and then wiping off most of the paint onto a clean cloth. The remaining paint is then applied to the floor in light, uneven strokes. This technique creates a subtle, textured effect that highlights the natural imperfections of the wood.
Once the whitewash has dried completely, it is essential to protect the finish with a clear topcoat. A water-based polyurethane is a popular choice for its durability, ease of application, and low odor. Apply two or three coats of polyurethane, allowing each coat to dry completely before applying the next. Lightly sand between coats with fine-grit sandpaper to ensure a smooth and even finish.
The final sheen of the polyurethane can be chosen to suit the homeowner's preferences. Matte or satin finishes are often preferred for whitewashed floors, as they create a more natural and understated look. Glossy finishes can also be used, but they may accentuate imperfections in the wood and create a more formal appearance.
Maintaining whitewashed wood floors requires regular cleaning and maintenance. Sweep or vacuum the floor regularly to remove dirt and debris. Clean spills immediately with a damp cloth. Avoid using harsh chemicals or abrasive cleaners, as these can damage the finish. Periodically reapply a coat of polyurethane to protect the finish and maintain the appearance of the floor.
Whitewashing can also be incorporated with other decorative techniques. For example, staining the floor a light gray or beige before whitewashing can add depth and dimension to the finish. Conversely, after whitewashing, certain areas can be sanded back to reveal the original wood, creating a reclaimed or time-worn look. Experimentation and artistic expression are encouraged, allowing homeowners to personalize their floors to reflect their unique style and preferences.

Wood Floor Refinishing And Whitewashing The Honeycomb Home

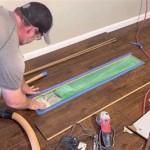
Sanding And Whitewashing Wood Floors

Diy Whitewashed Wood Floors Renovation Semi Pros

Nostalgiecat How To Whitewash Wooden Flooring

Diy Whitewashed Wood Floors Renovation Semi Pros

How To Whitewash Wood In 3 Simple Ways A Piece Of Rainbow

Whitewash Hardwood Floors Wood Flooring La

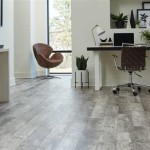
Trendy Whitewashed Hardwood Floors
:strip_icc()/10194750920whitewash20floors20step202-99eae86a2dd746d9b89b35a639a0973a.jpg?strip=all "How To Whitewash Hardwood Flooring For A Fresher Aesthetic")
How To Whitewash Hardwood Flooring For A Fresher Aesthetic

Studio Hardwood Flooring Stained Or Whitewashed Addicted 2 Decorating