Can You Whitewash Hardwood Floors With Stain?
Whitewashing hardwood floors is a popular technique used to achieve a light, airy, and often rustic aesthetic. It involves applying a diluted white or light-colored finish that allows the natural wood grain to remain visible. While paint is a common material used for whitewashing, the question arises: can stain be used to achieve a similar effect on hardwood floors? The answer is yes, but there are several crucial considerations to ensure a successful outcome. This article will delve into the process of whitewashing hardwood floors with stain, exploring the advantages, techniques, and potential challenges involved.
The primary goal of whitewashing is to lighten the wood without completely obscuring its natural beauty. The process essentially involves applying a translucent or semi-translucent layer of white or a light color that allows the wood grain and texture to show through. This creates a subtle, aged, or beachy look that appeals to many homeowners. Choosing between paint and stain depends on the desired level of transparency, durability, and the type of wood being treated.
Using stain for whitewashing offers some distinct advantages. Stains, particularly oil-based or water-based varieties, penetrate the wood fibers, enhancing the grain and providing a more durable finish compared to paint, which primarily sits on the surface. This penetration helps to prevent chipping and peeling, making stain a suitable option for high-traffic areas like flooring. Furthermore, stain typically offers a more natural and less artificial appearance than paint, which can sometimes look flat and opaque.
However, it's important to note that not all stains are created equal. For whitewashing, a stain with a less intense pigment is preferable. Highly pigmented stains will likely obscure the wood grain too much, defeating the purpose of achieving a whitewashed effect. Additionally, the type of wood being stained plays a crucial role in the final result. Different wood species absorb stain differently, which can affect the intensity and uniformity of the whitewash.
Surface Preparation is Key
Success in whitewashing hardwood floors with stain hinges heavily on meticulous surface preparation. The initial step involves thoroughly cleaning the floors to remove any dirt, dust, grease, or existing coatings. Sweep or vacuum the area to remove loose debris. Then, use a wood cleaner specifically designed for hardwood floors to eliminate any stubborn residue. Allow the floors to dry completely before proceeding to the next step.
Sanding is an essential part of the preparation process. The purpose of sanding is to create a smooth, even surface that will readily accept the stain. Start with a coarser grit sandpaper (e.g., 60-80 grit) to remove old finishes and imperfections. Then, gradually move to finer grits (e.g., 100-120 grit) to refine the surface. Ensure that all sanding marks are removed before applying the stain. Use a floor sander for large areas and an orbital sander for edges and corners. Proper sanding is crucial to achieving a uniform and professional-looking whitewash.
After sanding, vacuum the floors thoroughly to remove all sanding dust. Then, use a tack cloth to wipe down the surface, ensuring that no dust particles remain. Dust particles can interfere with the stain's adhesion and create an uneven finish. The cleanliness of the surface will significantly affect the overall appearance of the whitewashed floors.
Consider applying a wood conditioner before staining, especially if you are working with a wood species that is prone to blotching. Wood conditioner helps to even out the wood's porosity, allowing the stain to penetrate more uniformly. Apply the wood conditioner according to the manufacturer's instructions and allow it to dry completely before proceeding with the staining process.
Selecting the Right Stain and Application Technique
Choosing the right stain is paramount to achieving the desired whitewashed effect. Opt for a stain specifically formulated for interior wood surfaces. Water-based stains tend to be less toxic and easier to clean up, while oil-based stains offer greater durability and penetration. Consider using a white or very light gray stain for a classic whitewashed look.
Diluting the stain is crucial for achieving a translucent or semi-translucent effect. Start by diluting the stain with a compatible thinner, such as water for water-based stains or mineral spirits for oil-based stains. A common ratio is 1 part stain to 1 part thinner, but you can adjust the ratio depending on the desired intensity of the whitewash. Test the diluted stain on an inconspicuous area of the floor to ensure it achieves the desired look before applying it to the entire surface.
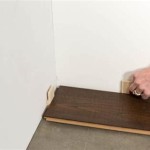
Apply the stain using a brush, a stain applicator pad, or a rag. Work in small sections, following the grain of the wood. Apply the stain evenly, avoiding excessive buildup. Immediately after applying the stain, use a clean rag to wipe off the excess. This is a critical step in achieving a whitewashed effect, as it removes the majority of the stain and allows the wood grain to remain visible. The pressure and direction of wiping can influence the final appearance, so experiment on a test area to find the technique that works best.
Allow the stain to dry completely according to the manufacturer's instructions. The drying time will vary depending on the type of stain and the environmental conditions. Avoid walking on the floors during the drying period. After the stain is dry, you may choose to apply a second coat for a more pronounced effect. If applying a second coat, repeat the dilution and application process, ensuring to wipe off the excess stain after each coat.
For a more rustic or distressed look, consider using a dry brush technique. With this method, you dip the tips of a dry brush into the stain and then lightly drag the brush across the wood surface. This creates a textured effect that highlights the wood grain and adds character to the floors.
Protecting the Whitewashed Floors
After the stain has dried completely, it is essential to apply a protective topcoat to seal the surface and protect it from wear and tear. Polyurethane is a popular choice for hardwood floors due to its durability and resistance to scratches, scuffs, and water damage. Water-based polyurethanes are less likely to yellow over time compared to oil-based polyurethanes, which can be a consideration when preserving the brightness of the whitewashed finish.
Before applying the topcoat, lightly sand the stained surface with a fine-grit sandpaper (e.g., 220 grit) to create a smooth, even surface for the topcoat to adhere to. Remove all sanding dust with a vacuum and a tack cloth before proceeding. Apply the polyurethane according to the manufacturer's instructions, using a brush, roller, or applicator pad. Apply thin, even coats, avoiding drips and runs.
Allow each coat of polyurethane to dry completely before applying the next. Multiple coats are typically recommended for optimal protection. Lightly sand between coats with fine-grit sandpaper to ensure a smooth finish. Remove all sanding dust before applying the subsequent coat. The number of coats will depend on the desired level of durability and the amount of foot traffic the floors will experience.
Once the final coat of polyurethane has dried, allow the floors to cure for several days before moving furniture back into the room. This allows the finish to fully harden and become more resistant to scratches and scuffs. Use felt pads under furniture legs to further protect the floors from damage. Regular cleaning with a pH-neutral wood floor cleaner will help to maintain the beauty of the whitewashed floors for years to come.
Maintaining whitewashed hardwood floors requires a consistent cleaning routine to prevent dirt and grime from accumulating. Avoid using harsh chemicals or abrasive cleaners, as they can damage the stain and topcoat. Sweep or vacuum regularly to remove loose debris. Use a damp mop with a pH-neutral wood floor cleaner to clean the floors as needed.
In conclusion, whitewashing hardwood floors with stain is a feasible and effective method for achieving a light, airy, and durable finish. By carefully preparing the surface, selecting the right stain, applying it properly, and protecting it with a high-quality topcoat, homeowners can transform their floors into a beautiful and inviting space.

Sanding And Whitewashing Wood Floors

Studio Hardwood Flooring Stained Or Whitewashed Addicted 2 Decorating

White Washing And Staining Unveiling The Subtle Charms Of Colour Change In Wood Sanding Floors

How To Whitewash Hardwood Floors The Right Way Flooring Girl

Wood Floor Refinishing And Whitewashing The Honeycomb Home

Wood Floor Refinishing And Whitewashing The Honeycomb Home

Applying Stain To Pickled Wood Floor

Whitewashed Hardwood Floors Gerber Flooring

How To White Wash Lime Wood Flooring Oak Timber

Whitewash Wood Stain Olympic Com
Related Posts