Laying Laminate Flooring in a Hallway Without Wall
Laminate flooring is a popular choice for homeowners due to its durability, ease of installation, and affordability. Its versatility allows it to be used in various areas of the home, including hallways. However, when encountering a hallway without a wall on one or both sides, the installation process presents unique challenges. Properly addressing these challenges is crucial for achieving a professional-looking and structurally sound floor.
The primary concern when installing laminate flooring in a hallway without a wall is edge stability and a clean, finished appearance. Traditional laminate flooring installations rely on baseboards and wall trim to cover expansion gaps and provide a clean edge. Without these traditional boundaries, alternative methods must be employed to ensure the flooring is secure, aesthetically pleasing, and protected from damage.
This article will explore the key considerations and techniques for successfully laying laminate flooring in a hallway without a wall, focusing on providing a secure, durable, and visually appealing result.
Preparing the Subfloor and Establishing a Level Surface
Before beginning any laminate flooring installation, properly preparing the subfloor is paramount. This is especially critical in a hallway without a wall because any imperfections in the subfloor will be more readily apparent and can compromise the stability of the finished floor. The subfloor must be clean, level, and dry. Remove any existing flooring materials, debris, or adhesive residue. Use a scraper, vacuum cleaner, and appropriate cleaning solutions to achieve a clean surface.
Leveling the subfloor is arguably the most important step. Use a long level or a laser level to identify any low or high spots. Minor imperfections can be addressed with self-leveling compound. For more significant discrepancies, consider using plywood shims secured with construction adhesive and screws. Ensure that shims are properly sanded down to create a smooth transition. A perfectly level subfloor guarantees a uniform and aesthetically pleasing final product.
Moisture is a laminate floor's enemy. Test the subfloor's moisture content using a moisture meter. The readings should be within the acceptable range specified by the laminate flooring manufacturer. If the moisture levels are too high, take steps to address the source of moisture or install a moisture barrier underlayment. A proper moisture barrier will prevent moisture from seeping up from the subfloor and damaging the laminate planks.
Choosing the correct underlayment is also crucial for longevity and sound absorption. Select an underlayment that is appropriate for the type of subfloor and the specific requirements of the laminate flooring. Some underlayments offer additional benefits, such as increased sound dampening or thermal insulation. Ensure the underlayment is properly installed with taped seams to prevent moisture penetration.
Securing Edges and Managing Expansion Gaps
The absence of a wall presents a significant challenge in managing expansion gaps, which are essential for accommodating the natural expansion and contraction of laminate flooring due to changes in temperature and humidity. Typically, expansion gaps are concealed by baseboards, quarter-round molding, or other wall trim. In a hallway without a wall, alternative solutions are needed.
One approach is to use transition strips, which are designed to cover expansion gaps and provide a smooth transition between different flooring types or elevation changes. Choose a transition strip that complements the laminate flooring and is appropriate for the specific edge condition. For example, a T-molding can be used to transition between the laminate flooring and another flooring type at the edge of the hallway. A reducer strip can be used to transition between the laminate flooring and a lower floor surface.
Another option is to create a "floating edge." This involves leaving an expansion gap along the open edge and then covering it with a decorative edging that is not directly attached to the subfloor. This allows the laminate flooring to expand and contract freely without being constrained by the edging. The edging can be made from wood, metal, or plastic and can be attached to the laminate flooring using adhesive or screws. Careful consideration should be given to the design of the edging to ensure it is aesthetically pleasing and securely attached to the laminate flooring, preventing tripping hazards.
When using transition strips or floating edges, it's imperative to ensure that the expansion gap is consistent and of the correct width, as specified by the laminate flooring manufacturer. Using spacers during the installation process helps maintain consistent spacing between the laminate flooring and the edge. Remember to remove these spacers after the adhesive or other fasteners have had sufficient time to set.
Carefully consider the anticipated traffic flow and potential impact on the exposed edge. Extra reinforcement or a more robust edging material might be necessary in high-traffic areas or areas prone to accidental impacts.
Achieving a Clean and Professional Finish
Beyond structural integrity, achieving a clean and professional finish is essential for the overall appearance of the laminate flooring installation in a hallway without a wall. This requires attention to detail and careful execution of each step.
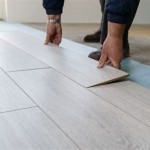
Accurate cuts are crucial, especially along the open edge. Use a sharp saw blade and a steady hand to ensure clean, precise cuts. Consider using a miter saw for angled cuts or a jigsaw for intricate shapes. Always measure twice and cut once to minimize errors and waste. Beveling the edge of the laminate planks can also create a smoother transition and a more polished look.
Concealing any visible fasteners or adhesive is also important. If using screws to secure the edging, countersink them and fill the holes with wood filler or color-matched putty. If using adhesive, ensure that any excess adhesive is wiped away immediately with a damp cloth. Regularly inspect the finished surface for any imperfections and address them promptly. Small gaps between planks can be filled with color-matched caulk or wood filler.
Consider using a trim router with a round-over bit to soften the edges of the transition strips or floating edges. This will not only improve the appearance of the installation but also reduce the risk of injury from sharp edges. A properly rounded edge provides a more comfortable and aesthetically pleasing transition.
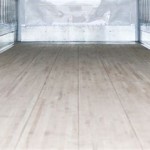
Finally, clean the finished floor thoroughly with a laminate floor cleaner. This will remove any dust, dirt, or debris and leave the floor looking its best. Regular cleaning and maintenance will help to prolong the life of the laminate flooring and keep it looking beautiful for years to come.
By carefully preparing the subfloor, properly managing expansion gaps, and paying attention to detail, a successful laminate flooring installation can be achieved even in a hallway without a wall, creating a durable, visually appealing, and functional space.

Installing Laminate Flooring In Hallways Do It Yourself

Install Vinyl Plank From A Hallway Into Room No Transition Strip

Installing Laminate Down Hallways From Another Room

One Room Challenge Week Three Installing Laminate Floor Hilltown House

Iheart Organizing Do It Yourself Floating Laminate Floor Installation

Non Slip Laminate Flooring For Hallways Halls Kronooriginal

How To Choose The Perfect Hallway Flooring Good Build Super Help Advice

Hardwood Floor Hallway Makeover

Hallways And Maple Bellawood Floors Suburban Pop

The Best Direction To Lay Your Wood Flooring Forté
Related Posts