Can You Hand Nail Hardwood Flooring To Concrete?
Hand-nailing hardwood flooring to concrete is a viable option for homeowners who want to install hardwood floors without the need for specialized equipment or advanced carpentry skills. While it may require more time and effort than other installation methods, hand-nailing offers several advantages, including cost-effectiveness and the ability to customize the spacing and pattern of the flooring.
Material Requirements
To hand-nail hardwood flooring to concrete, you will need the following materials:
- Hardwood flooring
- Concrete nails (1 1/2 inches to 2 inches long)
- Hammer or nail gun
- Nail punch
- Spacer blocks
- Chalk line
- Safety glasses
- Knee pads
Step-by-Step Instructions
1. Prepare the Concrete Surface
Ensure that the concrete surface is clean, dry, and level. Remove any debris, dust, or unevenness using a broom or vacuum cleaner. A moisture barrier can be installed between the concrete and the flooring to prevent moisture from damaging the wood.
2. Determine the Starting Point
Snap a chalk line along the longest wall to serve as a starting point for the flooring. This line will ensure that the flooring is straight and aligned.
3. Install the Spacer Blocks
Place spacer blocks along the chalk line at equal intervals (typically 12 to 16 inches apart). These spacer blocks will maintain consistent spacing between the flooring planks.
4. Lay and Nail the First Row
Place the first plank along the chalk line, ensuring that it is straight and flush against the wall. Use a hammer or nail gun to drive the nails through the plank and into the concrete. Sink the nails about 1/8 inch below the surface of the wood.
5. Continue Nailing Rows
Continue laying and nailing subsequent rows of planks, ensuring that the ends of each plank are staggered with the previous row. Use the spacer blocks to maintain consistent spacing.
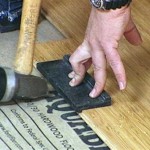
6. Sink the Nails
Once all the planks are installed, use a nail punch to sink any protruding nails below the surface of the wood. This will create a smooth and even surface.
7. Trim the Excess Flooring
If necessary, use a circular saw or jigsaw to trim any excess flooring along the edges of the room.
Advantages of Hand-Nailing Hardwood Flooring
- Cost-effective: No need for expensive equipment or tools.
- Customizable: Allows for precise spacing and pattern creation.
- Strength: Nails provide a secure and durable bond between the flooring and concrete.
- Versatile: Suitable for both residential and commercial applications.
- Do-it-yourself: Can be installed by homeowners with basic carpentry skills.
Conclusion
Hand-nailing hardwood flooring to concrete is a practical and economical option for homeowners looking to install durable and aesthetically pleasing flooring. By following the steps outlined above and adhering to proper safety precautions, you can achieve a professional-looking and long-lasting hardwood floor.

How To Install Wood Floors On Concrete Quora

How To Install Wood Floors On Concrete Quora

How To Install Engineered Wood Flooring On Concrete

Can You Glue Down Solid Wood Flooring Hardwood Guide Reallyfloors America S Est

Glue Wood Flooring To A Concrete Slab Fine Homebuilding

Installing Hardwood Floors On Concrete

Gluing Down Prefinished Solid Hardwood Floors Directly Over A Concrete

How To Install Engineered Wood Flooring On Concrete

Installing Wood Flooring Over Concrete Diy

Glue Wood Flooring To A Concrete Slab Fine Homebuilding
Related Posts