Best Vinyl Flooring For Kitchens: A Comprehensive Guide
Selecting the right flooring for a kitchen is a crucial decision, balancing aesthetics with practicality. The kitchen, a high-traffic area prone to spills and moisture, demands a durable and water-resistant surface. Vinyl flooring has emerged as a popular choice, offering a diverse range of styles, textures, and performance characteristics. Understanding the different types of vinyl flooring and their suitability for kitchen environments is essential for making an informed decision.
Vinyl flooring encompasses several distinct categories, each with specific advantages and disadvantages. These categories include sheet vinyl, vinyl tile, and luxury vinyl plank (LVP)/luxury vinyl tile (LVT). These categories vary in construction, installation methods, and overall performance. Considering factors like cost, durability, ease of maintenance, and aesthetic appeal is imperative when evaluating vinyl flooring options for the kitchen.
Understanding the Different Types of Vinyl Flooring
Vinyl flooring is not a monolithic product; it comprises various materials and construction methods that dictate its performance and suitability for different applications. The three primary types – sheet vinyl, vinyl tile, and luxury vinyl plank/tile – each offer unique attributes.
Sheet Vinyl: This option is sold in large rolls, typically 6 or 12 feet wide, minimizing seams and providing excellent water resistance. The seamless nature of sheet vinyl makes it an ideal choice for kitchens, where spills are common. Sheet vinyl traditionally consists of multiple layers: a printed layer for the design, a wear layer for protection, and a backing layer for stability. The thickness of the wear layer is a critical factor determining the durability and longevity of the flooring. Higher-quality sheet vinyl often features enhanced wear layers and cushioned backings for added comfort.
The installation of sheet vinyl requires a skilled professional to ensure a smooth, seamless surface. Incorrect installation can lead to bubbling, tearing, or water damage. While more affordable than some alternatives, the installation cost can be significant. Consider the subfloor preparation as well, as sheet vinyl requires a perfectly smooth and level surface to prevent imperfections from showing through.
Vinyl Tile: Vinyl tile comes in individual squares, typically 12x12 or 18x18 inches. This offers a modular approach to flooring, allowing for easier repairs and customization. Damaged tiles can be replaced individually, minimizing waste and reducing overall maintenance costs. Vinyl tile is generally less expensive than luxury vinyl options but also less durable. Installation is typically straightforward, involving adhesive application and proper alignment of the tiles.
However, vinyl tile's seams are a potential weakness, as water can seep through and damage the subfloor. Proper sealing of the seams during installation is critical to prevent moisture penetration. The design options for vinyl tile are diverse, ranging from classic patterns to contemporary styles, mimicking the look of stone or ceramic tile. The wear layer and backing material influence the durability and comfort of vinyl tile. Thicker wear layers offer better scratch and stain resistance.
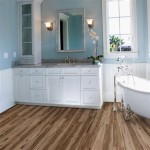
Luxury Vinyl Plank (LVP) and Luxury Vinyl Tile (LVT): These are premium vinyl flooring options designed to replicate the appearance of hardwood or stone. LVP comes in planks of varying lengths and widths, while LVT comes in square or rectangular tiles. Both offer a realistic look and feel, with embossed surfaces and detailed patterns. LVP and LVT are significantly thicker and more durable than traditional vinyl tile or sheet vinyl. They typically feature multiple layers, including a wear layer, a decorative layer, a core layer, and a backing layer. The core layer is often made from rigid materials like WPC (wood-plastic composite) or SPC (stone-plastic composite), providing enhanced stability and water resistance.
LVP and LVT are often installed using a click-lock system, making installation relatively easy, even for DIY enthusiasts. The interlocking planks or tiles create a tight seal, preventing water from penetrating the subfloor. LVP and LVT are highly resistant to scratches, stains, and dents, making them an excellent choice for high-traffic areas like kitchens. The thicker construction also provides added comfort underfoot and sound dampening. Although more expensive than sheet vinyl or vinyl tile, LVP and LVT offer superior performance and longevity, making them a worthwhile investment for a kitchen remodel.
Key Considerations for Choosing Vinyl Flooring in Kitchens
Several factors should guide the selection of vinyl flooring for a kitchen environment. These considerations encompass durability, water resistance, maintenance requirements, style preferences, and budget constraints.
Durability and Wear Layer: The wear layer is the top protective coating on vinyl flooring, determining its resistance to scratches, stains, and scuffs. In a kitchen, where spills and foot traffic are high, a thicker wear layer is essential. Wear layer thickness is measured in mils (thousandths of an inch). For residential kitchens, a wear layer of at least 12 mils is recommended, while busy households or commercial kitchens may benefit from a 20-mil or higher wear layer. Consider the type of finish applied to the wear layer as well. Some finishes offer enhanced stain resistance or scratch protection.
Water Resistance: Kitchens are prone to spills and moisture, so water resistance is a crucial attribute for any flooring material. Sheet vinyl, with its seamless construction, offers the highest level of water resistance. LVP and LVT, especially those with WPC or SPC cores, are also highly water-resistant. While vinyl tile is inherently water-resistant, the seams between tiles can be vulnerable to moisture penetration. Ensure that the seams are properly sealed during installation to prevent water damage. Look for vinyl flooring products that are labeled as waterproof, not just water-resistant, for maximum protection.
Maintenance and Cleaning: Kitchen flooring should be easy to clean and maintain. Vinyl flooring is generally low-maintenance, requiring only regular sweeping or vacuuming and occasional mopping. For spills, wipe them up immediately to prevent staining. Avoid using harsh chemicals or abrasive cleaners, as they can damage the wear layer. Use manufacturer-recommended cleaning products to maintain the appearance and longevity of the flooring. The textured surface of some LVP and LVT products can trap dirt, requiring more frequent cleaning.
Style and Aesthetics: Vinyl flooring offers a wide variety of styles and designs to complement any kitchen décor. Sheet vinyl provides a virtually limitless range of patterns and colors, while vinyl tile can mimic the look of ceramic or stone. LVP and LVT offer the most realistic wood and stone looks, with embossed textures and detailed patterns. Consider the overall style of your kitchen when choosing vinyl flooring. A modern kitchen might benefit from sleek, minimalist designs, while a traditional kitchen might suit warmer, more rustic patterns. Take samples of the flooring home to see how they look in the actual lighting and context of your kitchen.
Budget Considerations: Vinyl flooring offers a range of price points, from budget-friendly sheet vinyl to premium LVP and LVT options. Consider your budget carefully when choosing vinyl flooring. While it may be tempting to opt for the cheapest option, investing in a higher-quality product with a thicker wear layer and better water resistance can save you money in the long run by reducing the need for repairs or replacement. Factor in the cost of installation when budgeting for vinyl flooring. Professional installation can add significantly to the overall cost, especially for sheet vinyl.
Installation Methods and Considerations
Proper installation is crucial for the performance and longevity of vinyl flooring. The installation method depends on the type of vinyl flooring and the condition of the subfloor. Regardless of the type of vinyl flooring, proper subfloor preparation is essential.
Subfloor Preparation: The subfloor must be clean, level, and dry before installing any type of vinyl flooring. Remove any existing flooring, adhesives, or debris. Repair any cracks or unevenness in the subfloor. Use a self-leveling compound to create a smooth, even surface. Moisture can cause problems with vinyl flooring, so ensure that the subfloor is dry before installation. Use a moisture meter to check the moisture content of the subfloor. If the moisture level is too high, take steps to dry the subfloor before proceeding with the installation.
Sheet Vinyl Installation: Sheet vinyl requires professional installation to ensure a seamless, watertight surface. The installer will measure the room and cut the sheet vinyl to fit. The sheet vinyl is then glued to the subfloor using a special adhesive. The seams are welded together to create a watertight seal. Improper sheet vinyl installation can result in bubbling, tearing, or water damage.
Vinyl Tile Installation: Vinyl tile can be installed using either a peel-and-stick or a glue-down method. Peel-and-stick tiles are easy to install, but they may not be as durable as glue-down tiles. Glue-down tiles require the application of adhesive to the subfloor. Ensure that the tiles are properly aligned and pressed firmly into the adhesive. Use a roller to ensure that the tiles are fully adhered to the subfloor. Grout can be added between the tiles to create a more realistic look, but it will require periodic sealing to prevent stains and moisture penetration.
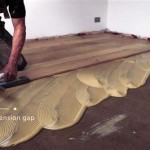
LVP and LVT Installation: LVP and LVT are typically installed using a click-lock system. The planks or tiles interlock together, creating a floating floor. The floating floor is not glued to the subfloor, allowing it to expand and contract with changes in temperature and humidity. Ensure that the subfloor is level before installing LVP or LVT. Use an underlayment to provide added comfort and sound dampening. Leave a small expansion gap around the perimeter of the room to allow for expansion and contraction. LVP and LVT can also be glued down, especially in areas with heavy foot traffic or where moisture is a concern.

Choosing Vinyl Flooring For Your Kitchen Tarkett

Which Vinyl Flooring Is Best For Kitchen

Is Vinyl Flooring The Best Choice For Kitchens

The Best Flooring For A Busy Kitchen Mega

The 8 Best Luxury Vinyl Flooring For Your Kitchen L Antic Colonial

The Best Vinyl Sheet Flooring

How To Choose Best Vinyl Flooring For Kitchen Scv Floorsmith

Best Kitchen Flooring Options 2024 Guide Forbes Home

Vinyl Flooring For Kitchen Best Options

6 Vinyl Flooring Myths Get The Facts From Our Experts Inc
Related Posts