How To Install Floating Vinyl Flooring On Concrete
Floating vinyl flooring has become increasingly popular due to its durability, ease of installation, and stylish appearance. Installing floating vinyl flooring on concrete is a relatively straightforward process that can be completed in a day or two. Here are the essential steps to guide you through the installation process.
1. Prepare the Concrete Subfloor
Before installing the flooring, it is crucial to ensure that the concrete subfloor is clean, level, and dry. Remove any existing flooring or debris from the surface. Check for any unevenness or cracks, and fill them using a self-leveling compound or patching material. Allow the subfloor to dry completely before proceeding further.
2. Install an Underlayment
An underlayment is a thin layer of material installed between the subfloor and the flooring. It provides cushioning, reduces noise, and helps level out any minor imperfections in the concrete. Roll out the underlayment over the prepared subfloor, ensuring that the seams overlap by at least 2 inches. Use tape to secure the seams and prevent them from separating.
3. Determine the Starting Point
Choose a starting point for installing the flooring. This can be a corner of the room or any other reference point. Measure and mark the starting line using a chalk line or tape measure. Ensure that the first row of planks is parallel to the starting line.
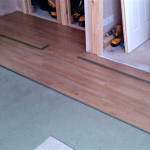
4. Install the First Row
Begin by placing the first plank along the starting line. Tap the plank into place using a rubber mallet or tapping block. Insert spacers between the wall and the plank to maintain a consistent expansion gap. Continue adding planks to the first row, ensuring that they are tightly joined together using the tongue-and-groove system.
5. Install Subsequent Rows
Once the first row is complete, continue installing subsequent rows by staggering the end joints of the planks for stability. Use the tongue-and-groove system to interlock the planks. Tap the planks into place using a tapping block or hammer. As you work your way across the room, use spacers to maintain the expansion gap around the perimeter.
6. Cut and Fit Planks Around Obstacles
When encountering obstacles such as walls, doorways, or pipes, you will need to cut and fit the planks accordingly. Use a utility knife or a flooring cutter to score and snap the planks to the desired shape. Carefully insert the cut planks around the obstacles, ensuring a snug fit.
7. Secure the Perimeter
Once all the planks have been installed, remove the spacers and install baseboards or quarter rounds around the perimeter of the room. This will secure the flooring and hide the expansion gap. Use caulk or a sealant to fill any gaps between the baseboards and the flooring.
8. Trim and Finishing Touches
After securing the perimeter, trim any excess underlayment around the edges of the flooring. Use a transition strip or molding to cover any gaps between the flooring and other types of flooring or surfaces.
Conclusion
Installing floating vinyl flooring on concrete is a DIY-friendly project that can enhance the look and feel of your home. By following these steps and taking your time, you can achieve professional-looking results. Enjoy your new, stylish, and durable vinyl flooring for years to come.

How To Install Vinyl Or Laminate Floors In A Basement Over Concrete Slab

Laminate Flooring On Concrete Basement Floors Expert Installation Guide Csg Renovation

How To Prepare A Concrete Floor For Vinyl Flooring Parrys

Easy Ways To Install Vinyl Plank Flooring On Concrete

How To Install Vinyl Or Laminate Floors In A Basement Over Concrete Slab

Tips For Installing Vinyl Plank Over Concrete Floors Lemon Thistle

Installing Laminate Flooring Over Concrete The Ultimate Guide Aa Floors

How To Install L And Stick Vinyl Plank Flooring Floor Preparation

Easy Ways To Install Vinyl Plank Flooring On Concrete

Tips For Installing Vinyl Plank Over Concrete Floors Lemon Thistle
Related Posts