Espresso Press And Go Vinyl Plank Flooring Installation
Espresso Press and Go vinyl plank flooring is a popular choice for homeowners due to its ease of installation, durability, and attractive appearance. The unique press-and-go installation method eliminates the need for glue or adhesives, making it a quick and hassle-free option, even for DIY enthusiasts. This article will provide a comprehensive guide to installing Espresso Press and Go vinyl plank flooring, outlining the necessary steps and tools, safety precautions, and essential tips for a successful installation.
Preparing the Subfloor
A solid and level subfloor is crucial for a successful vinyl plank installation. Before starting, ensure the subfloor is clean, dry, and free from any debris or imperfections. For wooden subfloors, check for squeaks and loose boards, repairing any issues with screws or adhesive. Concrete subfloors should be smooth and level, with any cracks or imperfections filled with patching compound. If necessary, use a leveling compound to achieve a smooth and even surface.
Tools and Materials for Installation
Gather the following tools and materials before beginning the installation process:
- Espresso Press and Go vinyl plank flooring
- Measuring tape
- Utility knife
- Tapping block
- Pull bar
- Safety glasses
- Knee pads
- Level
- Pencil
- Spacer blocks
- Underlayment (if required)
Step-by-Step Installation Guide
Follow these steps for a successful Espresso Press and Go vinyl plank flooring installation:
- Measure and Plan: Carefully measure the room and determine the layout of the planks. Start with the longest wall and work your way across the room, ensuring a staggered pattern for stability.
- Install Underlayment: Depending on the subfloor type and the manufacturer's recommendations, install an underlayment if needed. Underlayment provides cushioning, sound insulation, and moisture protection.
- Lay the First Row: Begin by laying the first row of planks against the wall, leaving a small expansion gap (as recommended by the manufacturer) between the planks and the wall. Use a spacer block to maintain a consistent gap.
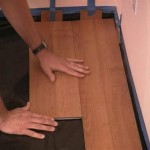
- Press and Go: Ensure the planks are properly aligned and click them together along their edges. Apply pressure to the plank ends to ensure a secure connection.
- Continue Laying Rows: Continue laying rows of planks, ensuring each row is staggered to create a brickwork pattern. Ensure the planks are flush with the previous row and press them firmly into place.
- Trim and Cut: For the last row, measure and cut planks to fit the remaining space. Use a utility knife to cut the planks accurately.
- Install Molding: After completing the installation, install baseboards or other trim around the perimeter of the room to cover the expansion gap and provide a finished look.
- Care and Maintenance: Once the installation is complete, sweep or vacuum the floor regularly. Avoid using harsh chemicals or abrasive cleaners that can damage the flooring.
Tips for Success
Here are some additional tips to ensure a successful installation:
- Acclimate the Flooring: Before installation, allow the flooring to acclimate to the room temperature for at least 48 hours.
- Work in Sections: Install the flooring in sections to minimize the risk of misalignment.
- Use a Tapping Block: Use a tapping block to gently tap the planks into place without damaging the edges.
- Check for Level: Use a level to check the planks are installed level and flat.
- Avoid Walking on the Flooring: Do not walk on the installed flooring until the adhesive (if used) has fully cured.
By carefully following these steps and tips, you can successfully install Espresso Press and Go vinyl plank flooring, enhancing the beauty and functionality of your home. Remember to consult the manufacturer's instructions for specific guidelines and recommendations for your chosen flooring type.

Expresso Press Go Luxury Vinyl Plank Flooring

Expresso Press Go Luxury Vinyl Plank Flooring

24 Sq Ft 6 X36 10mm Edelweiss Press Go Expresso Vinyl Plank Flooring Home Hardware

Press Go Expresso Vinyl Plank Flooring Home Hardware

Press Go Expresso Vinyl Plank Flooring Home Hardware

24 Sq Ft 6 X36 10mm Rhone Press Go Expresso Vinyl Plank Flooring Home Hardware

24 Sq Ft 6 X36 10mm Wheat Fields Press Go Expresso Vinyl Plank Flooring Home Hardware

24 Sq Ft 6 X36 10mm Mont Blanc Press Go Expresso Vinyl Plank Flooring Home Hardware

Versaclic London Mist Oak 18 0 Cm 7 1 In Rigid Core Vinyl Plank Box 14 12 Sq Ft Costco

Press Go Expresso Vinyl Plank Flooring Home Hardware
Related Posts