Installing Wood Laminate Flooring: A Comprehensive Guide
Transforming your home with the elegance of wood laminate flooring requires meticulous planning and careful execution. This comprehensive guide will walk you through the essential aspects of installing wood laminate flooring, ensuring a stunning and durable result.
1. Preparation: Laying the Foundation
Begin by thoroughly cleaning the subfloor to remove dirt, debris, and moisture. Ensure the surface is level and dry to prevent any future issues. If necessary, use a subfloor leveler to create a flat and even base.
2. Acclimation: Adjusting to the Environment
Laminate flooring planks need time to acclimate to the temperature and humidity of your home before installation. Unpack the planks and leave them in the room where they will be installed for at least 48 hours. This allows the planks to expand and contract naturally, reducing the risk of warping or buckling later on.
3. Underlayment: Providing Stability and Comfort
Underlayment is a crucial layer placed between the subfloor and laminate flooring. It provides cushioning, reducing noise and improving the overall comfort underfoot. Choose a high-quality underlayment that is appropriate for your specific application.
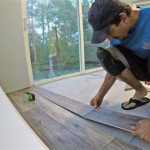
4. Starting the Installation: Establishing the First Row
Place spacers around the perimeter of the room to create an even gap between the walls and flooring. Begin installing the first row by snapping the planks together. Use a tapping block and a hammer to ensure a secure fit. Keep the planks parallel to the longest wall.
5. Continuing the Installation: Connecting the Rows
Continue installing subsequent rows by staggering the joints. Insert the end of a new plank into the groove of the previous plank at an angle, then lower it into place. Use a tapping block to firmly connect the rows.
6. Cutting Planks and Handling Irregularities
Use a power saw or miter saw to cut planks to fit around obstacles or irregular wall shapes. Measure carefully and make clean, precise cuts. For larger gaps, use transition strips or moldings to cover the seam.
7. Installing Trim: Finishing Touches
Once the flooring is installed, add baseboards, moldings, and transition strips to enhance the aesthetics and durability of the installation. Secure these elements with nails or adhesive.
8. Maintenance: Preserving the Beauty
Regular maintenance is crucial to keep your wood laminate flooring looking its best. Sweep or vacuum frequently to remove dust and debris. Use a damp mop with a mild cleaning solution for occasional cleaning. Avoid using abrasive cleaners or excessive moisture.

How To Install Laminate Flooring Forbes Home

Laminate Flooring Installation A Step By Guide

How To Lay Laminate Flooring Cost In Fantastic Handyman

How To Install A Laminate Floor Lv Hardwood Flooring Toronto

How To Install Laminate Flooring Guide 2024

8 Essential Tools For Laminate Flooring Installations The Family Handyman

6 Steps For Installing Laminate Flooring The Home Depot

Installing Laminate Flooring For The First Time Crafted Work

11 Common Mistakes When Installing Laminate Floors Flooring Diy

How To Install Lock Engineered Hardwood Flooring
Related Posts