Installing Floating Vinyl Plank Flooring On Concrete: A Comprehensive Guide
Floating vinyl plank flooring has emerged as a popular choice for concrete subfloors due to its durability, water resistance, ease of installation, and aesthetic versatility. Unlike traditional flooring options that require adhesives or fasteners to directly attach to the subfloor, floating vinyl plank flooring relies on an interlocking system and "floats" above the concrete. This article provides a detailed guide to properly installing floating vinyl plank flooring over concrete, outlining essential preparation steps, installation techniques, and troubleshooting tips.
Key Point 1: Preparing the Concrete Subfloor
Proper preparation of the concrete subfloor is paramount for a successful floating vinyl plank installation. A flawed foundation can lead to unevenness, instability, and ultimately, premature wear and tear of the flooring. The following steps are crucial for preparing the concrete surface:
1. Inspection and Testing for Moisture: Concrete is porous and can absorb moisture from the ground or surrounding environment. Excessive moisture can compromise the adhesive (if any underlayment with adhesive is used) or cause mold and mildew growth beneath the flooring. Before commencing any installation, a moisture test is essential. Several methods can be employed:
Calcium Chloride Test (ASTM F1869-16): This test involves placing a measured amount of calcium chloride on the concrete surface, sealing it with a vapor-impermeable cover, and weighing it after a specified period. The weight gain indicates the moisture emission rate in pounds per 1000 square feet per 24 hours. Flooring manufacturers typically specify a maximum moisture emission rate that the concrete must meet for warranty compliance. This test is generally considered the most accurate but requires professional expertise and specialized equipment.
Relative Humidity (RH) Test (ASTM F2170-11): This test involves drilling small holes into the concrete and inserting RH probes that measure the humidity level within the slab. The RH value provides an indication of the moisture content of the concrete. Flooring manufacturers typically specify a maximum RH value for installation. This method is non-destructive and provides a more comprehensive assessment of moisture throughout the slab. This test also requires specialized equipment.
Polyethylene Film Test: A less precise but simpler method involves taping a square of clear polyethylene film to the concrete surface and sealing the edges with tape. After 24-72 hours, inspect the film for condensation. If condensation is present, it indicates a high moisture level. While this test is not quantitative, it can serve as an initial screening tool. It is highly recommended that quantifiable test are conducted.
If moisture levels exceed the flooring manufacturer's specifications, mitigation measures are necessary. These may include applying a moisture barrier coating to the concrete surface to prevent moisture from migrating upwards.
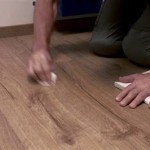
2. Cleaning and Leveling the Subfloor: The concrete surface must be clean, dry, and free of debris, dust, grease, oil, paint, and other contaminants. A thorough cleaning can be achieved by sweeping, vacuuming, and scrubbing the surface with a neutral pH cleaner. For stubborn stains or residues, a concrete degreaser or etcher may be necessary.
Leveling the subfloor is equally important. Unevenness can cause the vinyl planks to flex, crack, or separate at the seams. Identify any high or low spots using a long, straight edge or a level. High spots can be ground down using a concrete grinder or diamond grinding pads. Low spots can be filled with a self-leveling underlayment specifically designed for concrete. Follow the manufacturer's instructions for mixing and applying the self-leveling compound, ensuring that it is properly cured before proceeding with the flooring installation.
3. Concrete Repair: Any cracks, holes, or other damage to the concrete surface must be repaired before installing the flooring. Small cracks can be filled with a concrete crack filler. Larger cracks or spalled areas may require patching with a concrete repair mortar. Ensure that the repair materials are compatible with the concrete subfloor and are properly cured before proceeding.
4. Acclimation of Flooring: Floating vinyl plank flooring needs to acclimate to the room's temperature and humidity before installation. This allows the planks to expand or contract, minimizing the risk of gaps or buckling after installation. Store the unopened boxes of flooring in the room where they will be installed for at least 48-72 hours, maintaining a consistent temperature of between 65°F and 85°F (18°C and 29°C).
Key Point 2: Installation Techniques for Floating Vinyl Plank Flooring
The installation process for floating vinyl plank flooring involves a systematic approach to ensure a secure and aesthetically pleasing result. The following steps outline the key techniques:
1. Underlayment Installation: While some floating vinyl plank flooring products have a pre-attached underlayment, others require a separate underlayment. An underlayment provides additional cushioning, sound insulation, and moisture protection. Choose an underlayment that is compatible with vinyl plank flooring and suitable for concrete subfloors. Roll out the underlayment over the prepared concrete surface, following the manufacturer's instructions. Overlap the seams slightly and tape them securely with moisture-resistant tape. Some underlayments have adhesive backs, so be sure to apply them correctly.
2. Planning the Layout: Before starting the installation, plan the layout of the flooring. Consider the direction of the planks, the location of doorways, and the need for transition strips. Typically, planks are installed parallel to the longest wall of the room. To avoid narrow or awkward cuts at the end of rows, it may be necessary to cut the first row of planks. Calculate the width of the starting row to ensure that the last row will be at least half a plank wide. This provides a more balanced and professional look. It is important to note that some installation patterns may not be suitable for certain sizes and room layouts. Consult manufacturer manuals for guidance.
3. Installing the First Row: Begin installing the first row of planks along a straight edge, such as a wall. Ensure that the planks are properly aligned and that the tongue or groove is facing the wall. Use spacers to maintain a consistent expansion gap between the planks and the wall (typically ¼ inch to ⅜ inch). This expansion gap allows the flooring to expand and contract with changes in temperature and humidity, preventing buckling or warping.
4. Locking the Planks: The interlocking system of floating vinyl plank flooring varies depending on the manufacturer. Typically, the planks are angled together and then pressed down to lock them into place. Follow the manufacturer's instructions for the specific locking mechanism of your flooring. Use a tapping block and a rubber mallet to gently tap the planks together, ensuring a tight and secure fit. Avoid excessive force, as this can damage the locking mechanism.
5. Cutting Planks: Cutting planks is often necessary to fit around obstacles, such as doorways, pipes, or irregular walls. Use a utility knife with a sharp blade to score the plank along the cut line. Then, snap the plank along the score line. For more complex cuts, such as curves or angles, use a jigsaw or a coping saw. Always wear safety glasses when cutting planks.
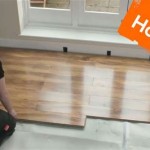
6. Installing Subsequent Rows: Continue installing subsequent rows of planks, staggering the end joints to create a more visually appealing and structurally sound floor. Staggering the joints also helps to prevent long, continuous seams that can be prone to failure. Ensure that the planks are properly locked together and that the expansion gap is maintained along the walls. Periodically check the alignment of the rows to ensure that they are straight and parallel.
7. Installing the Last Row: The last row of planks may need to be cut to fit the remaining space. Measure the distance between the last row and the wall, and then cut the planks accordingly. Remember to maintain the expansion gap along the wall. Use a pull bar to help lock the last row of planks into place.
8. Installing Transition Strips and Baseboards: Transition strips are used to cover the expansion gaps between the flooring and other surfaces, such as doorways, hallways, or different types of flooring. Install transition strips according to the manufacturer's instructions. Baseboards are installed along the walls to cover the expansion gap and provide a finished look. Attach the baseboards to the wall with nails or adhesive.
Key Point 3: Troubleshooting Common Installation Issues
Even with careful planning and execution, some common issues may arise during the installation of floating vinyl plank flooring. The following troubleshooting tips can help address these challenges:
1. Gaps Between Planks: Gaps between planks can occur due to improper locking, inadequate acclimation, or uneven subfloor. Ensure that the planks are properly locked together by using a tapping block and a rubber mallet. Allow the flooring to acclimate to the room's temperature and humidity before installation. Address any unevenness in the subfloor by using a self-leveling underlayment.
2. Buckling or Warping: Buckling or warping can occur due to excessive moisture, inadequate expansion gaps, or improper installation. Ensure that the concrete subfloor is dry and free of excessive moisture. Maintain a consistent expansion gap along the walls. Avoid installing the flooring too tightly against the walls, as this can restrict its ability to expand and contract. Repairing the damage later can be a laborious process, so prevention is paramount.
3. Squeaking or Creaking: Squeaking or creaking can occur due to uneven subfloor, loose planks, or friction between the flooring and the subfloor. Ensure that the subfloor is level and free of debris. Secure any loose planks by tapping them into place with a tapping block and a rubber mallet. Consider using a thin layer of foam underlayment to reduce friction between the flooring and the subfloor.
4. Difficult Locking Mechanisms: Some interlocking systems can be difficult to engage. Ensure that the planks are properly aligned and that the tongue and groove are clean and free of debris. Use a tapping block and a rubber mallet to gently tap the planks together. Experiment with different angles and pressures to find the optimal locking technique. Avoid forcing the planks together, as this can damage the locking mechanism. Some manufacturers offer instructional videos that are extremely beneficial for learning the correct linking techniques.
5. Scratches and Dents: While vinyl plank flooring is durable, it can be susceptible to scratches and dents. Protect the flooring from heavy furniture by using furniture pads. Avoid dragging heavy objects across the floor. Clean the flooring regularly with a soft broom or vacuum cleaner. Use a damp mop with a neutral pH cleaner to remove dirt and spills. Cleaners containing harsh chemicals or abrasives should be avoided, as they can damage the surface of the flooring.
By diligently following the guidelines outlined in this article, installing floating vinyl plank flooring over concrete can be a manageable DIY project. Careful preparation, attention to detail, and the correct execution are what are needed for professional looking results and a floor that will last a long time. Thorough reading of the manufacturer's instructions will also help avoid common installation issues.

Tips For Installing Vinyl Plank Over Concrete Floors Lemon Thistle

How To Install Vinyl Or Laminate Floors In A Basement Over Concrete Slab

Easy Ways To Install Vinyl Plank Flooring On Concrete

Lvp Flooring Installation How To Install Luxury Vinyl Plank In A Basement Diy

How To Prepare A Concrete Floor For Vinyl Flooring Parrys

How To Install Vinyl Plank Flooring As A Beginner Home Renovation

Tips For Installing Vinyl Plank Over Concrete Floors Lemon Thistle

How To Install Vinyl Or Laminate Floors In A Basement Over Concrete Slab

Tips For Installing Vinyl Plank Over Concrete Floors Lemon Thistle

Installing Luxury Vinyl Plank Over Concrete Your Next Summer Diy Project
Related Posts