Fixing Vinyl Plank Flooring: Essential Steps for a Flawless Repair
Vinyl plank flooring, with its durability and aesthetic appeal, is a popular choice for many homes and businesses. However, like any flooring material, it can become damaged or require repairs over time. If you find yourself with damaged vinyl plank flooring, don't panic. With the right tools and know-how, you can fix it yourself and restore its beauty.
Identifying the Damage
Before you start repairing, it's important to identify the type of damage you're dealing with. Common issues include scratches, dents, cracks, and loose planks. Once you've identified the damage, you can choose the appropriate repair method.
Tools and Materials
To fix vinyl plank flooring, you'll need a few basic tools and materials, including:
- Utility knife
- Putty knife
- Vinyl plank repair kit
- Adhesive
- Sandpaper (optional)
- Damp cloth
Step-by-Step Repair Guide
Here are the step-by-step instructions for fixing different types of vinyl plank flooring damage:
Scratches and Dents
- Use a putty knife or your finger to apply a small amount of adhesive to the scratch or dent.
- Cover the adhesive with a piece of vinyl repair tape or a color-matched crayon.
- Allow the adhesive to dry for at least 12 hours.
Cracks
- Use a utility knife to cut a V-groove along the length of the crack.
- Apply adhesive to the groove and insert a vinyl repair strip.
- Press the repair strip into place and flatten it with a putty knife.
- Allow the adhesive to dry for at least 24 hours.
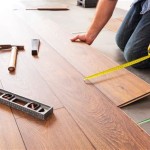
Loose Planks
- Remove any baseboard or molding that is preventing you from accessing the loose plank.
- Use a utility knife to cut away any adhesive or underlayment that may be holding the plank in place.
- Apply new adhesive to the subfloor and the bottom of the loose plank.
- Press the plank into place and use a heavy object to weigh it down while the adhesive dries.
Tips for a Professional-Looking Finish
For a professional-looking finish, here are a few tips to keep in mind:
- Use a color-matched repair kit or crayon to ensure that the repair is as seamless as possible.
- Sand the repair area lightly with fine-grit sandpaper to smooth out any rough edges.
- Clean the repaired area with a damp cloth to remove any dust or debris.
- If necessary, apply a clear sealant to the repaired area to protect it further.
Conclusion
Fixing vinyl plank flooring doesn't have to be a daunting task. By following the steps outlined above and using the right tools and materials, you can repair damaged planks and restore your flooring to its original beauty. Remember to take your time, be patient, and pay attention to detail for a professional-looking finish.

How To Repair Luxury Vinyl Plank Flooring The Palette Muse

10 Beginner Mistakes Installing Vinyl Plank Flooring

How To Fix A Bent Or Raised Up Edge On Your Luxury Vinyl Plank Flooring

How To Fix Vinyl Plank Flooring

Installing Vinyl Plank Flooring How To Fixthisbuildthat

Avoid Costly Mistakes Repairing Vinyl Plank Flooring Made Easy

10 Beginner Mistakes Installing Vinyl Plank Flooring Fixthisbuildthat

How To Repair Vinyl Plank Flooring Best Advices

How To Install End Piece On Vinyl Plank Flooring Lvp Laminate Engineered Wood Floors Simple Diy

How To Fix Gaps In Vinyl Plank Flooring Installing
Related Posts