```html
Home Legend Engineered Hardwood Flooring Installation Instructions
Installing Home Legend engineered hardwood flooring can significantly enhance the aesthetic appeal and value of a home. Engineered hardwood offers a balance of beauty and durability, making it a popular choice for homeowners. Successful installation, however, requires careful planning, preparation, and adherence to the manufacturer's instructions. This article provides a comprehensive guide to installing Home Legend engineered hardwood flooring, covering essential steps and considerations.
Before commencing the installation process, it is crucial to thoroughly read and understand the specific instructions provided by Home Legend for the chosen flooring product. These instructions may contain product-specific details that differ from general installation guidelines. Paying close attention to these details will help ensure a successful and long-lasting flooring installation.
Acclimation and Subfloor Preparation
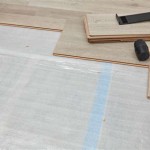
The first and arguably most critical step in installing Home Legend engineered hardwood flooring is proper acclimation. Acclimation refers to the process of allowing the flooring material to adjust to the temperature and humidity conditions of the installation environment. Engineered hardwood, like other wood products, expands and contracts in response to changes in moisture content. Failing to acclimate the flooring can lead to warping, gapping, and other problems after installation.
The acclimation period typically lasts for several days, but the exact duration will depend on the local climate and the specific recommendations of Home Legend. The flooring should be stored in the room where it will be installed, ideally stacked with spacers to allow for air circulation. Maintain a consistent temperature and humidity level in the room during the acclimation period, ideally mimicking the conditions that will be present during normal occupancy.
Subfloor preparation is equally important. The subfloor must be clean, level, and dry. Any imperfections in the subfloor can telegraph through the finished flooring, resulting in an uneven appearance and potential damage. Common subfloor materials include plywood, OSB (oriented strand board), and concrete. Each material requires specific preparation steps.
For plywood or OSB subfloors, inspect for loose boards, protruding nails or screws, and any signs of moisture damage. Replace any damaged boards and secure loose boards with screws. Sand down any high spots and fill any low spots with a leveling compound. Ensure the subfloor is free of debris, such as dirt, dust, and construction materials. Home Legend likely specifies acceptable moisture content levels for wood subfloors; test using a moisture meter and address any excessive moisture before proceeding.
Concrete subfloors require similar preparation. Start by cleaning the surface thoroughly to remove any dirt, dust, or adhesive residue. Inspect for cracks, holes, and unevenness. Fill any cracks or holes with a concrete patching compound and level the surface using a self-leveling concrete underlayment if necessary. A critical step for concrete subfloors is moisture testing. Concrete is porous and can wick moisture from the ground, potentially damaging the engineered hardwood. Use a concrete moisture meter or perform a calcium chloride test to determine the moisture content. If the moisture level exceeds the limits specified by Home Legend, a moisture barrier must be installed before laying the flooring.
Installation Methods and Techniques
Home Legend engineered hardwood flooring can typically be installed using one of several methods: floating, gluing, or nailing. The choice of installation method depends on the specific product, the subfloor material, and the homeowner's preferences. The manufacturer's recommendation should always be prioritized.
A floating floor installation involves connecting the planks or tiles together using a tongue-and-groove system or a click-lock mechanism, without directly attaching them to the subfloor. This method is popular for its ease of installation and versatility. It is often used over concrete subfloors, in conjunction with a moisture barrier and underlayment. An underlayment provides cushioning, sound insulation, and additional moisture protection. When installing a floating floor, it is crucial to maintain an expansion gap around the perimeter of the room and around any fixed objects, such as pipes and columns. This gap allows the flooring to expand and contract without putting pressure on the surrounding structures.
A glue-down installation involves applying an adhesive specifically designed for engineered hardwood flooring directly to the subfloor and then pressing the planks or tiles into the adhesive. This method provides a more solid and stable feel underfoot compared to a floating floor. It is suitable for both wood and concrete subfloors. Proper adhesive selection is paramount; use only adhesives recommended by Home Legend to avoid damaging the flooring or affecting its performance. The adhesive should be applied evenly and in accordance with the manufacturer's instructions. Follow the recommended open time and working time for the adhesive to ensure a proper bond.
A nail-down installation involves using nails or staples to secure the flooring planks or tiles to a wood subfloor. This method is generally used for thicker engineered hardwood products. It requires specialized tools, such as a flooring nailer or stapler. The nails or staples should be driven at an angle into the tongue of the plank, ensuring they are properly seated and do not interfere with the adjacent plank. Follow the manufacturer's recommendations for nail or staple spacing and depth.
Regardless of the installation method, it is essential to start with a straight and accurate layout. Use a chalk line to establish a reference line and ensure the first row of planks is perfectly aligned. Stagger the end joints of subsequent rows to create a more visually appealing and structurally sound floor. Use spacers along the walls to maintain the required expansion gap. Cut planks carefully to fit around obstacles and in corners. A tapping block and pull bar can be used to tighten the joints between planks.
Finishing Touches and Maintenance
Once the flooring is installed, remove the spacers and install baseboards or trim to cover the expansion gaps along the walls. The baseboards should not be attached to the flooring itself, allowing the flooring to move freely. Install transition strips where the flooring meets other types of flooring, such as tile or carpet. Transition strips provide a smooth and safe transition between different floor heights and materials.
Clean the flooring thoroughly to remove any dust, dirt, or adhesive residue. Use a broom, vacuum cleaner with a soft brush attachment, or a damp mop to clean the floor. Avoid using excessive water, as this can damage the flooring. Use cleaning products specifically designed for engineered hardwood flooring. Avoid using harsh chemicals, abrasive cleaners, or wax-based polishes, as these can dull the finish or damage the surface.
Protect the flooring from scratches and dents by using felt pads under furniture legs. Place mats at entrances to trap dirt and moisture. Avoid wearing shoes with high heels or cleats on the flooring. Clean up spills immediately to prevent staining. Regularly inspect the flooring for signs of wear and tear and address any issues promptly to prolong the life of the floor.
Key Point 1: Prioritizing Manufacturer's Instructions
Throughout the entire installation process, the instructions provided by Home Legend for the specific engineered hardwood flooring product being installed must be the primary point of reference. These instructions may contain crucial information regarding acclimation periods, subfloor preparation requirements, acceptable installation methods, recommended adhesives, and maintenance guidelines. Deviating from the manufacturer's instructions can void the warranty and lead to installation failures.
Key Point 2: Moisture Control
Moisture is a significant enemy of wood flooring, including engineered hardwood. Controlling moisture both before and after installation is paramount to ensuring the longevity and performance of the floor. Thoroughly test the subfloor for moisture content and address any excessive moisture before installing the flooring. Maintain a consistent temperature and humidity level in the room after installation to minimize expansion and contraction. Take precautions to prevent water damage from spills, leaks, and excessive humidity.
Key Point 3: Proper Acclimation
Allowing the Home Legend engineered hardwood flooring to properly acclimate to the installation environment is not merely a suggestion; it's a necessity. Failure to acclimate the flooring can lead to significant problems after installation, such as warping, gapping, and cupping. The acclimation period allows the flooring to adjust to the temperature and humidity conditions of the room, minimizing the risk of these issues. Follow the manufacturer's recommended acclimation period and maintain consistent environmental conditions during the process.
```
How To Install Lock Engineered Hardwood Flooring

How To Install Lock Engineered Hardwood Flooring

How To Install Lock Engineered Hardwood Flooring

Diy Engineered Hardwood Flooring Install My Way A To Z

How To Install Engineered Hardwood Flooring

Home Depots Legend Engineered Hardwood Lock Flooring

How To Install Lock Engineered Hardwood Flooring

How To Install Lock Engineered Hardwood Flooring

Home Depots Legend Engineered Hardwood Lock Flooring

How To Install Engineered Hardwood Flooring
Related Posts