How to Make Parquet Flooring
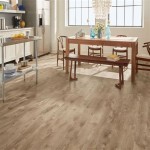
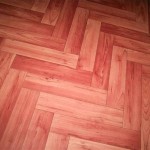
Parquet flooring, characterized by its geometric patterns composed of individual wood blocks or slats, provides a timeless and elegant aesthetic to any interior space. Constructing parquet flooring is a detailed process requiring careful planning, precise execution, and a thorough understanding of woodworking principles. This article will outline the essential steps involved in creating parquet flooring, from preparing the subfloor to applying the final finish.
Materials and Tools Required
Successful parquet flooring installation necessitates specific materials and tools. The selection of appropriate materials and the utilization of proper tools are crucial for achieving a durable and visually appealing result. This initial preparation contributes significantly to the overall quality and longevity of the finished floor.
Wood Blocks or Slats: The primary material is, of course, the wood itself. Common choices include oak, walnut, maple, cherry, and exotic hardwoods. The selection of wood depends on the desired look, durability, and budget. The wood should be kiln-dried and of consistent thickness. Consider purchasing extra material, approximately 10-15%, to account for cuts, mistakes, and pattern matching.
Subfloor Preparation Materials: These materials serve to create a stable and level foundation for the parquet flooring. They often include leveling compound, plywood or OSB sheathing (if needed), and underlayment.
Adhesive: A high-quality wood adhesive specifically designed for flooring applications is essential. Choose an adhesive that is compatible with both the wood species and the subfloor material. Consider factors like open time, cure time, and VOC content.
Fasteners: While adhesive is typically the primary method of securing parquet blocks, small brad nails or staples can provide additional holding power, especially in areas prone to movement or stress.
Sanding Equipment: A floor sander, edging sander, and hand sander are required to smooth the surface of the installed parquet flooring and prepare it for finishing. Different grit sandpaper will be needed for various stages of sanding, starting with coarser grits and progressively moving to finer grits.
Finishing Materials: These materials protect and enhance the appearance of the parquet flooring. Options include polyurethane, varnish, lacquer, oil-based finishes, and water-based finishes. Sealers and stains can be used to further customize the look.
Measuring and Layout Tools: A measuring tape, level, chalk line, square, and compass are crucial for accurate layout and alignment of the parquet pattern. Precision in these measurements is paramount for a visually balanced and aesthetically pleasing floor.
Cutting Tools: A miter saw or table saw is necessary for precisely cutting the wood blocks or slats to the required dimensions. A jigsaw may be helpful for intricate cuts or fitting around obstacles.
Spreading and Application Tools: A notched trowel is used to apply the adhesive evenly to the subfloor. Brushes, rollers, or spray equipment are needed for applying the chosen finish.
Safety Equipment: Safety glasses, dust masks, and hearing protection are essential to protect against potential hazards during cutting, sanding, and finishing.
Subfloor Preparation
A properly prepared subfloor is critical for the successful installation and longevity of parquet flooring. The subfloor must be level, clean, dry, and structurally sound. Any imperfections in the subfloor will be magnified in the finished parquet floor.
Inspection: Begin by thoroughly inspecting the existing subfloor for any signs of damage, such as cracks, water stains, or rot. Address any structural issues before proceeding. Check for levelness using a long level or laser level. Note any significant deviations from level.
Cleaning: Remove all debris, including dirt, dust, nails, staples, and old adhesive. Use a scraper, vacuum, and broom to ensure a clean surface. A clean subfloor promotes proper adhesion of the flooring material.
Leveling: If the subfloor is not level, use a self-leveling compound to correct any irregularities. Follow the manufacturer's instructions carefully. Apply the leveling compound evenly and allow it to dry completely before proceeding to the next step. Multiple applications may be required for significant deviations.
Subfloor Repair: Repair any cracks or holes in the subfloor with a wood filler or patching compound. Ensure that the repaired areas are flush with the surrounding surface. Replace any damaged sections of subfloor with new plywood or OSB sheathing.
Underlayment (Optional): Consider installing an underlayment to provide additional cushioning, sound insulation, and moisture protection. Choose an underlayment that is specifically designed for use with wood flooring. Overlap the seams of the underlayment and tape them securely.
Moisture Testing: Before installing the parquet flooring, test the moisture content of both the subfloor and the wood blocks or slats. Use a moisture meter to measure the moisture content. Ensure that the moisture content is within the acceptable range recommended by the flooring manufacturer. Exceeding the recommended moisture levels can lead to warping, cupping, or cracking of the parquet flooring.
Installing the Parquet Flooring
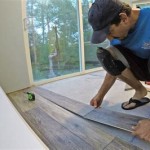
The installation process involves precise layout, careful adhesive application, and accurate placement of the wood blocks or slats. Patience and attention to detail are essential for achieving a visually appealing and structurally sound parquet floor.
Layout and Marking: Determine the center of the room by finding the midpoint of each wall and connecting them with chalk lines. Ensure that the intersecting chalk lines are perpendicular to each other. This intersection will serve as the starting point for the parquet pattern. Plan the layout of the pattern based on the chosen design. Consider the orientation of the pattern in relation to the room's dimensions and focal points. Mark the layout on the subfloor using a chalk line and a square.
Dry Lay (Optional): Before applying adhesive, consider laying out a section of the parquet pattern to ensure that the layout is correct and that the wood blocks or slats fit together properly. This dry lay allows for adjustments and corrections before committing to the adhesive application.
Adhesive Application: Apply the wood adhesive to the subfloor using a notched trowel. Use the correct notch size recommended by the adhesive manufacturer. Apply the adhesive evenly and in small sections to prevent it from drying out before the wood blocks or slats are placed. Work in manageable areas that can be covered within the adhesive's open time.
Block Placement: Carefully place the wood blocks or slats onto the adhesive, following the marked layout. Press each block firmly into the adhesive to ensure good contact. Use a rubber mallet to gently tap the blocks into place. Maintain consistent spacing between the blocks to achieve a uniform appearance. Use spacers if necessary.
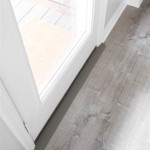
Cutting and Fitting: As the installation progresses, it may be necessary to cut wood blocks or slats to fit around walls, doorways, and other obstacles. Use a miter saw or table saw to make precise cuts. Ensure that the cut edges are clean and straight. Fit the cut pieces snugly against the walls or obstacles, leaving a small expansion gap.
Securing with Fasteners (Optional): If desired, use small brad nails or staples to provide additional holding power to the wood blocks or slats. Drive the fasteners at an angle into the subfloor, countersinking the heads. Use a nail gun or hammer and nail set.
Curing Time: Allow the adhesive to cure completely according to the manufacturer's instructions. Avoid walking on the installed parquet flooring during the curing process. Ventilate the room to promote proper curing of the adhesive.
Edge Treatment: Install baseboards or quarter-round molding to cover the expansion gap around the perimeter of the room. Use finishing nails or adhesive to secure the molding to the walls. Caulk any gaps between the molding and the wall or floor.
Sanding and Finishing
Sanding and finishing are critical steps in achieving a smooth, durable, and visually appealing parquet floor. Proper sanding removes any imperfections and prepares the surface for the application of the finish. The choice of finish affects the floor's appearance, durability, and maintenance requirements.
Initial Sanding Begin with a coarse-grit sandpaper (e.g., 36-grit or 40-grit) to remove any unevenness, adhesive residue, or imperfections from the surface of the installed parquet flooring. Use a floor sander to sand the main area of the floor, moving in the direction of the wood grain. Use an edging sander to sand along the edges of the room and in corners. Overlap each pass slightly to ensure a smooth and even surface.
Intermediate Sanding Switch to a medium-grit sandpaper (e.g., 60-grit or 80-grit) to refine the surface and remove any scratches left by the coarse-grit sandpaper. Continue sanding the entire floor, following the same procedure as with the initial sanding. Vacuum thoroughly after each sanding pass to remove dust and debris.
Fine Sanding Finish with a fine-grit sandpaper (e.g., 100-grit or 120-grit) to create a smooth and polished surface. This final sanding step prepares the floor for the application of the finish. Use a hand sander to sand any areas that are difficult to reach with the floor sander or edging sander.
Cleaning After sanding, thoroughly clean the floor to remove all dust and debris. Use a vacuum with a brush attachment to vacuum the entire floor, including the edges and corners. Wipe the floor with a tack cloth to remove any remaining dust particles. A clean surface is essential for proper adhesion of the finish.
Sealing (Optional) Apply a wood sealer to the sanded floor to prevent the finish from penetrating too deeply into the wood. This helps to create a more uniform and durable finish. Follow the manufacturer's instructions for application and drying time.
Finishing Apply the chosen finish to the sanded and sealed (if applicable) floor. Follow the manufacturer's instructions for application, drying time, and number of coats. Apply the finish evenly and in thin coats to prevent runs and drips. Allow each coat to dry completely before applying the next coat. Lightly sand between coats with a fine-grit sandpaper (e.g., 220-grit or 320-grit) to remove any imperfections and create a smooth surface.
Curing Time Allow the finish to cure completely according to the manufacturer's instructions. Avoid walking on the finished floor during the curing process. Ventilate the room to promote proper curing of the finish. The curing time can vary depending on the type of finish used.

How To Make Parquet Floors Look Modern

How To Make Parquetry

How To Lay Parquet Flooring Leader Floors Blog

Diy Brothers Make Trendy Parquet Flooring Using Free Pallet Wood From Facebook Marketplace Manchester Evening News

How To Make A Parquet Floor

Make Your Parquet Floors Look Modern

Diy Laying Engineered Oak Parquet Flooring Swoon Worthy

Parquet Flooring The 2024 Guide Floorings

Parquet Flooring The 2024 Guide Floorings

Make Your Own Plank Flooring Using 1 X 12 Lumber Hallstrom Home
Related Posts