Installing Vinyl Plank Flooring Over Plywood: A Comprehensive Guide
Vinyl plank flooring has emerged as a popular flooring choice due to its durability, water resistance, aesthetic versatility, and relatively straightforward installation process. A common subfloor for vinyl plank installation is plywood, appreciated for its stability and suitability as a base for various flooring materials. This article provides a detailed guide on how to successfully install vinyl plank flooring over a plywood subfloor, covering necessary preparations, tools, and techniques.
Assessing and Preparing the Plywood Subfloor
The success of a vinyl plank flooring installation hinges significantly on the condition of the subfloor. A properly prepared plywood subfloor ensures a level, smooth, and stable foundation, preventing issues such as unevenness, squeaking, and premature wear of the vinyl plank surface. Before commencing installation, a thorough assessment of the plywood subfloor is crucial.
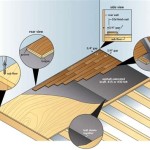
The first step in preparing the plywood subfloor involves a detailed inspection for any signs of damage. This includes looking for water stains, indicating past or present leaks, which can compromise the integrity of the plywood. Warping, delamination (separation of the plywood layers), and rot are also significant concerns that need to be addressed. If any of these issues are present, the affected sections of plywood must be replaced with new, properly treated plywood of the same thickness to ensure a consistent and level surface.
Once the inspection is complete, attention should be turned to addressing any unevenness in the plywood subfloor. This is best accomplished using a long, straight edge (such as a level or a long piece of lumber) placed across the subfloor in multiple directions. Any dips or high spots that are identified need to be corrected. Low spots can be filled with a self-leveling compound or wood patching compound, following the manufacturer's instructions carefully. High spots can be sanded down using a belt sander or floor scraper. The goal is to achieve a surface that is as flat and even as possible, typically within a tolerance of 3/16 inch over a 10-foot span.
After addressing any significant unevenness, the entire plywood subfloor should be thoroughly cleaned. This involves sweeping or vacuuming to remove any loose debris, such as dust, dirt, and wood shavings. Following this, the subfloor should be mopped with a mild detergent solution, ensuring that the surface is not excessively wet. Allowing the subfloor to dry completely before proceeding is essential. Any remaining moisture can interfere with the adhesion of the vinyl planks and potentially lead to mold or mildew growth.
Finally, ensure the plywood is securely fastened to the joists. Loose or squeaky plywood sheets need to be re-secured with screws designed for wood subflooring. Space the screws evenly to provide consistent support. This will help prevent movement and squeaking under the new vinyl plank flooring.
Selecting the Right Tools and Materials
Having the correct tools and materials is essential for a smooth and efficient vinyl plank flooring installation. This section outlines the necessary items to ensure a professional-looking result.
For measuring and marking, a measuring tape, a square, and a pencil are indispensable. These tools are used to accurately measure the room dimensions, mark cutting lines on the vinyl planks, and ensure that the planks are laid out squarely. Precision in measurement and marking is crucial for avoiding gaps and ensuring a visually appealing finished floor.
Cutting tools are necessary for trimming the vinyl planks to fit around walls, doorways, and other obstacles. A utility knife with a sharp blade is suitable for scoring the planks, which can then be snapped along the scored line. For more intricate cuts or to avoid damaging the surrounding area, a jigsaw or a vinyl plank cutter can be used. A vinyl plank cutter provides clean, precise cuts with minimal dust. Safety glasses should always be worn when using cutting tools.
Installation tools include a tapping block and a rubber mallet. These tools are used to gently tap the vinyl planks together, ensuring a tight and secure fit. The tapping block protects the edges of the planks from damage during the tapping process. A pull bar can be used to help engage the locking mechanisms of the planks along walls and in tight spaces.
Adhesives may be required, depending on the type of vinyl plank flooring being installed. Some vinyl planks feature a click-lock system that does not require adhesive, while others require glue-down installation. If adhesive is necessary, be sure to use the type recommended by the vinyl plank manufacturer and follow their instructions carefully regarding application and drying time. In addition to the vinyl planks themselves, expansion spacers are crucial. These are placed around the perimeter of the room to allow for the natural expansion and contraction of the flooring material due to temperature and humidity changes. Failure to leave adequate expansion space can lead to buckling or warping of the flooring.
Installing the Vinyl Plank Flooring: A Step-by-Step Guide
With the subfloor properly prepared and the necessary tools and materials gathered, the actual installation of the vinyl plank flooring can begin. This section provides a step-by-step guide to ensure a successful and aesthetically pleasing installation.
Before starting, it is recommended to acclimatize the vinyl planks to the room's temperature and humidity for at least 48 hours. This allows the material to expand or contract, minimizing the risk of gaps or buckling after installation. Store the planks flat in the room where they will be installed.
Begin by planning the layout of the vinyl planks. Start by measuring the room and determining the best direction to lay the planks, typically running them along the longest wall. Consider the placement of seams and try to avoid having narrow strips of planks along the edges of the room. It may be necessary to adjust the starting row to ensure a balanced appearance. Use a chalk line to mark a straight starting line parallel to the wall, leaving the appropriate expansion gap.
When installing the first row of planks, place expansion spacers along the wall to maintain the required gap. The first row should be installed with the tongue side facing the wall. Engage the locking mechanisms of the planks by aligning them carefully and gently tapping them together with a tapping block and rubber mallet. Ensure that the planks are securely locked and that there are no visible gaps between them. Continue installing subsequent rows, staggering the end seams to create a more visually appealing and structurally sound floor. Staggering the seams also helps to distribute stress evenly across the flooring. The typical recommendation is to maintain at least a six-inch offset between the end seams of adjacent rows.
When encountering obstacles such as pipes, doorways, or corners, measure and cut the vinyl planks to fit using a utility knife, jigsaw, or vinyl plank cutter. Accuracy is critical when cutting around obstacles to ensure a snug fit and a professional-looking finish. When cutting around pipes, consider using a hole saw or coping saw to create a precise opening.
For the final row of planks, it may be necessary to rip the planks to the correct width. Measure the remaining space carefully and use a straight edge and utility knife to score and snap the planks. Use a pull bar to engage the locking mechanisms of the planks in tight spaces. Remember to maintain the expansion gap along the wall. After all the planks have been installed, remove the expansion spacers. Install baseboards or quarter-round molding around the perimeter of the room to cover the expansion gap and provide a finished look. Use a nail gun or construction adhesive to secure the molding to the wall, not to the flooring, to allow for movement. Finally, inspect the finished floor for any imperfections and address them as necessary. Clean the floor with a damp mop to remove any dust or debris.
Following these steps will help facilitate a successful vinyl plank flooring installation over a plywood subfloor that results in a durable, attractive, and long-lasting flooring surface.

How To Install Vinyl Plank Flooring On Plywood Floor

Can You Lay Vinyl Flooring Over Plywood Ready To Diy

How To Install Vinyl Flooring Field Court

Installing Vinyl Floors A Do It Yourself Guide The Honeycomb Home

Vinyl Over Ecowarm Radiantboard

How To Install Vinyl Flooring Planks

10 Beginner Mistakes Installing Vinyl Plank Flooring

Two Hands Install A Grip Strip Vinyl Plank Over Plywood Subfloor Installing Flooring How To

How To Professionally Install Vinyl Plank Flooring A Comprehensive Guide Harshaw Home Renovators

How To Install Waterproof Vinyl Plank Flooring Four Generations One Roof
Related Posts