Essential Aspects of Armstrong Vinyl Plank Flooring Installation Instructions
Upgrading your home's flooring with Armstrong vinyl plank flooring can enhance its aesthetics and durability. However, it's crucial to adhere to the installation instructions precisely to ensure a seamless and long-lasting result. This article will provide a comprehensive guide to the essential aspects of Armstrong vinyl plank flooring installation, empowering you to achieve a professional-grade finish.
Planning and Preparation
Begin by determining the square footage of the area to be floored. Allow for an additional 10% for cuts and wastage. Ensure the subfloor is level, dry, and free of any imperfections. Use a moisture barrier or underlayment recommended by the manufacturer to prevent moisture penetration and improve comfort.
Tools and Materials
Gather the necessary tools, including a utility knife, tape measure, T-square, spacers, and a tapping block. Ensure you have the appropriate adhesive for the type of flooring and subfloor. Use a notched trowel to apply the adhesive evenly.
Acclimation
Before installation, allow the vinyl planks to acclimate to the room temperature for at least 24 hours. This process helps prevent planks from expanding or contracting excessively after being installed.
Laying the First Row
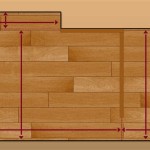
Align the first plank along the longest wall, leaving a small gap (typically 1/4 inch) around the perimeter. Use spacers to maintain consistent spacing between the planks. Secure the plank with adhesive, applying pressure to create a strong bond.
Subsequent Rows
For subsequent rows, stagger the joints by at least 6 inches. Apply adhesive to the subfloor and the side of the plank to be joined. Carefully insert the plank into the previous row, tapping it gently with a tapping block to ensure a secure fit. Repeat this process until you reach the opposite wall.
Cutting and Trimming
Measure and mark any areas where planks need to be trimmed. Use a utility knife or circular saw to make precise cuts. For irregular shapes, create a template for accuracy.
Finishing Touches
Once all the planks are installed, apply baseboards or moldings around the perimeter to cover the expansion gap and provide a finished look. Allow the adhesive to cure fully before moving furniture onto the floor.
Maintenance
Regular maintenance is essential to preserve the beauty and longevity of your Armstrong vinyl plank flooring. Clean the floor regularly with a damp mop and mild detergent. Avoid using harsh chemicals or abrasive cleaners.
By following these installation instructions meticulously, you can achieve a stunning and durable Armstrong vinyl plank flooring that will elevate the style and comfort of your home for years to come.

Armstrong Laminate Flooring Installation Instructions

Armstrong Laminate Flooring Installation Instructions

Vinyl Plank Flooring Tutorial No Nails Glue Real Estate Kier

How To Install Vinyl Plank Flooring As A Beginner Home Renovation
How To Lay Vinyl Flooring Sheets Tiles And Planks Tarkett

How To Lay Vinyl Flooring Sheets Tiles And Planks Tarkett

How To Install Vinyl Plank Flooring As A Beginner Home Renovation

How To Lay Vinyl Floor

Installing Vinyl Plank Flooring How To Fixthisbuildthat

How To Install Vinyl Plank Flooring
Related Posts


