List of Tools Needed To Install Laminate Flooring
Installing laminate flooring can significantly enhance the aesthetic appeal and functionality of a living space. While professional installation is an option, many homeowners choose to undertake this project themselves, leveraging the relatively straightforward installation process of laminate flooring. Successful DIY installation, however, hinges on having the correct tools readily available. This article provides a comprehensive list of essential tools needed for a professional-looking laminate flooring installation, along with the purpose and characteristics of each tool.
Measuring and Marking Tools
Accurate measurement and marking are paramount for a successful laminate flooring installation. These tools ensure precise cuts and proper alignment, minimizing waste and preventing unsightly gaps or misalignments.
Measuring Tape: A high-quality measuring tape is indispensable for determining the dimensions of the room and the length of boards needed. A measuring tape with a retractable mechanism and a locking feature facilitates accurate measurements, especially for longer distances. A tape measure that is at least 25 feet long is recommended for most rooms.
Pencil: A standard pencil is used for marking cut lines on the laminate boards. For darker laminate colors, consider using a light-colored pencil or chalk to ensure visibility. It's advisable to keep several pencils on hand, as they can dull quickly when used on laminate.
T-Square or Speed Square: A T-square or speed square is crucial for ensuring that cuts are perfectly square. This tool is particularly important when cutting boards to fit against walls or around obstacles. A T-square is often preferred for longer cuts, while a speed square is more convenient for smaller, more precise measurements.
Combination Square: A combination square, providing both 90-degree and 45-degree angle markings, is beneficial for creating angled cuts around doorways or other architectural features. Its adjustable head allows for marking specific depths and transferring measurements with accuracy. This tool enhances versatility and precision in more complex installations.
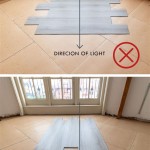
Chalk Line: For larger rooms, a chalk line can be used to create long, straight lines for aligning the first row of laminate flooring. This tool simplifies the process of establishing a straight baseline, preventing overall misalignment during the installation process. The chalk line should be used in conjunction with the measuring tape to ensure accuracy.
Cutting Tools
Proper cutting tools are essential for achieving clean, precise cuts on laminate flooring. The type of cutting tool required will depend on the thickness of the laminate and the frequency of cuts needed. Using the correct tool not only simplifies the cutting process but also minimizes chipping and splintering, resulting in a professional finish.
Laminate Flooring Cutter (Guillotine Cutter): A laminate flooring cutter, also known as a guillotine cutter, provides a fast and dust-free method for making straight cuts. This tool operates by using a sharp blade to shear the laminate board. It is particularly useful for large installations where many straight cuts are required. The benefit of this tool is its speed and lack of airborne dust. However, it is not suitable for making angled or intricate cuts.
Circular Saw: A circular saw is a versatile tool that can be used for making both straight and angled cuts. When using a circular saw for laminate flooring, it is important to use a fine-tooth blade designed specifically for cutting laminate or wood. This type of blade minimizes chipping and splintering. Securely clamping the laminate board to a work surface is also essential for safety and accuracy.
Jigsaw: A jigsaw is ideal for making curved or intricate cuts around doorways, pipes, or other obstacles. As with the circular saw, using a fine-tooth blade designed for laminate is crucial. A jigsaw allows for greater maneuverability and control than a circular saw, making it suitable for more complex cuts. Consider using a jigsaw blade with reverse teeth to reduce chipping on the visible surface of the laminate.
Utility Knife: A utility knife with a sharp, replaceable blade is useful for scoring laminate boards before snapping them. This technique can be used for making straight cuts, particularly on thinner laminate flooring. Scoring and snapping can reduce splintering and provide a cleaner edge than sawing, especially for smaller pieces. Always use a safety ruler when scoring to ensure a straight line and protect fingers.
Installation Tools
The specific tools used during the installation process are crucial for properly aligning and securing the laminate planks, ensuring a tight fit and a professional-looking floor. These tools minimize damage to the laminate and facilitate a smooth, efficient installation.
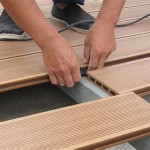
Tapping Block: A tapping block is used to gently tap the laminate boards into place without damaging the edges. This tool is typically made of hard plastic or wood and is designed to distribute the force evenly, preventing chipping or cracking of the laminate. The tapping block should be used in conjunction with a pull bar to ensure a tight fit between boards.
Pull Bar: A pull bar is used to pull the last row of laminate boards into place against the wall. This tool features a curved end that hooks onto the edge of the board, allowing you to apply leverage and create a tight seam. The pull bar is particularly useful in tight spaces where a tapping block cannot be used effectively.
Spacers: Spacers are essential for maintaining a consistent expansion gap between the laminate flooring and the walls. This gap allows the laminate to expand and contract with changes in temperature and humidity, preventing buckling or warping. Spacers are typically made of plastic and are available in various thicknesses. A ¼-inch expansion gap is commonly recommended, but consult the manufacturer's instructions for specific requirements.
Hammer: A standard hammer is used in conjunction with the tapping block and pull bar to gently tap the laminate boards into place. A rubber mallet can also be used, as it provides a softer impact and reduces the risk of damaging the laminate. Avoid using excessive force, as this can damage the tongue-and-groove locking mechanism.
Knee Pads: Installing laminate flooring often requires spending extended periods on your knees. Knee pads provide cushioning and support, reducing strain on your joints and improving comfort during the installation process. Investing in a comfortable pair of knee pads can significantly reduce fatigue and prevent long-term discomfort.
Preparation and Cleaning Tools
Proper preparation of the subfloor is essential for a successful laminate flooring installation. These tools ensure that the subfloor is clean, level, and free of debris, creating a stable and even surface for the laminate flooring. Cleaning tools are necessary for maintaining a clean work environment and removing dust and debris during and after the installation process.
Broom and Dustpan: A broom and dustpan are used to sweep the subfloor and remove any dirt, dust, or debris. A clean subfloor is essential for ensuring proper adhesion of the underlayment and preventing imperfections from telegraphing through the laminate flooring.
Vacuum Cleaner: A vacuum cleaner is used to thoroughly clean the subfloor, removing any remaining dust or debris. A vacuum cleaner with a brush attachment is particularly useful for cleaning textured subfloors. Ensure the vacuum cleaner is equipped with a HEPA filter to capture fine particles and prevent them from becoming airborne.
Level: A level is used to check the flatness of the subfloor. Any significant dips or bumps should be addressed before installing the laminate flooring. Self-leveling compound can be used to fill in low spots, while high spots can be sanded down. A level is essential for ensuring a smooth and even floor.
Scraper: A scraper is used to remove any adhesive residue, paint splatters, or other debris from the subfloor. A sharp scraper can effectively remove stubborn substances, creating a clean and smooth surface for the underlayment and laminate flooring.
Safety Equipment
Laminate flooring installation can generate dust and involve the use of sharp tools. Prioritizing safety is crucial to prevent injuries and protect your health. Safety equipment should be readily available and used consistently throughout the installation process.
Safety Glasses: Safety glasses protect your eyes from dust, debris, and flying particles generated during cutting and installation. Wearing safety glasses is essential for preventing eye injuries, especially when using power tools.
Dust Mask or Respirator: Laminate flooring installation can release dust particles into the air, which can be harmful to your respiratory system. A dust mask or respirator filters out these particles, protecting your lungs from irritation and long-term damage. Choose a dust mask or respirator that is rated for the level of dust exposure anticipated.
Gloves: Gloves protect your hands from splinters, cuts, and abrasions. Wearing gloves also provides a better grip on the tools and materials, improving safety and control. Leather or work gloves are recommended for laminate flooring installation.
Having all of these tools readily on hand before starting a laminate flooring project simplifies the work and increases the likelihood of a successful and professional looking job. Proper tools not only improve efficiency of the installation, but they also improve safety.

How To Install Laminate Flooring On Your Own Diy Hq Longwood Fl

8 Essential Tools For Laminate Flooring Installations The Family Handyman

How To Install Laminate Flooring The Home Depot

How To Install Laminate Flooring The Home Depot

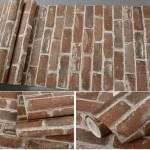
Laminate Flooring Tools For Installing

How To Install Laminate Flooring The Home Depot

The Essential Tools For Laying Laminate Flooring Carpet Underlay

How To Install A Laminate Floor

How To Lay Laminate Flooring Installation Guide Step By

How To Install A Laminate Floor
Related Posts