How To Lay Floating Engineered Wood Flooring On Concrete
Engineered wood flooring offers an attractive and durable alternative to solid hardwood, particularly in basements or other areas with concrete subfloors. The “floating” installation method, where the planks are not directly adhered to the subfloor, simplifies the process and can often be undertaken as a DIY project. This article provides a comprehensive guide to laying floating engineered wood flooring on concrete, covering preparation, installation techniques, and essential considerations for a successful outcome.
Preparing the Concrete Subfloor
The foundation for a successful floating floor installation is a properly prepared concrete subfloor. Neglecting this step can lead to problems with the finished floor, including unevenness, squeaking, and moisture damage. The key aspects of subfloor preparation involve cleaning, leveling, and moisture testing.
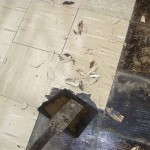
Cleaning: The concrete surface must be thoroughly cleaned to remove all dirt, debris, paint splatters, adhesive residue, and any other contaminants. Start by sweeping or vacuuming the entire area. For stubborn residue, use a scraper to remove any hardened materials. A mild detergent solution followed by a clean water rinse can further clean the surface. Allow the concrete to dry completely before proceeding. Avoid using harsh chemicals that could damage the concrete or leave behind a residue that interferes with the flooring installation.
Leveling: Engineered wood flooring relies on a flat, even surface for proper support and stability. Concrete slabs are rarely perfectly level, and even minor imperfections can cause issues. Identify any high or low spots using a long level or straightedge. Mark these areas for correction. For high spots, a concrete grinder can be used to carefully remove material until the surface is level and flush with the surrounding area. Wear appropriate safety gear, including eye protection and a dust mask, when grinding concrete. For low spots, a self-leveling concrete compound is required. Follow the manufacturer's instructions carefully when mixing and applying the compound. Ensure the compound is fully cured before proceeding to the next step. Multiple applications may be necessary for deeper depressions.
Moisture Testing: Concrete is porous and can wick moisture from the ground, potentially damaging the engineered wood flooring. It is crucial to determine the moisture content of the concrete slab before installation. Several methods can be used for moisture testing. A calcium chloride test, also known as a moisture test kit, involves placing a sealed container containing calcium chloride on the concrete surface for a specified period. The change in weight of the calcium chloride indicates the moisture emission rate. Alternatively, a concrete moisture meter can be used to directly measure the moisture content of the concrete. Follow the flooring manufacturer's recommendations for acceptable moisture levels. If the moisture content exceeds the recommended limits, a moisture barrier must be installed to prevent moisture from damaging the engineered wood flooring. A common moisture barrier consists of a polyethylene film or a liquid-applied membrane. Ensure the chosen moisture barrier is compatible with the flooring adhesive and the concrete subfloor.
Installing the Underlayment
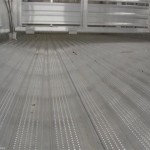
An underlayment is a thin layer of material placed between the concrete subfloor and the engineered wood flooring. It serves several important functions, including providing cushioning, reducing noise transmission, and offering additional protection against moisture. The selection of the appropriate underlayment depends on several factors, including the type of flooring, the desired level of sound insulation, and the presence of a moisture barrier.
Choosing the Right Underlayment: Various types of underlayment are available, including foam, cork, and rubber. Foam underlayment is a cost-effective option that provides basic cushioning and sound absorption. Cork underlayment offers superior sound insulation and is a more environmentally friendly choice. Rubber underlayment provides excellent cushioning and is often used in areas with high foot traffic. Some underlayments come with an integrated moisture barrier, eliminating the need for a separate moisture barrier installation. Refer to the flooring manufacturer's recommendations for the most suitable underlayment for the chosen engineered wood flooring.
Underlayment Installation: Unroll the underlayment material and position it along the starting wall. Cut the underlayment to fit the dimensions of the room, leaving a small gap along the walls to allow for expansion and contraction. Butt the edges of the underlayment seams together tightly and secure them with moisture-resistant tape. Avoid overlapping the seams, as this can create an uneven surface. Ensure the underlayment is flat and free of wrinkles before proceeding to the flooring installation.
Laying the Engineered Wood Flooring
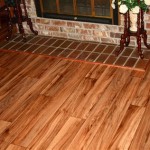
The actual process of laying the engineered wood flooring involves connecting the planks together using a tongue-and-groove system or a locking mechanism. This creates a continuous, floating surface that rests on top of the underlayment. Proper planning and attention to detail are crucial for achieving a professional-looking result.
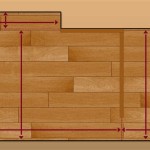
Planning the Layout: Before starting the installation, carefully plan the layout of the flooring. Consider the direction of the planks, taking into account the shape of the room and the location of doorways and windows. Generally, running the planks parallel to the longest wall creates a more visually appealing effect. Calculate the number of planks needed to cover the entire floor area. It is advisable to purchase extra planks to account for cuts and wastage. To avoid having narrow slivers of flooring along the walls, it may be necessary to adjust the width of the first row of planks. Use a saw to trim the planks to the desired width.
Installing the First Row: Begin installing the flooring along the longest straight wall in the room. Place spacers along the wall to maintain a consistent expansion gap. This gap allows the flooring to expand and contract without buckling or warping. Position the first row of planks with the tongue side facing the wall. Connect the end joints of the planks together using the locking mechanism. Use a tapping block and a hammer to gently tap the planks together until they are securely joined. Ensure the planks are aligned properly and that there are no gaps between them.
Installing Subsequent Rows: Continue installing the flooring row by row, staggering the end joints between adjacent rows. This creates a more visually appealing and structurally sound floor. To cut planks to the desired length, use a saw. Ensure the cut edges are clean and straight. When installing planks around obstacles such as pipes or doorframes, use a jigsaw to cut the planks to fit. For tight spaces, a pull bar can be used to connect the planks together. Maintain a consistent expansion gap along all walls and around obstacles.
Final Touches: Once the entire floor has been installed, remove the spacers along the walls. Install baseboards or quarter-round molding to cover the expansion gap and provide a finished look. Carefully inspect the floor for any imperfections or gaps. Touch up any damaged areas with a matching repair kit. Clean the floor with a damp cloth to remove any dust or debris. Avoid using harsh chemicals or abrasive cleaners, as these can damage the finish of the engineered wood flooring.
Addressing Potential Problems
Even with careful planning and execution, problems can occasionally arise during the installation process. Being prepared to address these issues can prevent further complications and ensure a successful outcome. Common problems include uneven subfloors, moisture issues, and difficulty locking the planks together.
Uneven Subfloors: If the concrete subfloor has not been adequately leveled, it can cause the engineered wood flooring to feel uneven or unstable. Address this issue by using shims to support the flooring in low spots. Place the shims between the underlayment and the concrete subfloor. For larger depressions, consider using self-leveling concrete compound to create a more uniform surface.
Moisture Issues: If the concrete slab has a high moisture content, it can cause the engineered wood flooring to warp or buckle. Ensure a proper moisture barrier is installed to prevent moisture from reaching the flooring. If moisture problems persist, consider using a dehumidifier to lower the humidity levels in the room.
Difficulty Locking Planks: If the planks are difficult to lock together, it may be due to debris in the locking mechanism or misalignment of the planks. Carefully inspect the locking mechanism for any obstructions. Use a tapping block and a hammer to gently tap the planks together until they are securely joined. Ensure the planks are aligned properly and that there are no gaps between them. If the planks are damaged, replace them with new ones.

Installing Engineered Hardwood On Concrete Twenty Oak

Floating Engineered Hardwood

How To Install Lock Engineered Hardwood Flooring

Installing Engineered Hardwood On Concrete Villagio Guide

Installing Wood Flooring Over Concrete Diy

Which Method Should I Use To Install My Engineered Wood Floor Tesoro Woods

Engineered Wood Floor Laying Flooring Installation Method

Installing Engineered Hardwood On Concrete Twenty Oak

How To Install A Floating Wood Floor

How To Fit An Engineered Wood Flooring A Concrete Slab
Related Posts