Essential Aspects of Installing Vinyl Plank Flooring on Stairs
Transforming your staircase with durable and stylish vinyl plank flooring is a rewarding project. However, proper installation is crucial for a visually appealing and long-lasting result. By following these essential steps, you can achieve a seamless and professional-looking installation on your stairs.
1. Preparation
Ensure a clean and level surface by removing any existing flooring, carpet, or debris. Check for any uneven spots and level them using a leveling compound if necessary. This step is essential for preventing any creaking or movement in the flooring over time.
2. Underlayment
Installing an underlayment beneath the vinyl planks provides additional cushioning, reduces noise, and helps even out any minor imperfections in the subfloor. Choose an underlayment that is specifically designed for vinyl plank flooring and roll it out over the entire stair surface.
3. Stair Nose and Transition Pieces
Stair noses are essential for providing a secure and finished edge to the vinyl planks at the front of each stair. Measure the width of each stair and cut the stair noses accordingly. Use a transition piece to join the vinyl planks with any adjacent flooring, such as carpet or hardwood.
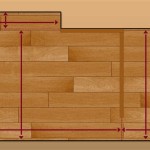
4. Cutting and Fitting
Measure and cut the vinyl planks to the desired length and width for each stair. Use a sharp utility knife or a vinyl cutter to ensure clean cuts. Fit the planks onto the stairs, starting from the bottom step. Use a tapping block and a hammer to gently tap the planks into place, ensuring a tight fit.
5. Nosing Installation
Once the planks are installed, it's time to fix the stair noses. Apply a thin layer of adhesive to the back of the stair nose and align it with the edge of the vinyl planks. Use a few small nails to secure the stair nose.
6. Finish and Seal
After the stair noses are installed, inspect the entire staircase for any gaps or loose planks. Fill in any gaps with a color-matched caulk. Apply a polyurethane finish to the vinyl planks for additional protection and shine. Allow the finish to dry completely before using the stairs.
By following these steps carefully, you can achieve a stunning and durable vinyl plank flooring installation on your stairs. Remember to use high-quality materials and tools, and don't rush the process. With proper planning and execution, you can create a staircase that not only looks great but also enhances the value of your home.

How To Install Vinyl Plank Flooring On Stairs In 6 Steps Inc

How To Install Vinyl Plank Flooring On Stairs In 6 Steps Inc

Vinyl Plank Flooring On Stairs Your Total Guide Floorings

How To Install Vinyl Plank Flooring On Stairs In 6 Steps Inc

How To Install Vinyl Plank Flooring On Stairs Ready Diy

Pros And Cons Of Installing Vinyl Flooring On Stairs

Vinyl Plank On Stairs With Our Special Nosing

How To Install Vinyl Plank Flooring On Stairs Step By Tutorial

How To Install Vinyl Plank Flooring On Stairs

How To Install Vinyl Plank Flooring On Stairs Step By Tutorial
Related Posts