Installing Laminate Flooring Around Curved Stairs: A Guide
Installing laminate flooring around curved stairs presents a unique challenge due to the irregular shapes and angles involved. Unlike straight runs, the installation requires careful planning, precise cuts, and specialized tools to achieve a seamless and aesthetically pleasing finish. This guide provides a detailed blueprint for tackling this project, covering essential steps from preparation to installation.
Preparing the Subfloor
A solid subfloor is crucial for a successful laminate installation. Before starting, ensure the subfloor is level, smooth, and free from any imperfections. This step is essential to prevent uneven flooring and potential damage to the laminate planks.
If the subfloor has significant imperfections, consider using a leveling compound or plywood sheets for a smooth surface. Ensure the subfloor is dry and free from moisture, as laminate flooring is susceptible to water damage.
Measuring and Planning
Careful planning is paramount when installing laminate flooring around curved stairs. Start by accurately measuring the area where the laminate will be installed. Consider the curvature of the stairs and the intended layout of the flooring.
Develop a layout plan, taking into account any obstacles like stair posts or handrails. This plan will serve as a guide for cutting and installing the planks. You can use graph paper or specialized software to create a visual representation of the installation. Consider using a template or pattern to guide the cutting of the planks around the curved edges.
Cutting and Installation Techniques
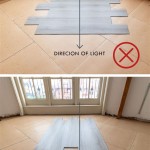
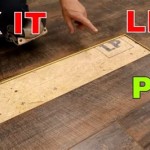
Installing laminate flooring around curved stairs requires specialized cutting techniques. A circular saw with a fine-tooth blade is ideal for making curved cuts. Mark the desired shape on the plank using a template or pencil and carefully cut along the line.
When installing the laminate planks around the curved stairs, start from the bottom and work your way up. Use a cutting mat or a sacrificial piece of plywood as a base for making precise cuts. Secure the planks with a tapping block and a rubber mallet. Ensure the planks are tightly fitted together and that the edges are flush.
Subfloor Preparation and Moisture Barrier
Before laying the laminate flooring, prepare the subfloor properly. Ensure it's level, smooth, clean, and dry. An uneven subfloor can lead to squeaky floors and uneven flooring. Consider using a leveling compound or plywood sheets to create a smooth and stable surface.
Applying a moisture barrier over the subfloor is crucial to protect the laminate flooring from moisture damage. This barrier can be a moisture-resistant underlayment or a polyethylene sheet. The moisture barrier prevents water from seeping up from the subfloor and damaging the laminate planks.
Layout, Cutting and Installation
For an accurate installation, measure and plan the layout of the laminate planks around the curved stairs. Using graph paper or specialized software, create a detailed plan to guide the cutting and installation process.
Utilize a circular saw equipped with a fine-tooth blade for making precise cuts along the curves of the stairs. Create templates or patterns to aid in cutting the planks to the desired shape.
Begin installing the laminate planks from the bottom of the stairs, progressively working your way to the top. Use a tapping block and a rubber mallet to secure the planks while ensuring tightly fitted joints.
Safety Precautions
Safety is paramount when working with tools and materials. Always wear safety goggles, gloves, and dust masks to protect yourself from potential hazards. Use caution when operating power tools and follow the manufacturer's instructions.
Ensure proper ventilation is available during the installation process to minimize exposure to fumes and dust.
If you are unfamiliar with laminate flooring installation, it's best to seek professional help. Improper installation can lead to costly repairs and potential safety risks.
Finishing Touches
After installing the laminate planks around the curved stairs, apply finishing touches for a professional look. Ensure any gaps around the stair posts or handrails are filled with appropriate sealant.
Transition strips or moldings can be used to seamlessly connect the laminate flooring to other floor coverings. Apply a final cleaning to remove dust and debris.
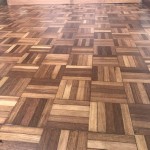
With careful planning, precise cutting, and proper installation techniques, you can successfully install laminate flooring around curved stairs. The end result will be a stylish and functional floor covering that enhances the beauty of your home.

Faq Installing Laminate Around Curved Staircase

Faq Installing Laminate Around Curved Staircase

Can I Used Engineer Hardwood Floors On Rounded Stairs Doityourself Com Community Forums

Laying Laminate Flooring On Curved Stairs

How To Cut Curves In Wood Flooring

Vinyl Plank On Curved Stairs Quite Diffe Could Work In Plett Flooring Luxury

Can I Used Engineer Hardwood Floors On Rounded Stairs Doityourself Com Community Forums

Installing Hardwood Flooring On Concrete Around Curved Stair Case

Cutting And Bending Curved Floor Parts Fine Homebuilding

How To Install Laminate Flooring On Staircase Step By Guide
Related Posts