Cutting Laminate Flooring: A Comprehensive Guide
Laminate flooring, a popular choice for both residential and commercial spaces, offers a cost-effective and aesthetically pleasing alternative to hardwood. Its durability, ease of maintenance, and variety of styles contribute to its widespread adoption. Installing laminate flooring, however, requires careful planning and precise execution, particularly when cutting the planks to fit the dimensions of the room and navigate obstacles.
This article provides a comprehensive guide to cutting laminate flooring, outlining the necessary tools, techniques, and safety precautions to ensure a professional and visually appealing installation. Understanding the different cutting methods and selecting the appropriate tools for each situation is crucial for achieving clean, accurate cuts and minimizing waste.
Preparing for the Cut: Tools and Materials
Before commencing the cutting process, it is essential to gather the necessary tools and materials. The choice of tools will depend on the type of cuts required and the thickness of the laminate planks. Having the right equipment on hand will not only make the job easier but also contribute to a higher quality finish.
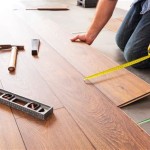
1. Measuring Tools: A tape measure is indispensable for accurately determining the required length and width of each plank. A combination square or speed square is useful for marking straight lines and ensuring accurate 90-degree cuts. A T-square or long ruler is helpful for longer, straight cuts, especially when ripping planks.
2. Marking Tools: Utilize a pencil or a fine-tipped marker to clearly mark the cutting lines on the laminate planks. Avoid using pens that may bleed or smear, as this can compromise the accuracy of the cut. A utility knife can also be used to score the surface of the laminate along the marked line, which helps to prevent chipping during the cutting process.
3. Cutting Tools: Several cutting tools are available for laminate flooring, each with its own advantages and disadvantages. Selecting the appropriate tool depends on the type of cut needed and the user's experience level.
a. Hand Saw: A hand saw, specifically a fine-tooth saw, can be used for basic straight cuts. However, it requires more physical effort and may not produce the cleanest cuts, especially on thicker laminate planks. A back saw, used in conjunction with a miter box, can improve the accuracy of angled cuts when using a hand saw.
b. Jigsaw: A jigsaw is a versatile tool for making curved cuts, intricate shapes, and notches around pipes and other obstacles. When using a jigsaw, it is crucial to use a fine-tooth blade designed for cutting laminate or hardwood. A blade designed for metal can also be used, but it should be a fine-tooth variety. Using a coarse blade will likely result in chipping and a rough edge.
c. Circular Saw: A circular saw provides a powerful and efficient way to make long, straight cuts on laminate flooring. It is particularly useful for ripping planks (cutting them lengthwise). A carbide-tipped blade with a high tooth count is recommended for minimizing chipping and ensuring a clean cut. A saw guide or straight edge can be used to ensure the cut remains straight.
d. Laminate Flooring Cutter: A laminate flooring cutter is a specialized tool designed specifically for cutting laminate planks. It operates similarly to a paper cutter, using a sharp blade to shear through the laminate. Laminate flooring cutters are generally quick, clean, and dust-free, making them a popular choice for many installers. However, they are limited to straight cuts and cannot be used for curves or intricate shapes. Furthermore, they may struggle with thicker laminate planks.
e. Miter Saw: A miter saw, also known as a chop saw, is ideal for making accurate angled cuts, such as those needed for corners and transitions. A miter saw can also be used for making straight cuts, but it is most effective for angled cuts. As with the circular saw, a carbide-tipped blade with a high tooth count is recommended.
4. Safety Equipment: Safety is paramount when working with power tools. Always wear safety glasses to protect your eyes from flying debris. Hearing protection is also recommended, especially when using loud power tools like circular saws and miter saws. A dust mask or respirator is advisable to prevent inhaling laminate dust, which can be irritating to the respiratory system.
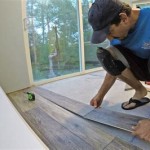
5. Work Surface: A stable and flat work surface is essential for making accurate cuts. A workbench or sturdy table is ideal. If using a circular saw, ensure the work surface is large enough to support the entire plank during the cut.
Cutting Techniques: Achieving Precise Results
The success of a laminate flooring installation hinges on the accuracy of the cuts. Employing proper cutting techniques will minimize waste, ensure a snug fit, and contribute to an overall professional appearance.
1. Measuring and Marking: Accurate measurements are paramount. Measure the area to be covered carefully, taking into account any irregularities in the walls or flooring. Mark the cutting lines clearly on the laminate planks using a pencil or fine-tipped marker. Double-check the measurements before cutting to avoid errors. When cutting around obstacles, such as pipes or door frames, use a template or cardboard to create an accurate outline of the shape to be cut.
2. Scoring the Surface: Before making the cut, score the surface of the laminate along the marked line using a utility knife. This helps to prevent chipping and splintering, particularly when using a saw. Make several light passes with the utility knife, pressing firmly to create a defined groove.
3. Cutting with a Saw: When using a saw, whether it be a hand saw, jigsaw, circular saw, or miter saw, follow these guidelines:
a. Support the Plank: Ensure the laminate plank is adequately supported during the cutting process. This prevents the plank from flexing or vibrating, which can lead to inaccurate cuts. Use clamps or a vise to secure the plank to the work surface if necessary.
b. Use a Sharp Blade: A sharp blade is essential for making clean cuts and minimizing chipping. Replace dull blades regularly to maintain optimal cutting performance. For power saws, use a blade specifically designed for cutting laminate or hardwood.
c. Control the Speed: When using a power saw, control the speed of the cut. Avoid forcing the blade through the laminate too quickly, as this can cause chipping and splintering. Let the blade do the work, and maintain a steady and controlled cutting speed.
d. Cut on the Waste Side of the Line: When cutting, position the blade slightly to the waste side of the marked line. This ensures that the finished piece is the correct size. After cutting, use sandpaper or a file to smooth any rough edges.
4. Cutting with a Laminate Flooring Cutter: A laminate flooring cutter provides a quick and clean way to make straight cuts. Simply position the plank in the cutter, align the cutting line with the blade, and press down firmly on the handle. Ensure the plank is fully seated in the cutter before making the cut.
5. Addressing Chipping: Despite best efforts, some chipping may occur during the cutting process. To minimize chipping, use a sharp blade, score the surface of the laminate before cutting, and cut on the waste side of the line. If chipping does occur, use wood filler or laminate repair putty to fill in the chips. Follow the manufacturer's instructions for application and drying time. Sand the filled areas smooth and blend them with the surrounding surface.
Specific Cutting Scenarios: Dealing with Obstacles and Transitions
Laminate flooring installations often involve cutting around obstacles, such as pipes, door frames, and corners. Mastering these techniques ensures a seamless and professional-looking installation.
1. Cutting Around Pipes: When cutting around pipes, use a template or cardboard to create an accurate outline of the pipe's diameter. Transfer the outline to the laminate plank and use a jigsaw to cut out the circle. It may be necessary to cut the plank in half lengthwise to allow it to be installed around the pipe. After installation, use a pipe collar or escutcheon to conceal the gap around the pipe.
2. Cutting Around Door Frames: Door frames often require undercutting to allow the laminate flooring to slide underneath. Use a jamb saw or undercut saw to carefully cut away the bottom portion of the door frame. Ensure the cut is deep enough to accommodate the thickness of the laminate flooring and the underlayment. A piece of laminate flooring can be used as a guide to ensure proper spacing.
3. Making Angled Cuts for Corners: Corners typically require angled cuts to create a seamless transition. Use a miter saw to make accurate angled cuts. Determine the angle of the corner using a protractor or angle finder and set the miter saw to the corresponding angle. Cut the laminate planks accordingly, ensuring that the angled cuts meet together snugly at the corner.
4. Creating Transitions Between Rooms: When transitioning between rooms with different flooring types, use transition strips to create a smooth and visually appealing transition. Transition strips are available in various materials, styles, and colors to match the laminate flooring. Cut the laminate flooring to the appropriate length and install the transition strip according to the manufacturer's instructions.
By following these guidelines and practicing patience and precision, individuals can successfully cut laminate flooring and achieve a professional-looking installation. Remember to prioritize safety, use the appropriate tools for each task, and take the time to measure and mark accurately before cutting.

How To Cut Laminate Flooring Maun Industries Limited

Diy Laminate Flooring Cutting Tool Review

How To Cut Laminate Flooring 6 Steps With S Wikihow

How To Cut Laminate Flooring Best

How To Cut Laminate Flooring Tools Step By Home Pros

How To Install Laminate Flooring Like A Pro Addicted 2 Diy

How To Cut Laminate Flooring 6 Steps With S Wikihow

How To Cut Laminate Flooring Maun Industries Limited

How To Cut Laminate Flooring A Complete Diy Guide

Cutting Laminate Around Corners Diy Tips
Related Posts