How to Install Engineered Wood Flooring
Engineered wood flooring offers a beautiful and durable alternative to traditional hardwood flooring. It's known for its stability, ease of installation, and versatility. If you're considering installing engineered wood flooring in your home, this guide will provide a step-by-step process to help you achieve a successful outcome.
Step 1: Preparation is Key
Before you even think about opening the boxes of your new flooring, meticulous preparation is crucial for a smooth installation process. It all starts with a thorough assessment of your existing subfloor. Engineered wood flooring requires a flat, level, and dry subfloor to prevent issues like squeaking, unevenness, and potential buckling.
Here's what you need to consider:
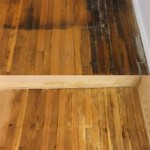
- Existing Flooring: If you have existing flooring, you'll need to remove it and ensure the subfloor underneath is in good condition.
- Subfloor Inspection: Inspect your subfloor for any structural flaws, such as gaps, cracks, or unevenness.
- Moisture Control: Engineered wood flooring is susceptible to damage from moisture. Ensure your subfloor is dry and install a moisture barrier if necessary.
- Leveling the Subfloor: If your subfloor isn't level, you'll need to address it through leveling compounds, plywood sheets, or other appropriate methods.
Once your subfloor is prepped, you're ready to move on to acclimating your engineered wood flooring. This crucial step involves allowing the flooring to adjust to the temperature and humidity of your home. This minimizes the risk of expansion or contraction issues after installation.
Step 2: Acclimating Your Flooring
Engineered wood flooring is composed of multiple layers, including a plywood core and a veneer top layer. These layers are susceptible to changes in temperature and humidity. Acclimation ensures the flooring adapts to the environment where it will be installed.
Here are the steps for acclimating your flooring:
- Unpack and Storage: Open the boxes of your engineered wood flooring and lay them flat in the room where they will be installed. Avoid stacking the planks.
- Storage Duration: Allow the flooring to acclimate for 48 to 72 hours, preferably at the same temperature and humidity conditions as your living space.
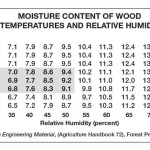
- Monitoring Conditions: Monitor the temperature and humidity throughout the acclimation process. Ideally, the temperature should be between 65°F and 75°F, with a relative humidity between 30% and 50%.
Step 3: Installation Techniques
Engineered wood flooring offers flexibility in installation techniques. The most common methods include:
- Floating Installation: In this method, the flooring is not nailed or glued directly to the subfloor. The planks are interconnected with a tongue-and-groove system and "float" on a layer of underlayment. Floating installation is a popular choice for its ease of installation and ability to reduce noise.
- Glue-Down Installation: This method involves securing the flooring to the subfloor using a special adhesive. Glue-down installations offer excellent stability, making them suitable for high-traffic areas.
- Nail-Down Installation: For this method, the flooring is nailed to the subfloor using finishing nails or cleats. Nail-down installation is primarily used for solid hardwood flooring, but can be used with engineered wood flooring in certain situations.
Choose the installation method that best suits your flooring type, subfloor conditions, and desired level of expertise. Remember to consult the manufacturer's installation guide for detailed instructions and recommended tools.
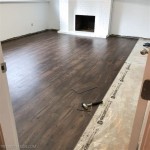
Step 4: Laying the Floorboards
With your subfloor prepped and the flooring acclimated, it's time to begin the installation process. The following tips will guide you through laying the floorboards:
- Starting Point: Begin installation in the corner farthest away from the room's main entrance.
- Staggering the Planks: To ensure a more aesthetically pleasing and structurally sound installation, stagger the end joints of each plank. Don't align the end joints of consecutive planks.
- Using a Flooring Tap Block: Tap the planks together using a flooring tap block. Make sure the planks are tight and secure. Do not use a hammer directly on the flooring planks.
- Expansion Gaps: Leave expansion gaps around the perimeter of the room and between the flooring and any fixed objects (walls, cabinets, etc.). This allows the flooring to expand and contract naturally with changes in temperature and humidity.
- Cutting for Obstacles: Use a circular saw or jigsaw to cut planks around obstacles like door frames, pipes, or vents.
Step 5: Finishing Touches
Once the installation is complete, you need to add the finishing touches to your newly installed engineered wood flooring.
- Baseboards and Trim: Install baseboards or trim to conceal the expansion gaps and complete the aesthetic of the room.
- Cleaning and Maintenance: After installation, clean the flooring thoroughly to remove any debris or adhesive residue. Use a hardwood floor cleaner specifically designed for engineered wood flooring to maintain its finish and protect it from scratches and damage.
Installing engineered wood flooring can be a rewarding experience, adding beauty and value to your home. With careful planning, preparation, and proper installation techniques, you can create a stunning and durable floor that you'll enjoy for years to come.

How To Install Lock Engineered Hardwood Flooring

How To Install Lock Engineered Hardwood Flooring

How To Install An Engineered Hardwood Floor

How To Install Lock Engineered Hardwood Flooring

Installing Engineered Hardwood On Concrete Twenty Oak

How To Install Engineered Hardwood Floors 4 Easy Installation Options

How To Install Lock Engineered Hardwood Flooring

How To Install Lock Engineered Hardwood Flooring

Engineered Wood Floor Laying Flooring Installation Method

How To Install Engineered Wood Flooring Tile Mountain
Related Posts