Engineered Vinyl Plank Flooring Underlayment Installation: A Comprehensive Guide
Engineered Vinyl Plank (EVP) flooring has become a popular choice for homeowners and businesses alike, prized for its durability, aesthetic versatility, and relative ease of installation. However, the long-term performance and comfort of an EVP floor are significantly influenced by the underlayment chosen and its proper installation. Underlayment provides a crucial buffer between the subfloor and the vinyl planks, addressing imperfections, mitigating noise, and enhancing thermal insulation. This article provides a detailed guide to understanding and installing underlayment for engineered vinyl plank flooring, ensuring a successful and lasting flooring solution.
The selection of the appropriate underlayment is as important as the selection of the EVP flooring itself. Different underlayments offer varying levels of sound absorption, moisture resistance, and support. Understanding the specific requirements of the installation environment and the characteristics of the chosen EVP flooring is paramount to making an informed decision.
Key Considerations for Choosing EVP Flooring Underlayment
Several factors dictate the optimal underlayment choice for an engineered vinyl plank flooring installation. These factors encompass the subfloor condition, desired performance characteristics, and the specifics of the EVP flooring product.
Subfloor Condition: The condition of the subfloor greatly influences the type of underlayment required. A smooth, level subfloor necessitates a thinner underlayment primarily for sound absorption and slight cushioning. Conversely, an uneven or slightly damaged subfloor demands a thicker underlayment with superior leveling capabilities. Imperfections in the subfloor can telegraph through the EVP flooring over time, leading to premature wear and an undesirable appearance. Therefore, addressing subfloor issues before underlayment installation is crucial.
Moisture Resistance: Moisture is a significant threat to any flooring system. Excess moisture can lead to mold growth, warping, and adhesive failure. In areas prone to moisture, such as basements or bathrooms, selecting an underlayment with a built-in moisture barrier is essential. These barriers prevent moisture from migrating from the subfloor to the EVP flooring, preserving its integrity and longevity. Even if a moisture barrier is not explicitly required, opting for a moisture-resistant underlayment can provide an extra layer of protection.
Acoustic Performance: The noise reduction capabilities of underlayment are particularly important in multi-story dwellings or areas where noise transmission is a concern. Underlayments are rated according to their Impact Insulation Class (IIC) and Sound Transmission Class (STC). The IIC rating measures the reduction of impact noise (e.g., footsteps), while the STC rating measures the reduction of airborne noise (e.g., voices). Higher ratings indicate better sound dampening performance. Check local building codes for minimum IIC and STC requirements for flooring installations in multi-family dwellings. Selecting an underlayment that meets or exceeds these requirements is crucial for maintaining a comfortable and compliant living environment.
EVP Flooring Specifications:The manufacturer's specifications for the selected EVP flooring often dictate the types of underlayment that are compatible. Some EVP flooring products have integrated underlayments, eliminating the need for a separate layer. Other products require a specific type or thickness of underlayment to maintain the warranty. Always consult the flooring manufacturer's guidelines before choosing an underlayment to ensure compatibility and avoid voiding the warranty.
Thickness and Density: Underlayment thickness and density directly impact its performance characteristics. Thicker underlayments generally provide better cushioning and sound absorption but may not be suitable for all applications. Denser underlayments tend to offer better support and leveling capabilities. The optimal thickness and density will depend on the aforementioned factors, including subfloor condition and desired performance.
Essential Tools and Materials for Underlayment Installation
Proper preparation is essential for a successful underlayment installation. Gathering the necessary tools and materials beforehand streamlines the process and minimizes potential disruptions.
Tools:
- Utility Knife: For cutting the underlayment to size.
- Measuring Tape: For accurate measurements and planning.
- Straight Edge or Ruler: To guide the utility knife for clean, straight cuts.
- Broom or Vacuum: For cleaning the subfloor.
- Moisture Meter: To assess the moisture content of the subfloor (highly recommended).
- Self-Leveling Compound (if needed): To address significant subfloor imperfections.
- Painter's Tape: To secure underlayment seams (depending on the underlayment type).
- Hammer and Nails or Stapler (if needed): For securing underlayment (depending on the type and manufacturer instructions).
- Safety Glasses: To protect eyes from debris.
- Knee Pads: For comfort during installation.
Materials:
- Underlayment: The selected underlayment material in sufficient quantity to cover the entire floor area. Calculate the square footage accurately and purchase slightly extra to account for waste.
- Moisture Barrier (if required): A separate moisture barrier if the underlayment does not have one built-in.
- Seam Tape (if required): Special tape designed to seal seams in underlayment, particularly those with moisture barriers.
- Subfloor Cleaner: To remove dirt, debris, and adhesives from the subfloor.
Step-by-Step Underlayment Installation Guide
The following steps outline the general process for installing underlayment for engineered vinyl plank flooring. Always refer to the specific instructions provided by the underlayment and flooring manufacturers, as variations may exist depending on the products used.
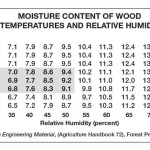
Step 1: Subfloor Preparation. This is arguably the most crucial step. Thoroughly clean the subfloor, removing all debris, dirt, dust, adhesives, and protruding nails or staples. Use a scraper to remove any stubborn residue. Inspect the subfloor for imperfections, such as cracks, holes, or uneven areas. For minor imperfections, a patching compound can be used. For significant unevenness (more than 3/16 inch over a 10-foot span), consider using a self-leveling compound. Allow the patching compound or self-leveling compound to dry completely according to the manufacturer's instructions. Use a moisture meter to check the moisture content of the subfloor. The acceptable moisture level will vary depending on the flooring and underlayment being used, but generally should be below 3%. If the moisture level is too high, postpone the installation until the subfloor has dried sufficiently.
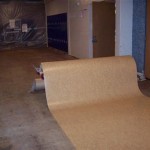
Step 2: Unroll and Acclimate the Underlayment. Unroll the underlayment in the room where it will be installed and allow it to acclimate to the room's temperature and humidity for at least 24 to 48 hours. This acclimation period allows the underlayment to expand and contract, minimizing the risk of buckling or warping after installation. Failing to acclimate the underlayment can lead to problems later.
Step 3: Cut the Underlayment to Size. Measure the room and cut the underlayment to fit, leaving a small expansion gap (typically 1/4 inch) around the perimeter of the room. Use a utility knife and a straight edge to ensure clean, precise cuts. When working with large areas, it may be necessary to seam together multiple sections of underlayment. Overlap the seams slightly and then cut through both layers simultaneously to create a flush, tight seam.
Step 4: Install the Underlayment. Begin installing the underlayment in one corner of the room, working your way across the floor. Lay the underlayment flat, ensuring it is smooth and free of wrinkles or bubbles. If the underlayment has a moisture barrier, ensure the barrier is facing down towards the subfloor. Secure the seams with seam tape, if required by the manufacturer. Some underlayments may require stapling or nailing to the subfloor; follow the manufacturer's instructions carefully. If using staples or nails, space them according to the manufacturer's recommendations (typically every 6-12 inches). Avoid over-stapling or over-nailing, as this can damage the underlayment and compromise its performance.
Step 5: Seam Treatment and Moisture Barrier (If Separate). If the underlayment requires seam tape, apply it carefully to all seams, ensuring a complete and airtight seal. If a separate moisture barrier is being used, overlap the seams by at least 6 inches and tape them securely with seam tape. Pay particular attention to areas prone to moisture, such as around pipes and doorways.
Step 6: Inspection and Final Adjustments. Once the underlayment is installed, thoroughly inspect the entire surface, looking for any wrinkles, bubbles, or loose seams. Address any issues before proceeding with the EVP flooring installation. Ensure that the expansion gap around the perimeter of the room is maintained. Trim any excess underlayment along the walls, ensuring a clean and professional finish.
Step 7: Proceed with EVP Flooring Installation. With the underlayment properly installed, you can now proceed with the installation of your engineered vinyl plank flooring, following the manufacturer's instructions. Ensure the first row of planks is aligned correctly and that the expansion gap is maintained. As you install each plank, check for proper alignment and secure locking mechanisms. Regularly inspect the finished floor for any imperfections or inconsistencies. A well-installed underlayment will provide a stable, comfortable, and quiet foundation for your EVP flooring, enhancing its longevity and aesthetic appeal.
Failure to properly install underlayment can lead to a variety of problems, including premature wear, squeaking, buckling, and moisture damage. Investing the time and effort to ensure a correct installation is crucial for protecting your investment in EVP flooring.

How To Install Waterproof Vinyl Plank Flooring Diy Installation

Lvp Flooring Installation Over Concrete Subfloor Full Instructional Builds By Maz Flooret

Choosing Underlayment For Vinyl Plank Flooring Your Ultimate Guide Jona Panel S Inc

10 Beginner Mistakes Installing Vinyl Plank Flooring

Lvp Flooring Installation How To Install Luxury Vinyl Plank In A Basement Diy

How To Install Vinyl Plank Flooring In A Bathroom Fixthisbuildthat

20 Tips For A Great Vinyl Plank Flooring Installation

How To Install Underlayment For Vinyl Plank Flooring

10 Beginner Mistakes Installing Vinyl Plank Flooring Fixthisbuildthat

Do I Need Underlayment For Vinyl Plank Flooring
Related Posts