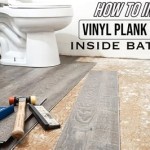
Can You Install Vinyl Flooring Around A Toilet? A Comprehensive Guide
Installing new flooring in a bathroom can significantly enhance its aesthetic appeal and functionality. Vinyl flooring, known for its water resistance, durability, and relatively easy installation, is a popular choice for bathrooms. However, navigating the intricacies of installing vinyl flooring around a toilet presents a unique set of challenges that homeowners and installers must address to ensure a professional and long-lasting result. This article provides a comprehensive guide to successfully installing vinyl flooring around a toilet, covering essential considerations, preparation steps, installation techniques, and potential pitfalls to avoid.
Prior to commencing any flooring project, a thorough assessment of the existing bathroom conditions is crucial. This involves inspecting the subfloor for any signs of damage, such as water stains, rot, or unevenness. Addressing these issues before installing the new vinyl flooring is paramount to prevent future problems like mold growth, buckling, or premature wear. The existing toilet should also be evaluated for stability and any potential leaks. Identifying and rectifying these issues beforehand will contribute to a more successful and durable flooring installation.
The selection of the appropriate type of vinyl flooring is also a critical decision. Vinyl flooring comes in several forms, including sheet vinyl, vinyl tiles, and luxury vinyl planks (LVP). Sheet vinyl offers a seamless, water-resistant surface, making it an excellent choice for bathrooms. Vinyl tiles provide design flexibility and are easier to replace if damaged. LVP offers a realistic wood or stone appearance and is known for its durability. The choice depends on budget, aesthetic preferences, and the level of water resistance required. Ensure the chosen vinyl flooring is suitable for bathroom environments and offers adequate slip resistance.
Key Point 1: Preparation is Paramount
Proper preparation is the foundation of any successful vinyl flooring installation, especially when working around a toilet. The process starts with removing the toilet from its mounting. This step is not merely about creating space for the flooring; it allows for a clean, precise installation and prevents potential damage to the toilet during the flooring process. Before disconnecting the toilet, turn off the water supply at the shut-off valve located near the toilet. Flush the toilet to remove as much water as possible from the tank and bowl. Use a sponge to absorb any remaining water in the bowl.
Disconnect the water supply line from the toilet tank. Carefully remove the bolts that secure the toilet to the floor. Rock the toilet gently to break the seal of the wax ring. Lift the toilet straight up and away from the flange to avoid dripping water and sewage. Place the toilet on a protected surface, such as a drop cloth, to prevent damage. Inspect the toilet flange for cracks or damage. Replace the flange if necessary. Plug the drain opening with a rag to prevent sewer gases from escaping into the bathroom. Clean the area around the flange thoroughly to remove any debris or old wax ring residue using a scraper and appropriate cleaning solutions.
Next, the subfloor must be meticulously prepared. This involves ensuring a clean, level, and stable surface. Remove any existing flooring, adhesives, or debris from the subfloor. Inspect the subfloor for any signs of damage, such as cracks, holes, or unevenness. Repair any imperfections using a leveling compound or patching material specifically designed for subfloors. Allow the leveling compound to dry completely according to the manufacturer's instructions. Sand the subfloor to create a smooth, uniform surface. This step is crucial for ensuring proper adhesion of the vinyl flooring. Vacuum the subfloor thoroughly to remove any dust or debris. A clean subfloor promotes better adhesion and prevents imperfections from showing through the new vinyl flooring.
Finally, before installing the vinyl flooring, it is essential to acclimate the material to the bathroom's temperature and humidity. This prevents expansion or contraction issues after installation. Store the vinyl flooring in the bathroom for at least 24 to 48 hours before installation, allowing it to adjust to the environment. This step helps minimize warping or buckling after the flooring is installed. Following these preparation steps ensures a solid foundation for the vinyl flooring installation, particularly around the toilet area.
Key Point 2: Precise Cutting and Fitting Techniques
The area around the toilet requires precise cutting and fitting of the vinyl flooring to ensure a seamless and professional appearance. This is arguably the most challenging aspect of the installation process. Accurate measurements and careful cutting are essential to create a snug fit around the toilet flange and any adjacent fixtures.
Begin by creating a template of the area around the toilet flange. This can be done using cardboard, heavy paper, or a flexible measuring tool. Place the template material around the flange and carefully trace the outline of the flange onto the material. Ensure the template accurately reflects the shape and dimensions of the area. Cut out the template using scissors or a utility knife, following the traced outline. Test the template by placing it around the flange to ensure it fits properly. Adjust the template as needed until it fits snugly around the flange.
Transfer the template onto the vinyl flooring. Position the template on the vinyl flooring and trace its outline using a marker or pencil. Be precise when tracing the outline to ensure accurate cuts. Use a sharp utility knife with a new blade to cut the vinyl flooring along the traced lines. Make multiple shallow cuts rather than trying to cut through the vinyl in one pass. This technique helps prevent tearing or jagged edges. For curved areas, use a flexible cutting tool or carefully score the vinyl multiple times before bending and snapping it along the scored lines.
Dry-fit the cut vinyl flooring around the toilet flange to check the fit. Ensure the vinyl flooring fits snugly around the flange without any gaps or overlaps. Make any necessary adjustments by trimming or reshaping the vinyl flooring as needed. For sheet vinyl, consider using a seam roller to smooth out any imperfections and create a seamless transition. For vinyl tiles or LVP, ensure the edges are aligned properly and the seams are tight. Proper fitting prevents water from seeping under the flooring and causing damage to the subfloor. Employing these meticulous cutting and fitting techniques ensures a professional and water-resistant installation around the toilet.
Key Point 3: Secure Installation and Sealing
Once the vinyl flooring is cut and fitted properly, the next crucial step is to secure it in place and seal the edges to prevent water damage. Proper adhesion and sealing are essential for ensuring the longevity and performance of the vinyl flooring, especially in the moisture-prone environment of a bathroom.
Apply adhesive to the subfloor according to the manufacturer's instructions. Use a notched trowel to spread the adhesive evenly across the subfloor. Ensure the adhesive covers the entire area where the vinyl flooring will be installed, paying particular attention to the area around the toilet flange. For sheet vinyl, use a full-spread adhesive to ensure maximum adhesion. For vinyl tiles or LVP, use a pressure-sensitive adhesive or click-lock system, depending on the product specifications.
Carefully position the cut vinyl flooring onto the adhesive-covered subfloor. Press the vinyl flooring firmly onto the adhesive, working from the center outwards to eliminate any air pockets. Use a roller to smooth out the vinyl flooring and ensure it adheres properly to the subfloor. Pay particular attention to the edges and corners, ensuring they are firmly bonded to the adhesive. Allow the adhesive to dry completely according to the manufacturer's instructions. This may take several hours or even overnight, depending on the adhesive type and environmental conditions.
After the adhesive has dried, seal the edges of the vinyl flooring around the toilet flange to prevent water from seeping underneath. Apply a bead of silicone caulk around the perimeter of the toilet flange where it meets the vinyl flooring. Ensure the caulk is waterproof and mildew-resistant. Smooth the caulk with a caulk smoothing tool or your finger to create a clean, watertight seal. Allow the caulk to dry completely before reinstalling the toilet.
Finally, reinstall the toilet onto the flange. Place a new wax ring onto the flange to create a watertight seal between the toilet and the flange. Carefully lower the toilet onto the flange, aligning the bolt holes with the flange bolts. Tighten the bolts evenly to secure the toilet to the floor. Do not overtighten the bolts, as this may crack the toilet. Reconnect the water supply line to the toilet tank. Turn on the water supply and check for leaks. If any leaks are detected, tighten the connections or replace the wax ring as needed. Properly securing and sealing the vinyl flooring around the toilet ensures a durable, water-resistant, and long-lasting installation.
Addressing potential issues during the installation process is also crucial. If the subfloor is significantly uneven, self-leveling compound may be necessary to create a smooth, even surface. When cutting the vinyl flooring, use a sharp utility knife and make multiple shallow cuts to avoid tearing. If gaps are present between the vinyl flooring and the toilet flange, use caulk to seal the gaps and prevent water damage. Taking these precautions will help ensure a successful and professional installation.

How To Install Vinyl Plank Flooring Around Bathroom Toilet Bowl Perfectly Tips And Tricks

How To Install Vinyl Plank Flooring In A Bathroom Fixthisbuildthat

How To Install Sheet Vinyl Around A Toilet

How To Cut Flooring Around A Toilet Luxury Vinyl Plank Bathroom Installation Calibamboo

How To Install Vinyl Plank Flooring In A Bathroom Fixthisbuildthat

How To Install Sheet Vinyl Around A Toilet

Is This For Laying Vinyl Flooring Around A Toilet Worth The Time Saved

How To Install Vinyl Plank Flooring In A Bathroom As Beginner Home Renovation

How To Install Vinyl Plank Flooring In A Bathroom Fixthisbuildthat

How To Install Vinyl Plank Flooring In A Bathroom Fixthisbuildthat
Related Posts