Whitewash Wooden Floors: Achieving a Timeless and Versatile Aesthetic
Whitewash wooden floors represent a popular design choice for homeowners seeking a bright, airy, and timeless aesthetic. The technique involves applying a diluted white paint or specialized whitewash product to wooden floors, allowing the natural grain and texture of the wood to remain visible. This results in a floor that is both visually appealing and versatile, complementing a wide range of interior design styles, from coastal and Scandinavian to modern farmhouse and minimalist.
The appeal of whitewashed floors extends beyond aesthetics. They can visually expand a space, making it feel larger and more open. The light color reflects natural light, creating a brighter and more inviting atmosphere. Moreover, whitewashed floors tend to conceal dust and minor imperfections better than darker-stained floors, offering a practical advantage in terms of maintenance.
However, achieving a successful whitewashed floor requires careful planning, preparation, and execution. The type of wood, the existing finish, the chosen product, and the application technique all play crucial roles in the final outcome. This article will explore the key considerations and steps involved in creating beautiful and durable whitewashed wooden floors.
Understanding Wood Types and Their Interaction with Whitewash
The type of wood used for flooring significantly impacts how it absorbs the whitewash and the final appearance of the floor. Different wood species have varying densities, grain patterns, and natural colors, all of which influence the outcome.
Softwoods, such as pine and fir, are more porous and tend to absorb more of the whitewash, resulting in a more pronounced effect. This can be desirable for achieving a rustic or heavily textured look. However, it also means that softwoods may require more precise application to avoid uneven coloring or excessive whitening.
Hardwoods, such as oak, maple, and birch, are denser and less absorbent than softwoods. They generally require more coats of whitewash to achieve the desired level of lightness. The tighter grain patterns of hardwoods often result in a more subtle and refined whitewash effect, highlighting the natural beauty of the wood without obscuring it. Oak, in particular, is a popular choice for whitewashing due to its pronounced grain and durability. The grain provides depth and character, and the hardness of the wood resists wear and tear.
The existing color and finish of the wood also need consideration. Darker woods may require more coats of whitewash to achieve a light and airy appearance. Heavily varnished or sealed floors will need thorough sanding to remove the existing finish and allow the whitewash to penetrate the wood properly. Ignoring this step will lead to poor adhesion and an uneven finish.
Furthermore, the age of the wood can affect the whitewashing process. Older floors may have accumulated dirt, oils, and residues over time, which can impede proper adhesion. Thorough cleaning and, in some cases, degreasing, may be necessary before sanding and applying the whitewash.
Choosing the Right Whitewash Product and Application Method
Several types of products can be used to achieve a whitewashed look on wooden floors, each with its own advantages and disadvantages. Traditional whitewash, lime wash, diluted paint, and specialized whitewash stains are among the common options.
Traditional whitewash is made from lime and water. It creates a chalky, matte finish that is historically accurate and environmentally friendly. However, traditional whitewash can be less durable than other options and may require more frequent reapplication. It is also more susceptible to staining and water damage. Lime wash, a similar product, often contains additional ingredients to improve its durability and adhesion.
Diluted paint is a readily available and relatively inexpensive option. White latex or acrylic paint can be diluted with water to create a translucent whitewash effect. The dilution ratio will vary depending on the desired level of opacity and the type of paint used. It is crucial to use a high-quality paint that is designed for interior use and can withstand foot traffic. Oil-based paints are generally not recommended for whitewashing floors due to their strong odor and longer drying times.
Specialized whitewash stains are specifically formulated for achieving a whitewashed look on wood. These products typically contain pigments, binders, and solvents that enhance adhesion, durability, and color consistency. They often offer better protection against wear and tear compared to diluted paint or traditional whitewash. Specialized stains are available in a variety of shades and transparency levels, allowing for greater control over the final appearance. They also tend to be easier to apply and maintain than other options.
The application method also plays a significant role in the final outcome. Common application methods include brushing, rolling, and wiping. Brushing allows for greater control over the application and is ideal for achieving a textured or distressed look. Rolling is faster and more efficient for covering large areas but may result in a less textured finish. Wiping involves applying the whitewash and then immediately wiping it off with a clean cloth, leaving a subtle hint of white in the wood grain. This method is particularly effective for highlighting the natural texture of the wood.
Regardless of the chosen product and application method, it is essential to test the product on a small, inconspicuous area of the floor before applying it to the entire surface. This will allow you to assess the color, opacity, and adhesion of the product and make any necessary adjustments before committing to the entire project.
Preparation and Application Techniques for a Professional Finish
Proper preparation is crucial for achieving a professional-looking whitewashed floor. This involves thorough cleaning, sanding, and potentially priming the floor before applying the whitewash product.
The first step is to clean the floor thoroughly, removing any dirt, dust, debris, and existing finishes. This can be achieved by sweeping, vacuuming, and scrubbing the floor with a mild detergent solution. Stubborn stains or residues may require the use of specialized cleaning products. Allow the floor to dry completely before proceeding to the next step.
Sanding is essential for creating a smooth and even surface that will allow the whitewash to adhere properly. The grit of the sandpaper will depend on the condition of the floor. For floors with existing finishes, start with a coarse grit sandpaper (e.g., 60-80 grit) to remove the old finish, followed by progressively finer grits (e.g., 100-120 grit and 150-180 grit) to smooth the surface. For floors that are already relatively smooth, you can start with a medium-grit sandpaper (e.g., 100-120 grit). Always sand in the direction of the wood grain to avoid scratching the surface.
After sanding, thoroughly remove all sanding dust with a vacuum cleaner and a tack cloth. Dust particles can interfere with the adhesion of the whitewash and create an uneven finish. Consider wearing a dust mask during sanding to protect your respiratory system.
Priming is optional but can be beneficial, especially for porous woods or floors with uneven coloring. A primer helps to seal the wood, create a uniform surface, and improve the adhesion of the whitewash. Choose a primer that is compatible with the chosen whitewash product. Apply the primer according to the manufacturer's instructions and allow it to dry completely before proceeding.
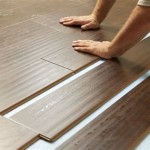
When applying the whitewash, use a high-quality brush, roller, or applicator pad, depending on the chosen application method. Apply the whitewash in thin, even coats, working in the direction of the wood grain. Avoid applying too much whitewash at once, as this can lead to drips, runs, and an uneven finish. Allow each coat to dry completely before applying the next. The number of coats will depend on the desired level of opacity and the type of whitewash product used. Typically, two to three coats are sufficient.
After the final coat has dried, consider applying a clear protective finish to seal the whitewash and protect it from wear and tear. A polyurethane or water-based sealant is a common choice. Apply the sealant according to the manufacturer's instructions. Multiple coats of sealant may be necessary for high-traffic areas.
Throughout the entire process, it is important to maintain proper ventilation to ensure adequate drying and minimize exposure to fumes. Follow the manufacturer's instructions for all products used and wear appropriate safety gear, such as gloves and eye protection.

York White Washed Oak Wood Flooring

Diy Whitewashed Wood Floors Renovation Semi Pros

Wood Floor Refinishing And Whitewashing The Honeycomb Home

Diy Whitewashed Wood Floors Renovation Semi Pros

60 Cozy Whitewashed Floors Décor Ideas Digsdigs

Antique And Aged French Oak Flooring Vintage Historic Decorative Materials A Division Of Pavé Tile Wood Stone Inc

How To White Wash Lime Wood Flooring Oak Timber

Whitewash Hardwood Floors Wood Flooring La

Sanding And Whitewashing Wood Floors

Diy Whitewashed Wood Floors Renovation Semi Pros
Related Posts