Whitewashing Hardwood Floors Without Sanding
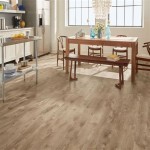
Whitewashing hardwood floors offers a transformative effect, lending a bright, airy, and often more modern aesthetic to interior spaces. The process typically involves applying a diluted white paint or stain to the wood surface, allowing the grain to remain visible and contribute to the overall visual texture. Traditionally, achieving a whitewashed look requires sanding the floors extensively to prepare the surface for optimal paint adhesion. However, sanding can be a labor-intensive and dust-producing undertaking. Alternative methods have emerged that circumvent the sanding process, presenting a more convenient option for homeowners seeking to update their floors. This article provides an in-depth exploration of techniques for whitewashing hardwood floors without the need for sanding, covering surface preparation, product selection, application procedures, and considerations for achieving a durable and visually appealing finish.
Surface Preparation is Paramount
The success of any painting or staining project, particularly one that omits sanding, hinges on thorough surface preparation. The existing floor finish must be meticulously cleaned and prepared to ensure proper adhesion of the whitewashing product. This preparatory phase is crucial not only for the final aesthetic outcome but also for the longevity of the finish.
The initial step involves a comprehensive cleaning process. Begin by sweeping or vacuuming the floor to remove loose dirt, dust, and debris. Subsequently, a deep cleaning is necessary. Use a specialized hardwood floor cleaner designed to remove ingrained dirt, grease, and grime. Avoid using harsh chemicals or abrasive cleaners, as these can damage the existing finish and potentially interfere with the adhesion of the whitewash. Follow the manufacturer’s instructions for the chosen cleaner, paying close attention to dilution ratios and application methods. A microfiber mop is generally recommended for applying and removing the cleaning solution, as it effectively lifts dirt without leaving behind residue.
After cleaning, evaluate the floor for any existing imperfections. Scratches, scuffs, and areas where the finish is worn or damaged should be addressed. Although sanding is being avoided, a light abrading of these localized areas can significantly improve the adhesion of the whitewash. Use a fine-grit sanding sponge or sandpaper (220-grit or higher) to gently rough up the surface of these imperfections. This provides a slightly textured surface for the whitewash to grip onto. Be careful not to sand through the existing finish completely, especially on areas that are still intact. The goal is simply to create a more receptive surface.
Following this localized abrasion, thoroughly remove any sanding dust with a tack cloth or a damp (not wet) microfiber cloth. Ensure the floor is completely dry before proceeding to the next step. This meticulous cleaning and localized abrasion are critical for achieving a uniform and durable whitewashed finish without sanding the entire floor.
Selecting the Right Products for the Job
Choosing the appropriate whitewashing product is a vital decision. Several options are available, each with its own characteristics and advantages. The selection should be based on desired aesthetic, durability requirements, and the type of existing floor finish.
Water-based paints and stains are generally preferred for whitewashing hardwood floors without sanding. They offer several benefits, including low odor, ease of application, and quick drying times. Furthermore, water-based products tend to be less prone to yellowing over time compared to oil-based alternatives. When selecting a water-based paint, opt for a high-quality acrylic latex paint that is specifically formulated for interior use. Flat or matte finishes are often favored for whitewashing, as they create a softer, more diffused look. Glossy paints can appear too stark and highlight imperfections in the floor.
Alternatively, water-based stains can be used to achieve a more translucent whitewashed effect. These stains penetrate the wood grain slightly, enhancing the natural texture and creating a subtle color wash. Look for stains that are labeled as “pickling” or “whitewash” stains, as these are specifically designed to create the desired effect. A gel stain can also be used. Gel stains sit on top of the existing finish and can provide good coverage.
Primers designed for adhesion on glossy surfaces are also a useful option. These primers are formulated to bond to existing finishes without sanding, providing a stable base for the whitewash paint or stain. They are particularly helpful when dealing with floors that have a very smooth or glossy finish, as they significantly improve the adhesion and durability of the final coat.
Regardless of the product chosen, it is imperative to test it in an inconspicuous area before applying it to the entire floor. This allows for evaluation of the color, opacity, and adhesion of the product on the specific floor finish. A small closet or an area under furniture can serve as a suitable test location. Observing the result after the product has dried completely will help in making any necessary adjustments to the application technique or product selection.
Application Techniques for a Successful Whitewash
Proper application techniques are essential for achieving a professional-looking whitewashed finish without sanding. The goal is to create a uniform and even coat that allows the wood grain to remain visible while effectively transforming the color of the floor.
Dilution is a critical aspect of the whitewashing process. Diluting the chosen paint or stain with water (or the recommended thinner for the specific product) creates a more translucent effect and allows the wood grain to show through. The degree of dilution will depend on the desired level of opacity. A general guideline is to start with a ratio of 1 part paint/stain to 1 part water, and adjust the ratio as needed based on the test area. For a more subtle whitewash, increase the amount of water; for a more opaque finish, reduce the amount of water.
Application should be done in thin, even coats. Use a high-quality paint brush, foam brush, or a lint-free cloth to apply the diluted whitewash to the floor. Work in small sections, applying the product in the direction of the wood grain. Avoid applying the whitewash too thickly, as this can obscure the grain and result in an uneven finish. After applying the whitewash to a section, immediately wipe off the excess with a clean, lint-free cloth. This is a crucial step in achieving the desired whitewashed effect. The wiping action removes the excess product, allowing the grain to remain visible and preventing the finish from becoming too opaque.
Multiple thin coats are preferable to a single thick coat. Allow each coat to dry completely before applying the next. This ensures proper adhesion and prevents the finish from becoming sticky or uneven. The drying time will vary depending on the product used and the ambient humidity, but generally, it is recommended to wait at least 2-4 hours between coats. Lightly abrading the dried coat with a fine-grit sanding sponge (320-grit or higher) between coats can further improve adhesion and create a smoother finish. However, this step should be performed very gently and cautiously to avoid removing too much of the whitewash.
Once the desired level of opacity has been achieved and the final coat has dried completely, it is important to apply a protective topcoat. A clear polyurethane or polycrylic finish will protect the whitewashed floor from wear and tear, preventing it from chipping, scratching, or fading. Choose a water-based topcoat for compatibility with the water-based whitewash. Apply the topcoat in thin, even coats, following the manufacturer’s instructions for drying times and application methods. Multiple coats of topcoat are recommended for added protection. A matte or satin finish topcoat is generally preferred, as it maintains the soft, diffused look of the whitewash. Avoid using a glossy topcoat, as it can make the floor appear too shiny and highlight imperfections.

Wood Floor Refinishing And Whitewashing The Honeycomb Home

Sanding And Whitewashing Wood Floors

Paint Whitewash Hardwood Floors Without Sanding

How To Whitewash Hardwood Floors The Right Way Flooring Girl

Paint Whitewash Hardwood Floors Without Sanding
:strip_icc()/10194750920whitewash20floors20step202-99eae86a2dd746d9b89b35a639a0973a.jpg?strip=all "How To Whitewash Hardwood Flooring For A Fresher Aesthetic")
How To Whitewash Hardwood Flooring For A Fresher Aesthetic

Whitewash Hardwood Floors Wood Flooring La

Nostalgiecat How To Whitewash Wooden Flooring

Wood Floor Refinishing And Whitewashing The Honeycomb Home

Wood Floor Refinishing And Whitewashing The Honeycomb Home
Related Posts